ear3
Member
When my installation starts up in a few days, the initial part of the build will involve batching hundreds of different cuts at a variety of sizes, so I wanted to get everything set up once on the MFT and UG Cart and then cut straight through till all the boards are sized. That means I need a few extra flag stops to accommodate all the different sizes. I did order an extra Festool one, but then I figured why not just whip out a couple of my own?
There may be a more straightforward design for a DIY model, but I'm actually pretty bad at designing anything that has movable parts, even when it's something as simple as a rotating piece of metal. When I was a kid, after my parents saw how much I liked building with blocks and Lincoln logs, they got me an Erector Set. But I just stared at the parts, having no intuition about what to do with them, and then went back to my blocks. All this is just to say that for my design, I simply followed the Festool flag stop.
I went through a couple iterations, first trying one with a T-Bolt to hold the bolt securing the flag -- but after cracking the wood I realized it was simpler just to mount the 1/4" x 20 screw through a plain bored hole.
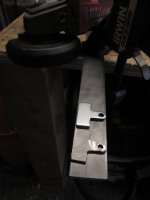
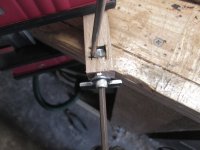
First I cut the metal strap to size with an angle grinder and put a bolt hole through it (using the short UG cart flag as the template, since that's where it will be mounted):
[attachthumb=1]
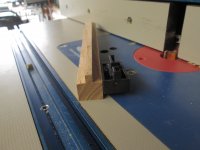
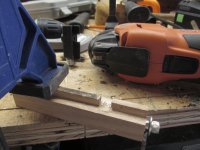
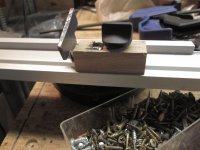
Cut a piece of oak to size on the table saw then routed out the part that slides along the fence -- I made a long piece so I could just use the same board if I made any errors along the way, which did, in fact, happen. It's important to know what length bolt you're using in advance in order to size the piece properly so the bolt doesn't extend too far down and scrape the bottom of the fence, or, come up short. Washers can help fix the former error, but not the latter:
[attachthumb=2]
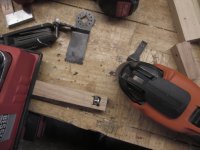
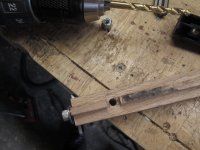
On the first version, I did the through hole for the flag bolt first, but on the second iteration, I realized it would be easier to mortise the lock nut first, and then use that as a reference for where you drill the hole. There aren't too many times where I wish I had a mortising machine, but this was one of them. No matter -- the Multimaster + drill for cleanout worked pretty well.
[attachthumb=3]
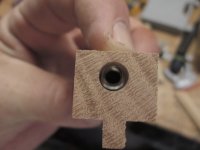
Using a nylon locking nut -- rather than a regular one -- is key, because it keeps the bolt tight when you flip the flag up and down.
Drilling the bolt hole was the one tricky part of this build. I eye-balled how far down the nut rested in the mortise, and then placed the nut on the end of the piece to mark the center. I ended up having to clean out a bit more material on the bottom to get the nut to line up with the hole:
[attachthumb=4]
I used a 1/4"x20 hex bolt. On the festool flag stop, there are holes through the plastic at the bottom of the mortise where you can stick a small hex wrench to hold the nut while unfastening the screw. I deliberately made my mortise tight so I could simply use a flat head screwdriver to hold the nut in place while I tightened the bolt.
[attachthumb=5]
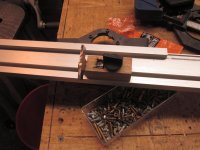
Next I used the Multimaster to make the cut out at the bottom to fit the M6 nut -- (T-track on Festool fence doesn't accept 1/4"x20]:
[attachthumb=6]
And drilled the hole from the bottom so I knew it would line up:
[attachthumb=7]
Now I've got a new flag stop, and a familiar process to produce more:
[attachthumb=8]
[attachthumb=9]
There may be a more straightforward design for a DIY model, but I'm actually pretty bad at designing anything that has movable parts, even when it's something as simple as a rotating piece of metal. When I was a kid, after my parents saw how much I liked building with blocks and Lincoln logs, they got me an Erector Set. But I just stared at the parts, having no intuition about what to do with them, and then went back to my blocks. All this is just to say that for my design, I simply followed the Festool flag stop.
I went through a couple iterations, first trying one with a T-Bolt to hold the bolt securing the flag -- but after cracking the wood I realized it was simpler just to mount the 1/4" x 20 screw through a plain bored hole.
First I cut the metal strap to size with an angle grinder and put a bolt hole through it (using the short UG cart flag as the template, since that's where it will be mounted):
[attachthumb=1]
Cut a piece of oak to size on the table saw then routed out the part that slides along the fence -- I made a long piece so I could just use the same board if I made any errors along the way, which did, in fact, happen. It's important to know what length bolt you're using in advance in order to size the piece properly so the bolt doesn't extend too far down and scrape the bottom of the fence, or, come up short. Washers can help fix the former error, but not the latter:
[attachthumb=2]
On the first version, I did the through hole for the flag bolt first, but on the second iteration, I realized it would be easier to mortise the lock nut first, and then use that as a reference for where you drill the hole. There aren't too many times where I wish I had a mortising machine, but this was one of them. No matter -- the Multimaster + drill for cleanout worked pretty well.
[attachthumb=3]
Using a nylon locking nut -- rather than a regular one -- is key, because it keeps the bolt tight when you flip the flag up and down.
Drilling the bolt hole was the one tricky part of this build. I eye-balled how far down the nut rested in the mortise, and then placed the nut on the end of the piece to mark the center. I ended up having to clean out a bit more material on the bottom to get the nut to line up with the hole:
[attachthumb=4]
I used a 1/4"x20 hex bolt. On the festool flag stop, there are holes through the plastic at the bottom of the mortise where you can stick a small hex wrench to hold the nut while unfastening the screw. I deliberately made my mortise tight so I could simply use a flat head screwdriver to hold the nut in place while I tightened the bolt.
[attachthumb=5]
Next I used the Multimaster to make the cut out at the bottom to fit the M6 nut -- (T-track on Festool fence doesn't accept 1/4"x20]:
[attachthumb=6]
And drilled the hole from the bottom so I knew it would line up:
[attachthumb=7]
Now I've got a new flag stop, and a familiar process to produce more:
[attachthumb=8]
[attachthumb=9]
Attachments
-
 IMG_5133.JPG1.9 MB · Views: 1,034
 -
 IMG_5143.JPG2.7 MB · Views: 1,048
 -
 IMG_5149.JPG2.5 MB · Views: 913
 -
 IMG_5150.JPG2.4 MB · Views: 928
 -
 IMG_5151.JPG2.6 MB · Views: 843
 -
 IMG_5152.JPG2.9 MB · Views: 816
 -
 IMG_5153.JPG3 MB · Views: 767
 -
 IMG_5154.JPG2.6 MB · Views: 956
 -
 IMG_5155.JPG2.6 MB · Views: 1,190
")


