DIY saw / router table with CS70, Incra miter and Incra LS Positioner

L.N.

Member
Joined
Nov 8, 2016
Messages
28
Some time ago i bought an secondhand CS70 replace my current DIY saw / router table (TS55 with some parts of the CMS-MOD-TS 55 R, OF1010 with DIY router lift) with LS Positioned and Incra 1000SE miter. The main reason for the upgrade was that is used the table too much and was tiered of taking the TS55 out of the table. I couldn’t find many examples of an CS70 saw table with an Incra Miter and LS Positioner, so i want to share my design. 

IMG_2494_zpsmsjms0pg.jpg

The old saw / router table

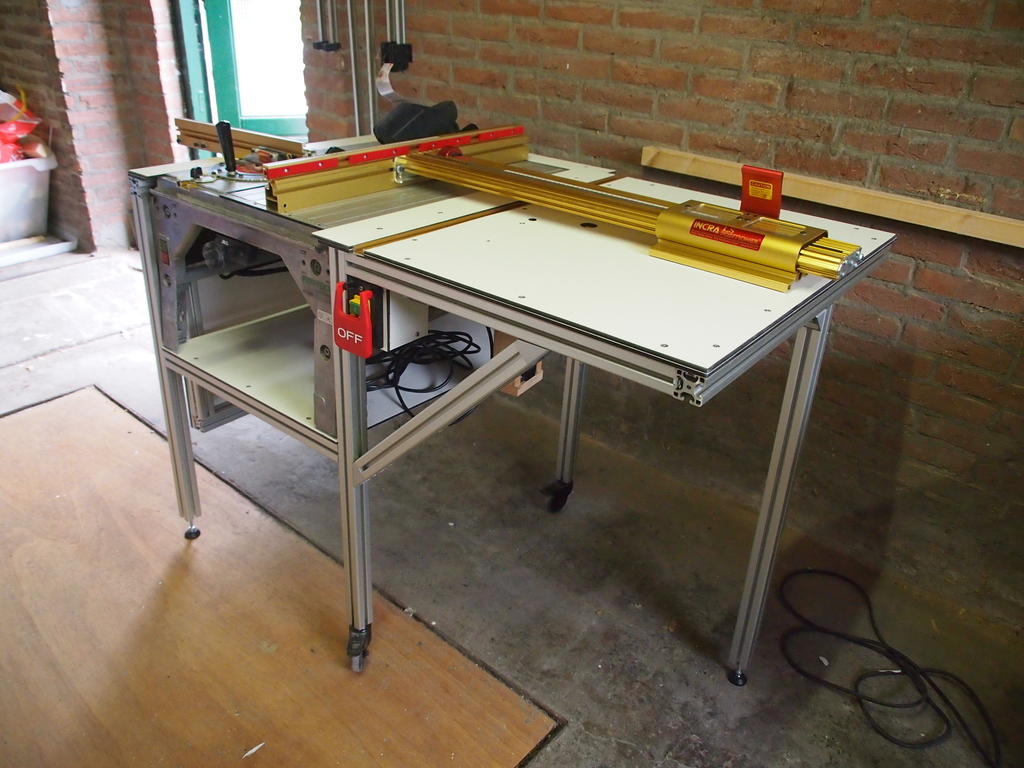
For the new table i choose to make a frame of aluminium extrusion profiles with a top of HPL. The CS70 i bought was without a miter or fence. The concept was to make an compact design with an extension table and my Incra miter and Incra LS Postioner. It has 2 easy to remove feet. I’m not sure if i need both of them. I made several designs and this is the final design:

Zaagtafel-DEF-1_zpsome6t3zm.jpg


Zaagtafel-DEF-2_zpsrxfraghe.jpg


Zaagtafel-DEF-4_zpsmu0ho0wp.jpg


The idea is to have a foldable extension that can be placed on two sides to accomodate long panel or broad panels. Removing them or placing them back is just a minutes work (loosen and tighten 2 screws).

You start with some pre cut profiles:

IMG_0477_zpslgw9vykq.jpg


And some other parts:

IMG_0480_zpspwiwqg6v.jpg

And before you know is the frame already finished:

IMG_0497_zps9c4eaxqm.jpg

Extension on one side

IMG_0496_zpsu73bvqzs.jpg

Extension on the other side

IMG_0495_zpsbiwnbhtw.jpg

Extension folded down

IMG_0494_zpsakexonup.jpg
 
Adapting the CS70 to use the Incra Miter was relatively easy. The Incra Track has exactly the same thickness as the aluminium panels of the top of the CS70. You only need to cut a small piece of the top panel (same width as the track) and a small portion one the front CS70 profile to fit the track. I’m surprised not more users did this.

IMG_0502_zpszwb3hh0s.jpg


IMG_0504_zps914q8kn6.jpg

Removing a small piece of the front profile

IMG_0503_zpswc6bhgr3.jpg

I removed about 4,5 cm of the width of the aluminium top panel

IMG_0505_zpshyc0n4kd.jpg


IMG_0506_zpspnxu3ifl.jpg

Snug fit

IMG_0544_zpsys7elopx.jpg

Incra track cut to the right lenght

IMG_0547_zps0sejvvut.jpg


IMG_0539_zpslrrtawew.jpg

Test with the HPL panels. The panels are roughly cut to size. 

What left to do is:
- Attach the tops
- Set the CS70 flush with the top
- Secure the CS70 to the frame
- Install the LS Positioner
- Instal the Incra track for the router
- Install the router lift (reused from the old saw / router table)
 
Clearly a great deal of imagineering has gone into your creation, but it's a little too abstruse to understand from the pictures.  Perhaps an overall view of the complete saw, set up to do an obvious table saw function, then other pics showing the system prepared for other common woodworking processes, would help tounderstand your design features.

It's hard for me to reconcile some of your detailed pictures to your descriptions - which may be more my failing than yours.

Best - Gary
 
Gary, i'm still in the process of building the saw / router table, so it is difficult to show it in a working capacity. But I hope to continue to work in the coming days and hope that the process makes it more clear for you.
 
Very inventive & looks very cool.  I think I saw from your photos that you have used Item profiles/extrusions? Where did you source them from & did they meet your quality expectations?

Thanks Mark
 
Yes, the profiles are from Item. They are the light version of the 40 x 40 mm profile and bought directly from Item24.nl. I'm very happy with the profiles. Strong, good connections, well made parts. The sales representative of Item visited my at home and took his time to explain everything. This is not common for a big company to do for a small customer like me. He even dropped of the profiles personally so to save on delivery costs.
 
Gary,

Maybe this makes it more clear:

IMG_0557_zpsu9fzxfoj.jpg


The left (white) is the foldable table and in the middle is the CS70 (saw). On the right is the Incra LS Positioner and where the router is going to be.

IMG_0558_zpsgrz50sbh.jpg

IMG_0561_zpsj7qsjqlk.jpg


This is how the saw functions.

IMG_0560_zpson4sdfex.jpg


On the right side is where the router is going to be. The router wil be placed under the table, where the router bit is. The miter track is going to be flush with the HPL.
 
Making this saw table is more work then i thought. Especially the HPL is slowing me down. But luckily i'm almost finished with the HPL. Today and yesterday i worked on the top for the router:

IMG_0577_zpsjm5b3qys.jpg


This is a test to find the best location for the router and the router lift (wooden part behind the router). I predrilled the holes, so to make the installation easier.

IMG_0581_zpsf7imthur.jpg


Closeup of the router lift

IMG_0585_zpsz3degl2b.jpg


Everything installed. :)

Still to do:
- Make smooth transitions between the CS70 and the frame. This will be done with HPL.
- Install the Incra LS positioner
- Install power socket and power switch for the router
 
promark747 said:
Hi L.N.,

What are the part numbers for those hinge pieces with the ratchet handle?

Thanks

Do you mean the hinges for the folding table? It is called "Hinge 8 40x40, heavy-duty with Clamp Lever" and the Art. No.: 0.0.373.93. See this link. But that is the only product from Item that it wouldn't recommend. It can hold only 20nm and that is not enough to be useful.
 
More progress and i nearing the end of the build. First i attached the Incra LS Positioner and started out by marking the position:

IMG_0589_zps3stnqhab.jpg


IMG_0591_zpsyhovnglj.jpg


Installing the LS Positioner was easy, so i moved forward to install the last HPL pieces. They needed a pass over the router,so i could use the router and LS Posiotioner. I have to say that is missed this system a couple of times during this build.

IMG_0590_zpsckz2izsm.jpg


The HPL overlaps with the edge of the CS70 to have a flush and easy transition between the HPL and the CS70.

IMG_0594_zpsshp3f4p8.jpg


Detail of OF1010 router under the table.

And of course, a mistake happeded. The ball bearing of the router bit did't touch the HPL. The result is this:

IMG_0596_zps2gi1xdyx.jpg


MG_0593_zpslhiihpdi.jpg


Overview of the whole table.

Still to do:
- Install power socket and switch for the router.
 
The power switch is installed:

IMG_0607_zpswpxvqg7f.jpg


The power socket is installed, but not properly. I'm going to do that tomorrow.....
 
Hi !
congratulation. It's a nice build. It must be very strudy.

A couple of questions, if I may ask :
- could you detail which parts did you get from the CMS MOD TS55 ?
- could you tell where did you get the Incra LS (17" or 25" ?) and how much time did it take to get to you ?

I'm trying to get a LS17 or 25 during a holiday trip in the US (I'm in France) and lead time are 5~6 wks + 1 wk for delivery !! and buying in europe would mean +30~45% on the price ! ... So I am looking for an acceptable price (and delivery
 
Chrisprols said:
Hi !
congratulation. It's a nice build. It must be very strudy.

A couple of questions, if I may ask :
- could you detail which parts did you get from the CMS MOD TS55 ?
- could you tell where did you get the Incra LS (17" or 25" ?) and how much time did it take to get to you ?

I'm trying to get a LS17 or 25 during a holiday trip in the US (I'm in France) and lead time are 5~6 wks + 1 wk for delivery !! and buying in europe would mean +30~45% on the price ! ... So I am looking for an acceptable price (and delivery
 
And some details:

P3298196_zpspuiycpdc.jpg


P3298192_zpsht1r85uc.jpg


IMG_0618_zpsggjabqrn.jpg


IMG_0616_zpsg4ztw8fy.jpg


1P3298204_zpsbcelsttf.jpg


P3298201_zps9avnsers.jpg


IMG_0611_zps9546shby.jpg


Left is the hole with the bolt to lower and raise the router. It uses an Allen key.

IMG_0610_zpscrs3anpp.jpg


IMG_0613_zpsbwdkhzlq.jpg
 
Great design and construction...and nicely documented, thanks for letting us see your one off design and details...looks like it wouldn't  take much to go up to a 1400 if needed.
 
Vondawg said:
Great design and construction...and nicely documented, thanks for letting us see your one off design and details...looks like it wouldn't  take much to go up to a 1400 if needed.

Thank you!

Indeed, you don't have to change much to install an OF1400. The top is of 2 x 6 mm HPL glued together and an additional sheet of 6 mm HPL is bolted to the underside of top.  In this additional sheet is the contour of the OF1010 cut out to make it easy and stable to install the router. I purposely bolted this last layer of HPL and not glued so I could easily take it off.  Using another type of router would require to cut out the contour of the new router in the HPL and reposition the toggle clamps.

The only problem that can arise is if the distant between the whole for the router bit in the top and the hole for the router lift is different. Relocating the router lift would mean that is need to drill a new hole through the top.

In my first design I wanted to use an Incra or Woodpeckers router plate with a Triton MOF001 router (2400W). But this would set me back another €450 and I found that too much. I made the design is such way that it would be easy to install this combo later on. The benefits are the built in router lift and the additional power.
 
L.N. said:
Thank you. i'm very happy with the result. It is very sturdy.

Hi,

Sorry, somehow the website didn't notify me of your repply.
Thanks for your answer. thanks for taking the time to document your built and posting the informations.

Have a good day !

PS: yes fine tools ship to France. I'll look at your other website for good prices :)
yes it is cheaper to buy in the US and come back with the equipment in the luggage.
 
Back
Top