DomiDrawers Revisited

Overtime

Member
Joined
Jan 25, 2007
Messages
265
Following the lead from the trailblazers in the DomiDrawer post of three weeks ago, I thought I would give it a try.
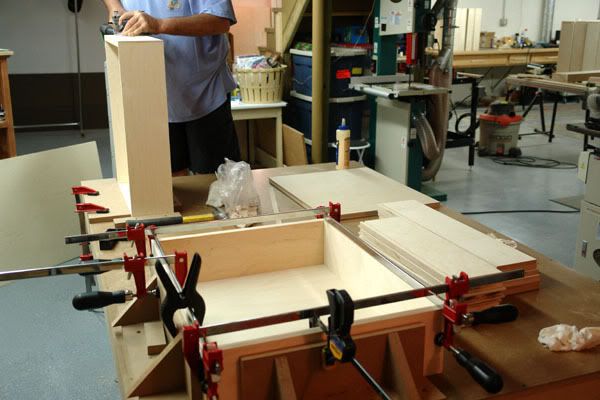
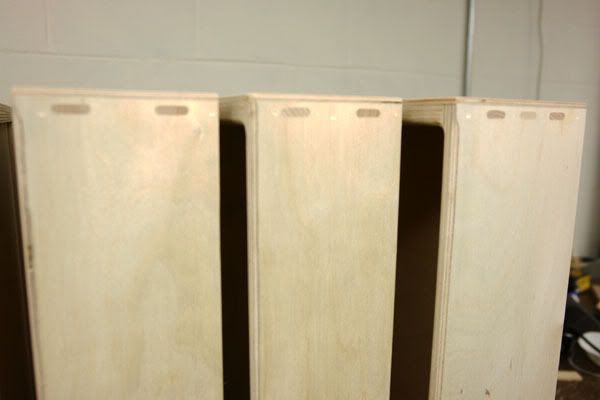
Project  - 16 utility grade ( heavy duty) drawers For three base units. Material - 1/4" 1/2" and 3/4" baltic birch. Two size boxes - 4 1/8 and 5 1/2 tall. Solid faces will be added. And hung on full ext BB slides.

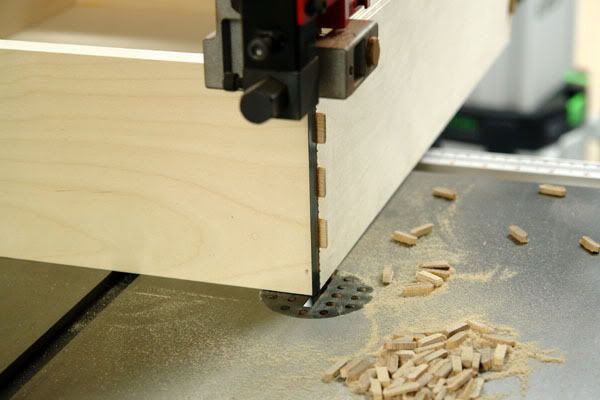
A 1/2" rabbit was cut on the ends of 3/4" (fronts and backs) - sides are 1/2"  and a 1/4" daddo was cut in all stock for the bottom. Using a temp squaring jig I glued (bottoms also) and nailed the outer corners with 18 ga 1 1/4" brads then clamped em up for 15 -30 min. After they were tight I set them up to get Dominoed. Using a temp stop to hold the drawers in place and standing on a step stool.

DSC00821.jpg


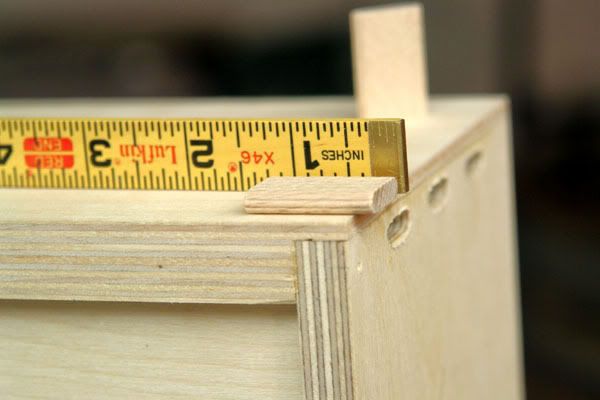
I was planning on setting the 5mm domino cutter on the deepest setting - hoping to get them close to flush after driving them in. And benefit from the strength of a deeper fit. But not to be and as noted before the 5 mm bit flairs out towards the bottom of the cutting surface at the shank. And since the bit screws on there is no adjustment. Only the 5mm bit has this feature ( as needed for strength of the skinny bit) just my luck.
  This means that when using the 28mm cut depth you get a flair out cut at the top of the hole. So I used the 25mm depth which made the domino sink about a light 1/2"  into the rabbited 3/4" stock and thru the 1/2". Could have stepped up to 6mm but the fives were a good fit in the rabbit and I have lots of fives. So 5mm it is. I am glad I used the 3/4" stock for the fronts and backs with the rabbits.

DSC00824.jpg


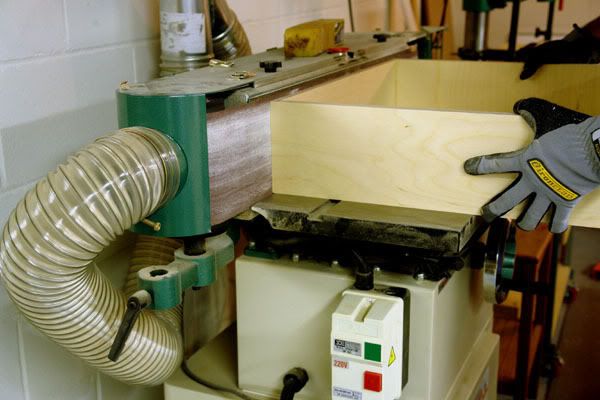
I cut the nubbs off at the band saw ( did not expect to have this extra step ) and hated to see them go

DSC00816.jpg


Then over to the osc edge sander to finish off the nubbs.

DSC00818.jpg


I used the index pins on the 5 1/2" boxes and that worked well - on the 4 1/8" boxes I marked and cut. Brads , glue and dominos that should hold em. Looks not a priority here but in a more formal application they would look just fine (without the brads)

DSC00822.jpg


The process went smoothly up till midway thru I sideswiped a (stray) brad nail  :o I thought I toasted the bit. But no it made it no problem. Even with cutting thru all that plywood. 164 domino$ cut and used. Time to make my own stock.

 
Overtime,
Thanks for sharing details of your Domidrawers!  This is a great idea, and I'm sure I will use it in the future, as better drawer-making skills are going to be needed in my home soon with some upcoming projects.

It looks like a great solution to an age-old project need.

Looks like you need to stop using brads!

Thanks again,
Matthew
 
OT-

Your DomiDrawers are looking good!  Why would you need to put brads in them??? :o ;D

I think we may have hit on a new way to make some really good looking, quality drawers with Domino!  I don't recall seeing tenoned drawers in any of my woodworking books. 

With some nifty contrasting Domino tenons, one could have some really spiffy looking drawers - quickly ans efficiently.

I'm making some drawer fronts this week for another client and will see if they would like some as the first ones worked out so well.
 
OT,

Many thanks for posting.  Great looking drawers!  This is one of my future Domi projects (Domino on order), so seeing the details helps a lot.

Regards,

Dan.
 
Thanks guys. Matt - great forum to exchange ideas , techniques and info on the tools. Clint - thanks for starting that domidrawer thread. Great stuff !  Dan - your photo tutorial makes picture posting a snap. No more typing http://andonandonforeverandthensome.com[IMG]  ;D 

  And about those brads  :o  I used them to aid in the glue up process. After fumbling to get the first one into the clamps I quickly reached for the gun. It's all Norman's fault  ;D Tacking the corners made it easy to flip the box around to get glue into the bottom dado, slip the bottom in and clamp. Surely they are not needed for strength and would not contribute much any way. But I found it more tricky to clamp them up compared to HB dovetail drawers. I did not want to huff the cabinet masters around so I made the squaring jig to use the light clamps.
  And now, after handling them for shellac and hardware I am confident that they will perform well and stay square and strong for years.
 
Thanks for explaining the flare-out with the 5mm bit.

I did this last week and got some slop and some burn marks in the height of my mortises.  I figured I wasn't holding the machine securely enough.  You saved me a great deal of time trying to figure it out myself. 

This is one of those things that needs to go into "the" manual.
 
Overtime,

I think we should give credit where credit is due; it was Tezzer who first came up with the idea of domidrawers on the Ubeaut forum. I have a feeling that sales of the Leigh dovetailing jig may fall off a bit now that there is a much easier way of making drawers.

Rocker
 
Rocker said:
Overtime,

I think we should give credit where credit is due; it was Tezzer who first came up with the idea of domidrawers on the Ubeaut forum. I have a feeling that sales of the Leigh dovetailing jig may fall off a bit now that there is a much easier way of making drawers.

Rocker

Yep the photos and info from Clint, Ted and Teezer got my intrest. But it was Tezzer's photo of his "rebate domidrawer" that made it "click" for me, and led me to give it try.

Some more thoughts on the flare-out aspect. Making a full depth plunge using the 5mm bit will cause this. I still had a very slight flare when set at the 25mm depth. But only a mill or two which was easily removed when sanding down the nubs. I doubt that Festool would make a "long" version of this bit but it would be possible since there just happens to be 4mm of space to play with - (The distance from the bit tip to the face plate when in the relaxed position) while still retaining the shank profile for strength. Wow all that for 8 guys who want to sink a 5X28mm domino its full length! No more coffee  ??? 
 
 
I know this is an old thread, but I was searching the FOG for information on using the Domino for drawer joinery and this thread was top of the list. I plan to use dominoes as is detailed here. It just occurred to me that it would look a little more special if the ends of the dominoes were stained a darker colour to make them stand out a bit. Anyone done this before and if so, were there any problems encountered?

Richard.
 
Hi,

Instead of just staining, why not make your own Dominoes in a contrasting timber? Its easy to do.

Rob
 
Rob,

Making my own dominoes just seems like reinventing the wheel that's all. I only need 20 or so and I have hundreds in the systainer.

Richard.
 
Use the SIPO dominos.  They're already a different color.

[attachimg=#]              [attachimg=#]
 
Making them is pretty easy and quick. :)

There are some contrasting Dominos, not FesTool, out there for sale, I think.
 
clintholeman said:
Making them is pretty easy and quick. :)

There are some contrasting Dominos, not FesTool, out there for sale, I think.

Woodcraft sells Tuffer Tenons in maple, oak and walnut...  They fit the Domino mortises quite well, but they have grooves on the side. So for this type of through tenon use it probably wouldn't look good.
 
It appears as if they may only be available in oak now. At least I cannot find any others on their website. Anyway, I was looking to make use of the dominoes that I have already rather than add more. I will test-stain the ends of one or two tomorrow to see how they look. It will not affect the glue area anyway.

Edit: the other woods are on closeout, but will be unavailable soon.
 
What I do. Make your own out of some contrasting timber, I make 5mm for small drawers and 6mm for large drawers (because the 6mm doesnt have the flare-out and you can go deeper, stronger) after you have glued and clamped the drawer and its dry, plunge your mortise to full depth according to the cutter used.

If you plunge 28mm, then cut your home made Domies at 35mm lengths. Scribe a line all round 25mm up from the bottom, and with sharp chisel, from the scribe line back down to the bottom, round over the edges to fit in the mortise. The 3mm left above the scribe that remains square will force a square edge into the top of the round mortise, giving the illusion of a hand mortised joint.

It looks so much better than a rounded machined Domi look. You still get a slight round if you look close, but it?s a great illusion for the casual observer for not much extra effort.  [smile]

[Forgot to add- Dont forget to put a clamp either side of the drawer where the mortises are, so when you tap in the Dominos the drawer sides dont split]
 
Tezzer said:
What I do. Make your own out of some contrasting timber, I make 5mm for small drawers and 6mm for large drawers (because the 6mm doesnt have the flare-out and you can go deeper, stronger) after you have glued and clamped the drawer and its dry, plunge your mortise to full depth according to the cutter used.

If you plunge 28mm, then cut your home made Domies at 35mm lengths. Scribe a line all round 25mm up from the bottom, and with sharp chisel, from the scribe line back down to the bottom, round over the edges to fit in the mortise. The 3mm left above the scribe that remains square will force a square edge into the top of the round mortise, giving the illusion of a hand mortised joint.

It looks so much better than a rounded machined Domi look. You still get a slight round if you look close, but it?s a great illusion for the casual observer for not much extra effort.  [smile]

[Forgot to add- Dont forget to put a clamp either side of the drawer where the mortises are, so when you tap in the Dominos the drawer sides dont split]

Tezzer,

That's a great method, and the pics ilustrate the final result well. It does look like a proper morticed joint!

Only one very minor issue - I had to read the above several times before I fully understood what you were trying to get across. I think it would be great if at some point you could write a brief tutorial on this technique, with some pictures along the way. I think that'd be extremely useful for alot of people on here.
 
jonny round boy said:
I think it would be great if at some point you could write a brief tutorial on this technique, with some pictures along the way. I think that'd be extremely useful for alot of people on here.

No probs Jonny, i will do that.  ;D
 
I do domi drawers too. A nice quick technique for durable drawers.

I like to trim off the protruding domino ends with a flush trim bit with the router.  Its pretty quick and works well even with prefinish drawer stock.
 
Had my first bash at a drawer today using dominoes and a rabbet. I'm really happy with the end result. Following the advice mentioned on the FOG elsewhere, I used the 5mm dominoes with a 20mm depth. I stained the ends of the dominoes prior to inserting them. Then I used a flush bit on the OF1400 to smooth the ends off and re-stained the ends. The front and back of the drawer is 3/4" ply and the sides are 1/2" ply.

I considered using 4mm dominoes on the drawer bottom, and still may do so. The drawer bottom is sitting snugly in a 1/4" rabbet so this would be purely for aesthetics.

Richard.

[attachthumb=#]
 
Back
Top