Domino Bevel Butt Joint?

Joined
Jul 30, 2023
Messages
19
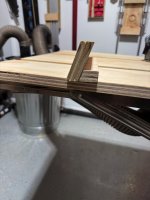
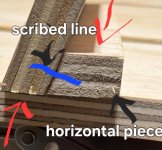
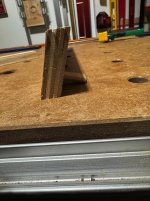
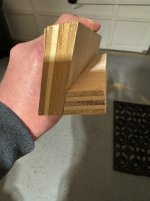
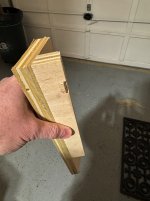
I'm trying to figure out the geometry to join these with a domino (18 degree bevel).  I either have to reference the bottom of the pieces (As shown in the photo) or draw a line on the larger left piece and do a "domino in the middle".

I've done picture frames with my domino before (and they turned out perfectly aligned; my stock worked with the reference stops) but this situation is a bit different.

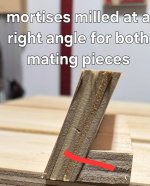
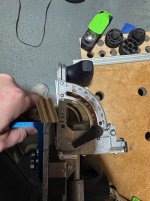
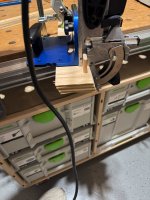
Any pointers are appreciated.  Do I just set my domino fence to 18 degrees and place the fence against the bottom edge of the left board?  What about the right board?  Referencing off the bottom for it with the fence of the domino didn't look like it would give me the correct geometry.

for the right side piece, I thought about doing extra long domino cuts before I put the bevel in it at the table saw, but figured I'd ask here first.

Thanks
 

Attachments

  • IMG_4530.jpeg
    IMG_4530.jpeg
    936.5 KB · Views: 112
Mill the mortises at 90* to the joints.

[attachimg=1]
 

Attachments

  • Screenshot_20250113_174307_Chrome.jpg
    Screenshot_20250113_174307_Chrome.jpg
    81.3 KB · Views: 279
Reference faces?

Asking because the Zeta P2 procedure for this cut is a big pain in the butt. =IMbuHTDAy_jvKXWC
 
Angled fence registers against the faces as pointed by the arrows.[attachimg=1]
 

Attachments

  • Screenshot_20250113_174307_Chrome.jpg
    Screenshot_20250113_174307_Chrome.jpg
    74.5 KB · Views: 268
Thanks for the clarification.

Ya, that's the same as the Zeta.  I guess you'll have to do the measuring here too.  Unfortunately, I don't think the fence height is what's on the scale when angled for the DF500.  I guess a test block with the drill point marked on the side and manual fence adjust is in order for this one.
 
If I were to do those joints, I'd scribe a line across on the mating boards (roughly centered on the horizontal piece) and use the milled flats on the DF500 to set the fence.

After milling all the horizontal pieces, reset the fence for the vertical piece using the milled flat, and one test cut on a vertical scrap should confirm how good the fence setting is. No measuring is needed for setting the fence.

[attachimg=1]
 

Attachments

  • Screenshot_20250113_174307_Chrome.jpg
    Screenshot_20250113_174307_Chrome.jpg
    334.8 KB · Views: 269
ChuckS said:
Angled fence registers against the faces as pointed by the arrows.[attachimg=1]

If you do this method the reference faces are different.  Does that make a difference in reality?

Bob
 
Maybe the tiniest of fingertip feeler gauge off.  But the scribe line Chuck describes matching up with the side centerline of the DF500 should be close-enough.  Probably get you closer than the ruler/measuring needed for the Zeta.
 
Does the joint need to be concealed on the outside. I.E. is it a hidden connection, not seen from the left of the upright piece? If so, I would plunge as deep as possible prior to table saw cut as you mention in your OP
 
bobtskutter said:
ChuckS said:
Angled fence registers against the faces as pointed by the arrows.[attachimg=1]

If you do this method the reference faces are different.  Does that make a difference in reality?

Bob

Yeah, ideally the best result is obtained if the same/matching reference faces are used. The milled flats plus a test cut or two offer the best alignment option in this particular case.
 
Thanks all for the great responses.  I cut one like this with the fence set to 72%.  (First pic showing the domino machine on the wider board).  Which of course, since it cuts at 90 degrees to the board, causes the tenon to slope down since the board is beveled.  Ok, I'll use the shortest tenons possible.  But I still have a problem cutting the tenon in the narrower board.  If I cut it before putting the bevel on it, the mortise won't be at the correct angle.  And I don't see a good way to cut it when referenced to the same surface where I cut the mortise on the first piece.  (I'm showing the picture her; of course I would not cut it like this).  Do I just have to cut it with the piece oversized and then see if I can flush trim it safely (haven't thought through the geometry of that yet; it may be a crazy idea with these angles)?
 

Attachments

  • IMG_4538.jpeg
    IMG_4538.jpeg
    956.3 KB · Views: 48
  • IMG_4537.jpeg
    IMG_4537.jpeg
    953.8 KB · Views: 45
  • IMG_4536.jpeg
    IMG_4536.jpeg
    933.9 KB · Views: 60
The Zeta video will give you how to position stuff I think.  At least it was clear to me.  On the Zeta though, we put a spacer on the rotating fence to shift the cut closer towards the inside corner.  You have a movable fence on the DF500.  Just put your strike line closer to the inside and shift your fence accordingly until the marker on the side of your DF500 lines up.  Since you'll be working off strike lines, you'll have to readjust for the other side as well.  Also note you won't be using the same reference surfaces.
 
Your last photo doesn't show the proper registration. Flip the piece over (assuming the fence angle is properly set -- not at 90*). The cutter should enter the slope at 90*.

You're getting there. [smile]
 
I realized now that not everyone knows this, but the centerline of the drill bit (sideways) is marked by the shoulder.  Just reiterating it here with diagram.

[attachimg=1]
 

Attachments

  • df500 centerline.jpg
    df500 centerline.jpg
    66.5 KB · Views: 200
woodferret said:
I realized now that not everyone knows this, but the centerline of the drill bit (sideways) is marked by the shoulder.  Just reiterating it here with diagram.

[attachimg=1]

I call that the milled flat...shoulder seems to be a better term.

As useful as it's, Festool doesn't give it a name in its manual.
 
ChuckS said:
Your last photo doesn't show the proper registration. Flip the piece over (assuming the fence angle is properly set -- not at 90*). The cutter should enter the slope at 90*.

You're getting there. [smile]

Thanks.  I ended up cutting like this and it worked great.[attachimg=1]

Even though it was referencing a different face from the other piece, I had my measurement block set at 16mm (using standard American 3/4" plywood) and amazingly it lined up perfectly.  Although it blew through.  I'll need to use shorter dominos when I do this.  Not sure how I got lucky with the near perfect alignment. 

[attachimg=2][attachimg=3]
 

Attachments

  • IMG_4546.jpeg
    IMG_4546.jpeg
    974.5 KB · Views: 190
  • IMG_4547.jpeg
    IMG_4547.jpeg
    944.6 KB · Views: 194
  • IMG_4548.jpeg
    IMG_4548.jpeg
    957.8 KB · Views: 187
woodferret said:
I realized now that not everyone knows this, but the centerline of the drill bit (sideways) is marked by the shoulder.  Just reiterating it here with diagram.

[attachimg=1]

Thank you.  This is helpful.  I think I got lucky using the fence to measure my offset this time but this method looks like it would be more precise; or drawing a line and doing the "Domino in the middle" method on the "vertical" board so it is referenced off of the same location as the stabilizing horizontal piece.
 
NewWoodWorkerVA said:
ChuckS said:
Your last photo doesn't show the proper registration. Flip the piece over (assuming the fence angle is properly set -- not at 90*). The cutter should enter the slope at 90*.

You're getting there. [smile]

Thanks.  I ended up cutting like this and it worked great.[attachimg=1]
Snip.
Just as illustrated in post #5.

Congrats on your first attempt and success, and you did well. Angled pieces sometimes can trip even the more experienced users.

P.S. Adjust the fence angle (see gap) AS WELL AS the fence height (lower the fence to raise the cutting point) as the blow-out shouldn't happen if the mortise was milled properly. (of course, you'd need to make corresponding change when milling the mating vertical piece.) You can place the domino against the prototype joint and eyeball where you should position the mortise without any blow-out.

[attachimg=1]
 

Attachments

  • df blow out.JPG
    df blow out.JPG
    50.3 KB · Views: 187
Nicely done!  8)

(Check your TSO bigfoot, it looks like it's not sitting flush with the face of the domino)

Bob
 
Just for someone coming along to see this later, there are also cases where building some kind of fixture to hold/position your parts can be very beneficial. This is especially true for multiple pieces or smaller pieces. The reference points do not have to be your actual part. You can reference the fixture too.
This can also keep your fingers out of the mix, on parts where the bit might come through. Also, don't be afraid to shorten the Dominos. A bandsaw is probably the safest way to go there, but there are others.
 
Back
Top