Domino Chair Build with Angles

Tukston

Member
Joined
Jun 16, 2022
Messages
14
Hi everyone,
I recently purchased a domino 500 in the hope it would help me with a chair build I am working on. I am busy making a test chair out of scrap wood to help me iron out the kinks.

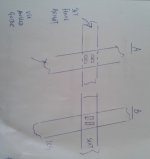
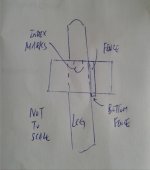
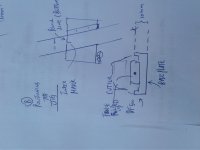
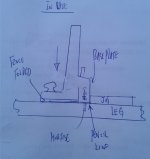
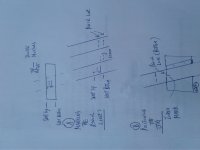
If you see the attachment you will see there are 6 connection points that I was hoping to use the festool for. The front legs I think are manageable using the seat and leg edges as reference to make the tenons. The problem I am having is connecting the back leg to the seat and the back rest to the top of back leg.

My first question would be if it is possible to make these joins accurately with the domino and if so how would I go about this?

If anyone can help me with the challenge it would be greatly appreciated.

Many thanks,
Tukston.[attachimg=1]
 

Attachments

  • B202F97E-0517-461B-84E7-6A9231778D67.jpeg
    B202F97E-0517-461B-84E7-6A9231778D67.jpeg
    228.9 KB · Views: 944
Definitely doable.  Look for center-referencing strategies for the domino-  Chuck has posted his several times, and it's gonna be perfect for this.

Another question, that I don't know the answer to, is how to orient the domino for best strength.  The best way might not be the most obvious.
 
BTW

One really cool thing with the Domino is you can dry assemble everything to test fit your assemblies before gluing.
 
The Domino can be used to make mortises where needed for this design but wood is almost certainly not strong enough to survive someone of adult size actually sitting in a such a chair. Metal would be more appropriate.

The Domino natively aligns with surfaces that are parallel to the mortise and marks that are centered on the mortise so the front leg/seat mortises will be easy to locate.

The mortises for the top of the back legs won’t be much more difficult.

Since the back is curved you’ll need to make a shim to support the fence of the Domino so that the tool/mortise is parallel to the outer face of the leg. If you made this design in cad you should be able to work out the exact dimensions of the perfect shim. Use double stick tape to adhere the shim to the curved back. Depending on how picky you are you might need to compensate for the thickness of the adhesive tape, the closer the shim is to the mortise there more influence the adhesive thickness will have on whether the mortises in the back and legs are coplanar.

For the mortises in the sides of the back legs you’ll again use the fence and marking techniques used on the previous joints but for the mortises in the side of the seat you’ll probably want to make a jig (for each side) that registers with the seat top and provides a stop to position the bottom of the Domino against. And you have to be more elaborate with the positioning marks, making them longer and showing the center of the mortise in both axis and wrapping around the jig.
 
I agree with Michael. That back leg joint is relying 100% on the strength of the glued in Domino. I would do a half-lap plus a Domino at the least.
 
Great suggestion Micheal. The strength has been a concern, hence first building test version. 
Michael Kellough said:
The Domino can be used to make mortises where needed for this design but wood is almost certainly not strong enough to survive someone of adult size actually sitting in a such a chair. Metal would be more appropriate.

The Domino natively aligns with surfaces that are parallel to the mortise and marks that are centered on the mortise so the front leg/seat mortises will be easy to locate.

The mortises for the top of the back legs won’t be much more difficult.

Since the back is curved you’ll need to make a shim to support the fence of the Domino so that the tool/mortise is parallel to the outer face of the leg. If you made this design in cad you should be able to work out the exact dimensions of the perfect shim. Use double stick tape to adhere the shim to the curved back. Depending on how picky you are you might need to compensate for the thickness of the adhesive tape, the closer the shim is to the mortise there more influence the adhesive thickness will have on whether the mortises in the back and legs are coplanar.

For the mortises in the sides of the back legs you’ll again use the fence and marking techniques used on the previous joints but for the mortises in the side of the seat you’ll probably want to make a jig (for each side) that registers with the seat top and provides a stop to position the bottom of the Domino against. And you have to be more elaborate with the positioning marks, making them longer and showing the center of the mortise in both axis and wrapping around the jig.
 
Hi Michael,

Having read your reply in detail I have 2 questions. You mention metal - could you elaborate what you had in mind. Regarding the strength point, i have increased the service area of the top of leg that meets the back rest - leg top is 45mmx75mm - back rest is also 45mm wide. Will help but not sure that it will resolve it.

My second question regards to your last idea of making a jig to connect seat to leg. I am not following you 100%?
What i have done is referenced the top of the seat to make a tenon into the side of the seat . Where I am stuck now is making a corresponding tenon in the leg. Could you please fill me in on exactly what you had in mind?

Thank you for your time. Much appreciated!

Michael Kellough said:
The Domino can be used to make mortises where needed for this design but wood is almost certainly not strong enough to survive someone of adult size actually sitting in a such a chair. Metal would be more appropriate.

The Domino natively aligns with surfaces that are parallel to the mortise and marks that are centered on the mortise so the front leg/seat mortises will be easy to locate.

The mortises for the top of the back legs won’t be much more difficult.

Since the back is curved you’ll need to make a shim to support the fence of the Domino so that the tool/mortise is parallel to the outer face of the leg. If you made this design in cad you should be able to work out the exact dimensions of the perfect shim. Use double stick tape to adhere the shim to the curved back. Depending on how picky you are you might need to compensate for the thickness of the adhesive tape, the closer the shim is to the mortise there more influence the adhesive thickness will have on whether the mortises in the back and legs are coplanar.

For the mortises in the sides of the back legs you’ll again use the fence and marking techniques used on the previous joints but for the mortises in the side of the seat you’ll probably want to make a jig (for each side) that registers with the seat top and provides a stop to position the bottom of the Domino against. And you have to be more elaborate with the positioning marks, making them longer and showing the center of the mortise in both axis and wrapping around the jig.
 
Welded aluminum or steel tube would be appropriate materials to execute this nicely minimal design.

You can certainly make the chair with wood in full scale to judge proportions etc. but unless the legs are at least 2-1/2” square I think the stress on the joints would be too high for wood. And you’d need to make custom tenons to get them long enough.

Jeff’s suggestion to use a half lap joint for the back legs might add enough strength…

The jig for the side joints would be simple. A piece of plywood about 4” square with a fence planted on one face at the approximate 15 degree angle of the leg. Make a jig for each side and carefully layout the line representing the center of the mortise or mortises (you need at least two for the joint). A paper template printed from the cad design (with 10mm offset from base of machine to center of mortise) might make it easy to get the marks right. The template should include a reference mark to help position the jig relative to the front of the seat.
 
Tukston said:
Snip.

My first question would be if it is possible to make these joins accurately with the domino and if so how would I go about this?

If anyone can help me with the challenge it would be greatly appreciated.

Many thanks,
Tukston.[attachimg=1]

Your design is fine, and wood alone is enough for strength. Also no other joinery is needed as the loose tenon joinery is robust for chairs and tables. The key rather is the wood species and thickness, which you didn't provide. Twin/double tenons are super strong if you stock is thick enough.

If you Google, you should see that many have used the dominoes alone to build seats and chairs, a few similar to yours in style.

If you plan to make just one chair, the intersecting line method is good enough. If a batch of 4 or 6, I'd make a simple guide jig to do the angled mortising.
 
How will you join the front legs? As per your drawing, where they join to the underside of the seat?
 
Hi Chuck,

I am using ash wood with a width of 45mm x 75mm - certainly enough space for 2 10x50 tenons.

I am a newbie and so if you have any info on making jig and line methods please hook me up.

Many thanks!

ChuckS said:
Tukston said:
Snip.

My first question would be if it is possible to make these joins accurately with the domino and if so how would I go about this?

If anyone can help me with the challenge it would be greatly appreciated.

Many thanks,
Tukston.[attachimg=1]

Your design is fine, and wood alone is enough for strength. Also no other joinery is needed as the loose tenon joinery is robust for chairs and tables. The key rather is the wood species and thickness, which you didn't provide. Twin/double tenons are super strong if you stock is thick enough.

If you Google, you should see that many have used the dominoes alone to build seats and chairs, a few similar to yours in style.

If you plan to make just one chair, the intersecting line method is good enough. If a batch of 4 or 6, I'd make a simple guide jig to do the angled mortising.
 
Yeah, I plan to join the leg to the seat with a domino. The leg sits under the seat - 45mmx45mm in dimensions.

Lincoln said:
How will you join the front legs? As per your drawing, where they join to the underside of the seat?
 
[attachimg=4]I have had connection issues here, so I need to be brief.

You need to decide on the orientation of the tenons and its pros & cons - see A vs B. For illustration purposes, I picked A for making the guide jig.

Under A, no jig is needed to mortise the seats. Just use two fence settings. First mortise the top tenon on ALL seats, then reset the fence to mortise the second tenon (the bottom one).

Make a jig with two fences (top and underneath - one for mortising the left leg and one for the right) and two index marks to position the DF using the center line on the base of the machine for alignment. Correction: You need only one center index mark on the jig (not two as shown in the hastily drawn sketch).

If joinery B is used, two jigs can be made.

I hope this makes sense to you, but I have no access to my old photo files for a while to share more jig photos. Other members can help you more.[attachimg=1][attachimg=2][attachimg=3]
 

Attachments

  • 20220617_092517.jpg
    20220617_092517.jpg
    1.4 MB · Views: 695
  • 20220617_093051.jpg
    20220617_093051.jpg
    131.5 KB · Views: 686
  • 20220617_100433.jpg
    20220617_100433.jpg
    1.6 MB · Views: 691
Hi Chuck, your drawings and descriptions have certainly made it much cleaner for me. There is just one detail I am not getting. Looking at the mortises in the seat itself - your drawing A. To achieve this one uses the plate on the domino - the plate enables height placement. What is not clear to me is how do i reference this height on the leg? I cant see away to use the plate on the domino, this has to be folded back to 0 degrees otherwise I dont have access to the leg to make the mortise. I am assuming the jig is gonna replace the plate on the leg mortises. Just not 100% how?
Thanks for helping Chuck!
 
First, the "plate" you use is the term for the "fence" in my book, the bottom of the machine is the baseplate.

The following notes assume that you already know that the distance between the center point of the cutter and the baseplate is exactly 10mm.

1) To mill the mortises on the legs, first determine where you want them milled on the legs.
2) Instead of marking the center lines of mortises on the legs, lay out the pencil lines 10mm from those center lines. (Dia. A)

3) Place the jig on the leg blank with the jig's index mark edge aligned with one of the pencil lines (Dia. B). Repeat 3 for the second mortise.

4) Plunge the machine to make the first mortise.

I hope this helps.

[attachimg=3]
[attachimg=1][attachimg=2]
 

Attachments

  • 20220617_194059.jpg
    20220617_194059.jpg
    1.4 MB · Views: 598
  • 20220617_194835.jpg
    20220617_194835.jpg
    1.5 MB · Views: 639
  • 20220617_194048.jpg
    20220617_194048.jpg
    1.5 MB · Views: 639
Chuck you are an absolute legend! I really appreciate the time you put in this for me I am sure many others. I totally get it now, thank you!
 
Back
Top