Domino DF500 Table Apron with a larger reveal

rxmart2

Member
Joined
Mar 10, 2025
Messages
4
Greetings!

New Domino owner here looking to see what the best ideas might be here.

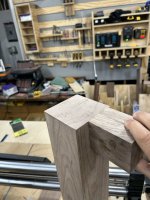
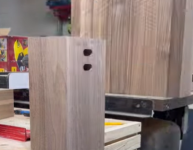
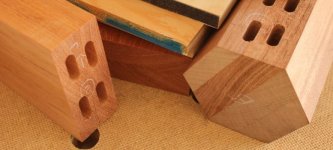
I'm building Walnut Parsons-Style Table, 72"X39" approximately.  The legs are made up of four mitered 4"X29.5" 4/4 Walnut boards so it's basically a 4X4 table leg with a little over 2X2 hollowed out in the middle.  I have reinforced the upper 3" of each leg with beechwood so the top of each leg is close to solid hardwood.

The Aprons are 1.35"x2.75", and there are two identical sized braces that run inside, equally spaced.  I have also doubled up the width of the aprons at each end to allow for more mortises and added strength.

My question is regarding the best way to do a larger reveal and have it line up correctly.  Ideally I'd like the reveal to be at least an inch, but with the domino max table height of 30MM to center, I'm not sure of how to accurately cut the dominos in the legs.  I understand the measurements and can try to line things up, but is there an easier way?  I'll try to post a picture.

aaand the picture from my phone didn't work.  I'll mess with it in the AM.
 
Ok that wasn’t so bad.  So this is a mock-up of the apron, I doubled up the thickness but can easily remove it. My original plan was to put 2 stacks of 2 8mm dominos in vertically, but then I thought “how am I going to line this up”?  It shouldn’t be too hard to get two in using the trim stop and essentially creating a small “reveal” on the back side, but I feel like it would be much harder to do that on the front.

Hope that makes sense.  If anyone has ideas of what else I could or should be doing I’m all ears, still a newb at this.

I also thought about putting one row of two 10MM dominos horizontally, would that work?  Certainly seems easier.
 

Attachments

  • IMG_0139.jpeg
    IMG_0139.jpeg
    242.5 KB · Views: 80
An actual Parsons Table does not have any reveal - all the pieces are flush: top, aprons, and legs.

That said, to get a 1” offset with the DF500, you’ll probably want to reference off the base plate, knowing it’s 10 mm to the mortise center. Whatever fence height you use on the aprons, add 15 to that to get the distance from the front edge of the leg to the DF500’s base. Draw a line, clamp a scrap, and cut.
 
Yeah I should have said "modified" parsons table, it's more like this without the castle joints.


Thanks for the above link.  I think that is how I might produce the holes on the back side to my "doubled up" piece since the domino table height is enough to do that and still use the trim stops. 

I came across this, and was wondering if this might be better?  Even with 10MM dominoes, I question the strength of mounting them horizontally in this application.
 

Attachments

  • Aprons.png
    Aprons.png
    150.9 KB · Views: 56
Additional tenons will increase the joint's strength.

[attachimg=1]

Btw, I wouldn't orient the mortises (horizontally) as shown in the photo you came across unless the mating piece was too narrow.
 

Attachments

  • df double.JPG
    df double.JPG
    46.7 KB · Views: 189
I agree you want the tenons installed vertically if possible. The main forces on the joint you have to worry about are the legs racking. If the apron isn't wide enough (vertical direction) to support two vertical mortises, then a pair vertically and one horizontally would be good (put the horizontal one above the pair of vertical). Maybe make the horizontal one a 10mm domino instead of 8mm.

And, from your first photo, maybe just align the inside faces of the legs and aprons and let the reveal be whatever it is there. That would be simpler if you're not particular about the exact reveal dimension.
 
I agree with [member=57948]ChuckS[/member] the more tenons the better and I wouldn't do the horizontal orientation either.

I had a better pic of the test pieces, but can't seem to find it. It's also not quite a fair comparison, since the parts meet flush, but offset is really the only difference.
I'm thinking, in your case, I would reference off of the bottom of the tool and make spacers to place them in the correct positions.
This was the very first job I did with my new DF500. It came up just a few days after I purchased it, just dumb luck. These would have been significantly more difficult without it.
 

Attachments

  • a frames.jpg
    a frames.jpg
    194.4 KB · Views: 43
Wow those are amazing!

Thanks for the advice guys, I'm really digging this new tool and all it can do.

As an aside, my 3M sander just decided not to work in the middle of this project, and I've been waiting for it to happen so I can grab the ETS150/5.  Can't wait to try my third Festool ...err.. tool tomorrow!
 
rxmart2 said:
As an aside, my 3M sander just decided not to work in the middle of this project, and I've been waiting for it to happen so I can grab the ETS150/5.  Can't wait to try my third Festool ...err.. tool tomorrow!

You might wanty to check into whether 3M will cover a replacement for you - their RO sanders had widespread and well known/documented problems. Plenty of info on the interwebs if your model is one of those.
 
Back
Top