Domino Gadget for box building.

polarsea1

Member
Joined
Apr 11, 2007
Messages
294
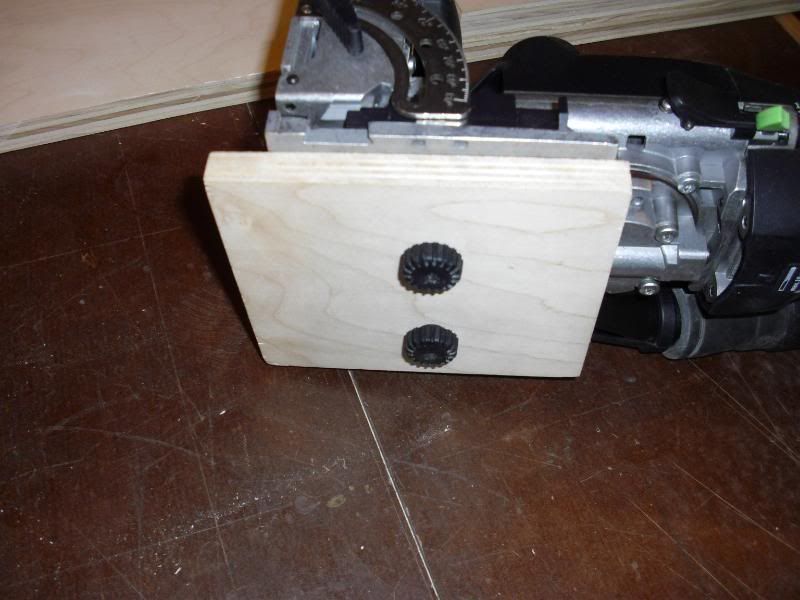
The angle bracket too shaky for me so I'd been thinking about building a more robust version from aluminum angle but came up with this idea made from scrap 1/2" ply:

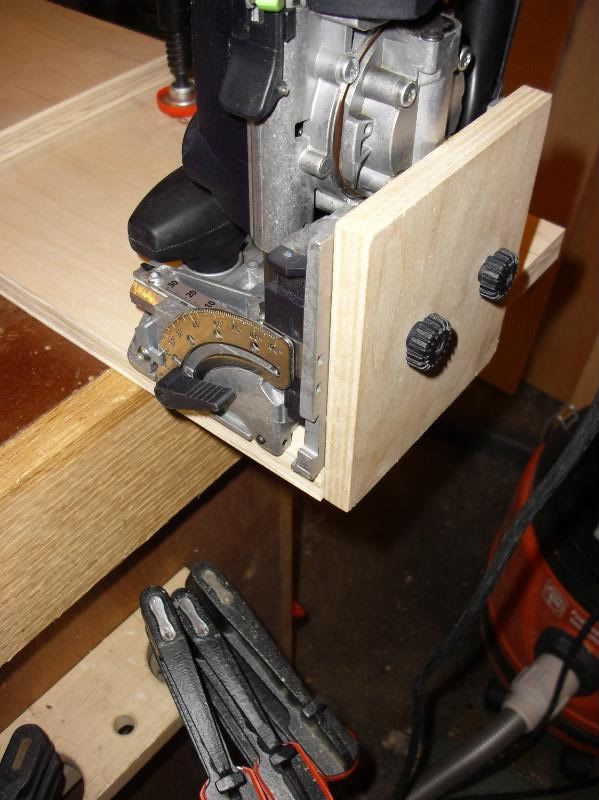
The bottom plate of the domino is the same distance from the bit as the fence is at it's lowest position so I made a stop fixing it in place with the screws from the angle bracket. It indexes the vertical mortise 10mm on center from the outside edge of the horizontal piece.  I remove it and flip the fence to the horizontal position referencing the outside face of the perpendicular member to complete the corner.

DominoGadget002.jpg


DominoGadget003.jpg


DominoGadget004.jpg
 
Great idea!  Would it make sense to slot the holes so it can be slid forward and back rather than removed when you go to bore the mating holes on the perpendicular piece of the drawer or box?  I've heard that Festool makes some kind of machine that can be used to bore slotted holes ??? but perhaps such a mod would not be useful because it's not necessary to switch back and forth between using the fence and jig when making multiple drawers or boxes.  Just a thought.

BTW, when you say "box building," you're including domi-drawers, right?

Regards,

John
 
How about letting it stick further out, like the MFK 700, and just turn the Domino upside down to drill the mating hole?  You could just leave it on.  There could be a knob on the back to hold and stabilize.
 
I was actually referring to cabinet cases but I'm sure it would work for any box you'd like to build with the caveat that a 10mm center won't work with 1/2" ply.  I do both ends of the side panels then pop it off to do the tops and bottoms and/or stretchers, I'm too lazy to slot it.

fshanno, that would work too - I might try it.

John Stevens said:
Great idea!  Would it make sense to slot the holes so it can be slid forward and back rather than removed when you go to bore the mating holes on the perpendicular piece of the drawer or box?  I've heard that Festool makes some kind of machine that can be used to bore slotted holes ??? but perhaps such a mod would not be useful because it's not necessary to switch back and forth between using the fence and jig when making multiple drawers or boxes.  Just a thought.

BTW, when you say "box building," you're including domi-drawers, right?

Regards,

John
 
I've been doing my cases with dominoes and screws.  I'm going to make that little deal and try it the next time I put a box together.

A variation on your idea could provide for handling 1/2" ply.

[attachthumb=1]

Notch the stop so that it's bearing face is a little higher than the Domino base plate.  That would decrease the 10mm to whatever you want.

 
I went ahead and made one of these with the variation I mentioned.

[attachimg=1]

Nice touch with the Festool knob, don't you think?  Looks official. 

Plunging upside down is no problem at all.  This is very efficient for case making.  You don't have to take it off for end mortises.  I put some notches for attaching the outriggers but I should have just made the whole thing narrower and it would have been fine. 

I think this is a game changer.
 
fshanno, great idea. I've had ideas running through my brain about a fixture of sorts primarily for making 1/2" drawers. I just recently completed a tool chest and used the Domino to join the sides (1/2" stock). The Domino is a bit overpowering when working with 1/2" material. By that, I mean the weight of the machine and working with the smaller sizes was a bit awkward and could certainly benefit from the addition of some fixturing to aid in domino placement. I intend to play around with your solution for projects I have in mind.

I might add that I have been very sucessful when joining 3/4" material and have built 3 shop cabs using dominos. Things just got a little funky when I went to 1/2" material. I think that with 1/2" it is more critical to be pretty close to center on the stock.
 
Polarsea1 -

Cool idea!  Only question is how you align your Domino so that you place your mortises in the correct place, in this orientation?  Are the extra long lines on your workpiece for just that reason?

Regards,

Lee
 
is9582 said:
Polarsea1 -

Cool idea!  Only question is how you align your Domino so that you place your mortises in the correct place, in this orientation?  Are the extra long lines on your workpiece for just that reason?

Regards,

Lee

I encounter that problem pretty quickly myself.  So I drilled a hole which reveals the registration line on the bottom.

[attachimg=1]

It seems to work pretty well.
 
Fshanno -

Perfect solution.  Do you recall the specs (thread/pitch) on the two bolts you used to attach the base to the Domino, and where you found them? I'll have to build one, too. 

Thanks,

Lee
 
I used the screws that came with the (useless to me) angle bracket.  I counterbored the back so I could also use the O-rings that prevent the screws from coming away from the bracket.
 
polarsea1 said:
I used the screws that came with the (useless to me) angle bracket.  I counterbored the back so I could also use the O-rings that prevent the screws from coming away from the bracket.

That's exactly what I did.  I bought the new angle bracket with the flip up stops, which works beautifully by the way.  So the screws from the old one were available.

This seems like a mundane little thread about another simple little homemade wooden jig.  But I think we're dealing with something that could be revolutionary for Domino owners and ultimately could be the impetuous to turn a lot of other forks into Domino owners who otherwise might not have been.  The two innocuous little screw holes have already served as the basis for the MGS-20 stop attachment.  This notion of screwing things to the bottom could very well end up being a huge deal.  I've been thinking of all the possibilities of using different kinds of plates for many different uses.  Anyway, food for thought.
 
Thanks guys.  I'd thought about harvesting the screws from that accessory, too, but didn't know if I was alone in that thinking.  This attachment point does seem to lend itself to many possibilities. This user's group is a cool and useful resource.

Regards,

Lee
 
If I understand the thread, from the Festool ekat site, I think this might help.

[attachimg=#]

[attachimg=#]

Hope that this helps.

Peter

 
Actually Peter I was thinking of the larger knob that he placed towards the front of the jig.
 
Sorry,

That could be several knob types.  Try to be back in a minute...

 
That knob could be numerous possibilities.

from the OF 1400 - the threaded portion could be cut down to length.

[attachimg=#]

[attachimg=#]

Good Luck,

Peter
 
Back
Top