Domino setup for attaching beveled rails to tapered/splayed legs?

gearhound

Member
Joined
Oct 12, 2016
Messages
149
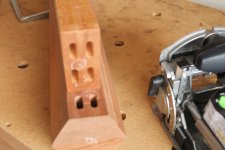
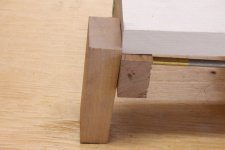
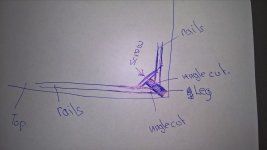
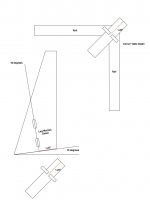
I'm planning on building a desk soon in a similar style to the one in the attached photos. I'm having a hard time wrapping my head around how to accurately place the dominos in the legs/rails? I'm thinking of using HalfInchShy's tips for laying it out like a mid-panel shelf, but not sure if there's a better/easier way to determine placement?

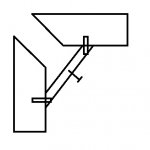
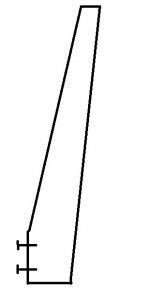
This will also be my 1st project using splayed/raked legs so I'm also struggling to get a grip on the angles needed to pull this off? It appears to me that it's just a single taper on the inside of the legs of 1" thick stock that starts below the rail....maybe going from about 4.5" down to 3"? It appears that the rake/splay is created from the miters on the legs? Maybe about 10degrees?

Sorry if these are pretty basic questions...I'm just trying to get a good idea how to plan this out being my 1st time attempting. I see this style being used pretty frequently in modern furniture, has anyone came across a good article or video that lays out building table bases in this style?

Thanks for reading and any help that can be provided,
Matt

[attachimg=1][attachimg=2]
 

Attachments

  • il_fullxfull.1210905999_7rlh.jpg
    il_fullxfull.1210905999_7rlh.jpg
    140.7 KB · Views: 2,381
  • il_fullxfull.1210905997_pgaz.jpg
    il_fullxfull.1210905997_pgaz.jpg
    169.1 KB · Views: 2,408
Will you be making the legs detachable?
If so you only have to attach the rails and cut the ends at an angle.
The legs can be mounted in the normal way I guess, or behind the rails out of sight with some sort of clever solution.

I made a somewhat similair design low dining table.
The angle apeares to be the same, I calculated it at 5degrees, I think 10 is to much.
 
If I am doing this angled joinery, I will think outside of the box, and complete the domino joinery while the leg stock is still in the rectangular shape.

If the leg stock is already shaped, I would glue (with paper in between or use reversible old brown glue) temporary blocks to the legs so any domino joinery cuts are at a right angle between the aprons and legs.

I have done a couple tricky angled joinery with the DF500, but a lot of care was needed.
 
I think that's what I would do.  Use a bevel gauge to get the domino base aligned plumb on the leg (use the inside top corner on the leg for your reference and clamp a spacer of the appropriate width to get the offset from the bevel gauge to get the right look).  Making the mortises is then just like the mid panel mortises PM describes.   

The issue I see is the placement and interection of the dominos on what appears to be a 25mm thick leg?  I think it's easiest to cut the mortises perpendicular to the face of the 45 degree miter cut on the aprons.  You might need a build a jig to give you suitable reference surface for the domino.  If you offset the opposing dominos for each apron meeting a leg it's a little more work, but you have to be careful that you don't mix up your mortise offsets from the top of the leg. Alternatively, I'm wondering if you could use the domino to cut a through mortise in the leg and use a longer domino to connect 2 aprons and a leg?  You would need to be careful about the depth settings on the aprons so you don't blow out the exposed side and would likely need to cut a custom length domino to fit that joint.  Any mistakes will be clearly visible, but I think that will be the case no matter how you approach this.  I haven't seen this done, but it's interesting to ponder.  But I'm just a crazy person that hasn't attempted a joint like this, so don't listen to me, wait for at least one other crazy person to concur.  :)
 
ChuckM said:
If I am doing this angled joinery, I will think outside of the box, and complete the domino joinery while the leg stock is still in the rectangular shape.
Unfortunately this will decrease mortise depth on the finished piece. With DF500 the maximum depth is not that great to begin with. Not a problem if you are using DF700.
 
Doesn't that depend on the thickness of the filler blocks? True, a DF700 is best and must be used if the depth required is beyond the DF500 capacity.

Looking at the photos (which, of course, could be misleading), I see not a lot of wood on the legs to mortise into without blowing through them. In any case, detailed measurements are needed before I could tell if a DF500 is suitable for the job. I would also use a double row of dominoes for this type of joinery.

For one-time application and if a DF700 is not available, one could use a DF500 to mortise the holes and then use a drill bit to make the mortises longer so the longer dominoes for the DF700 can be used. That was what I did for a table construction.
 

Attachments

  • IMG_0723.JPG
    IMG_0723.JPG
    3.9 MB · Views: 851
ChuckM, point taken.
I was thinking in general that a spacer might eat up the precious mortise depth. Indeed, actual drawing is needed to evaluate.
If Festool is thinking of updates to DF500 I'd like to see ~40 mm maximum plunge.
 
Thanks for the responses so far guys!

I only have the DF500 at this point and my plan is to use two dominos on each rail + glue to permanently connect the short sides to the legs....for the long sides I was planning on two dominos only glued into the rail and triangle cross braces pocket-holed into the corners to prevent racking and so the desk can be broken down in the future if need be. Is this the best approach? It probably would be best to use the knock-down connectors for this, but at $375 for the kit I'm not sure if I completely need it or not.

I'm very slowly trying to learn Sketchup so I'm not certain on what angles to cut the legs/rails? From the photo it appears that the rails are at a 45 degree bevel and from [member=27355]NL-mikkla[/member]'s response that the legs are splayed and raked at roughly 5 degrees. Has anyone modeled something like this in Sketchup or have a link to an article/video building a table base like this? Due to my lack of sketchup skills and never attempting a base like this, I think I'm going to build a plywood mockup and see how the angles work out before attempting with walnut.

 
gearhound said:
Due to my lack of sketchup skills and never attempting a base like this, I think I'm going to build a plywood mockup and see how the angles work out before attempting with walnut.

This is an approach even seasoned furniture makers like Michael Fortune use when they build challenging pieces the first time. Consider using cardboard as a mock-up material or use cardboard as a template to trace your work onto wood where suitable.

It is better to screw up on your scraps than on your prepared stock!
 

Attachments

  • IMG_4898.JPG
    IMG_4898.JPG
    4 MB · Views: 692
  • IMG_4881.JPG
    IMG_4881.JPG
    4.7 MB · Views: 654
Typically the apron pieces are braced with each other permanently and attached to the table top. The legs are bolted through corner braces. What you describe is how typically beds are made: two panels with legs and detachable long rails.
 
I think you are all making it more difficult that need be.

Why not atached the rails to the top with screws or domino's whatever you want, how fancy you want.
Cut the ends of the rails at the desired angle, I think 5 degrees is ok.
Make the legs as tapered as you want but keep the upper part square.
Cut the ends of the legs at the angle you cut the rails.

Connect the legs to the rails like the normal way.
See the picture for the idea, I have used it with square legs mounted at an angle in the two axles.
For some reason I can’t find a picture of my own, but this internet picture basically shows the idea
 

Attachments

  • F66E4DA8-0CF9-417F-97DF-7ADA1D7830CE.jpeg
    F66E4DA8-0CF9-417F-97DF-7ADA1D7830CE.jpeg
    34.4 KB · Views: 707
NL-mikkla said:
I think you are all making it more difficult that need be.

Why not atached the rails to the top with screws or domino's whatever you want, how fancy you want.
Cut the ends of the rails at the desired angle, I think 5 degrees is ok.
Make the legs as tapered as you want but keep the upper part square.
Cut the ends of the legs at the angle you cut the rails.

Connect the legs to the rails like the normal way.
See the picture for the idea, I have used it with square legs mounted at an angle in the two axles.
For some reason I can’t find a picture of my own, but this internet picture basically shows the idea

I definitely have a problem over-complicating projects! In my past table builds, I've attached the top to the rails with figure8 fasteners to account for wood movement so figured going with the 'bed like' build technique would be best for making the table as rigid as possible? How do you domino in the short side rails and account for the top's movement?
 
I always glue and domino the rails to the top, som etimes I use screws but I try to avoid as much steel as possible, but that’s some sort of obsession I guess.
I never had any problems wit movement, you can glue extra cross supports underneath the top for extra rigidity.

I don’t like the bed technique because you end up with big parts when disassembled.
If prefer the table technique and I’m sure it will be rigid.

The only movement will come out of the tapered legs if they are to small, but that’s part of the design and unavoidable.
I have made similair desing table’s (danish design looking stuff) and all customers realised that movement due to narrow legs is part of the design.
Maybe explain before taking the order?
 
Well, I've cut the plywood mockup of the tapered legs and one of the rails but still really racking my brain on this!

In my searching of how to do it, I actually came across the guy who made the table in the pictures asking the same question on here! (http://festoolownersgroup.com/festool-how-to/how-to-use-domino-to-45-mitered-apron-to-legs/) Not sure if he ever came up with a good way to do it as it was his only post....he was using pocket holes on the fronts of the aprons and that's not a good look so he was trying to find how to domino the 45 degree aprons too.

I've never made a table with anything other than 90 degree aprons and I've never made one with removable legs, so I'm really struggling and definitely overthinking this build. I've been playing around with the domino settings and trying to find a good way to plunge into the legs at 45 degrees, but it seems next to impossible for me to pull off....let alone have any repeatability.

It seems like the only way to pull this off will be domino'ing or screwing the aprons to the top and then fitting in the legs....but that seems to present its own challenges having never done it before. How do you go about keeping the aprons all squared up with the bevels to result in no gap once putting in the legs? I also don't understand how the wood has room to expand if I permanently attach the aprons?

Attaching beveled aprons seems like it would be a pretty common thing to do, but for some reason I can't find any real information on how to do it? Does anyone have a link to an article or video detailing how I can do it using hardware to make the legs detachable?

Thanks again for all the suggestions so far guys! 

 
Your side rails will be 90 degrees to the top and 45 degrees to the leg.  Easy to plunge dominos into the bottom of the top and into the side rails to give you registration and then use thru-screws from the bottom of the rails into the top to hold the rails in place but give you some movement with oversized domino slots.

The angled leg will be something like 5-10 degrees splaying out.  I drew it in the drawing below at 10 degrees, but you can adjust this.

The domino is centered on a line that is 90 degrees to the top of the leg.  This gives the mortises a 10 degree splay angle outside.

It's a simple cut.  The two dominoes on each end of each side rail will be mortised into the 45 degree side using the fence as Rick outlines in the post you referenced above.  Let's assume those dominos are 6mm x 30mm.  And that you want them 3" apart center to center.  You'll likely have to cut them short and use two of them.

On the leg you will cut the top at a 5 or 10 degree angle to splay it out.  The dominos are then placed 90 degrees to that top face with the angle spaying them out.  The plunge will be directly into the face, not at an angle.  Easy to draw a line along the leg face and then align the center point of the domino in both axes to the center of where you want the dominos.

The angles play head games with figuring it out.  Just remember your mortises are ALWAYS cut 90 degrees to the face of the piece, whether it's a leg or the end of the side rails.

Hope this helps.

[attachimg=1]
 

Attachments

  • Mortise Details.jpg
    Mortise Details.jpg
    53.7 KB · Views: 1,792
I don't see any need to attach the legs with domino's.
You will give up the detachable leg option which imho is a big advantage and a proffesional feature

I understand your concern about the gap between the aprons and the leg.
But also here I think when your a mm off you will not notice that, certainly not from a small angle.

As said before, just build as you would build the 90degree table you did in the past, it will work out fine
 

Attachments

  • apron detail.jpg
    apron detail.jpg
    19.1 KB · Views: 415
  • leg detail.jpg
    leg detail.jpg
    16.4 KB · Views: 429
neilc said:
Your side rails will be 90 degrees to the top and 45 degrees to the leg.  Easy to plunge dominos into the bottom of the top and into the side rails to give you registration and then use thru-screws from the bottom of the rails into the top to hold the rails in place but give you some movement with oversized domino slots.

The angled leg will be something like 5-10 degrees splaying out.  I drew it in the drawing below at 10 degrees, but you can adjust this.

The domino is centered on a line that is 90 degrees to the top of the leg.  This gives the mortises a 10 degree splay angle outside.

It's a simple cut.  The two dominoes on each end of each side rail will be mortised into the 45 degree side using the fence as Rick outlines in the post you referenced above.  Let's assume those dominos are 6mm x 30mm.  And that you want them 3" apart center to center.  You'll likely have to cut them short and use two of them.

On the leg you will cut the top at a 5 or 10 degree angle to splay it out.  The dominos are then placed 90 degrees to that top face with the angle spaying them out.  The plunge will be directly into the face, not at an angle.  Easy to draw a line along the leg face and then align the center point of the domino in both axes to the center of where you want the dominos.

The angles play head games with figuring it out.  Just remember your mortises are ALWAYS cut 90 degrees to the face of the piece, whether it's a leg or the end of the side rails.

Hope this helps.

[attachimg=1]

That REALLY helps! I truly appreciate you taking the time to lay all this out for me! The angles were definitely playing some crazy head games with me.

In your opinion is the table in the pictures closer to a 10degree splay? My current plywood mockup is cut at 5, but I've yet to attempt to attach the legs so I'm not sure which way to go?

What are your thoughts on cutting a through mortise in the legs and that way I wouldn't have to worry about dominos running into each other coming from opposite sides? I've never used the domino this way, so it'd be a 1st and not sure if it would make it more complicated for me or not.

Thanks again for the help,
Matt
 
NL-mikkla said:
I don't see any need to attach the legs with domino's.
You will give up the detachable leg option which imho is a big advantage and a proffesional feature

I understand your concern about the gap between the aprons and the leg.
But also here I think when your a mm off you will not notice that, certainly not from a small angle.

As said before, just build as you would build the 90degree table you did in the past, it will work out fine

I'd definitely like the option to detach the legs, so I'm thinking of still cutting the domino mortises and dryfitting everything and then attaching the aprons to the top like [member=167]neilc[/member] suggested. Without first attaching the aprons to the legs, I'm scratching my head to figure out how to accurately attach the aprons to the top? I figure I could lay the top upside down and space everything out, but without being able to secure the legs during this process I'm questioning how I'd space everything out correctly? I know this a common way to build tables, but having never used this technique I don't have a good way to do it? Do people just cut short spacers the same width and angle of the table legs and use those as a reference for how to square up the aprons?
 
For detachable legs, if you choose an adequate size apron brace, you might consider the Festool domino connectors.

Also, I’d cut a stopped dado in the legs for the aprons to slide into.  Then there could be a slight amount of clearance between the legs and aprons, but it would occur within the stopped dado, so there would be no gap.
 
Back
Top