Dominoes

Bertotti

Member
Joined
Oct 18, 2020
Messages
384
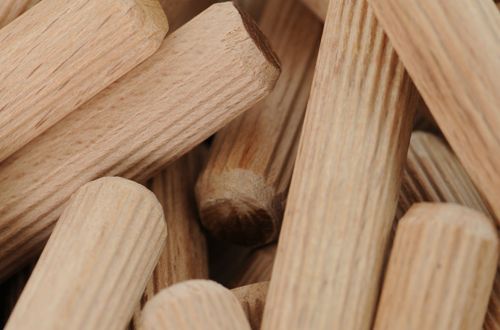
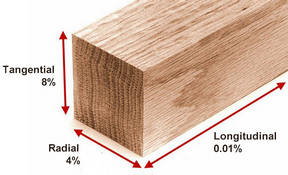
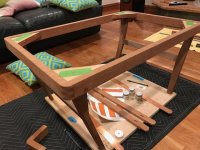
I have only been cutting to just a tiny bit bigger than the size of the dominoes and gluing them on both sides. I have now seen many videos of others some make one side the proper size and the other larger for easier assembly, some don't glue them at all, and others a combination of both. Is there a right or wrong way to use these dominoes? I still alternate my end-grain on glues ups while seeing others don't do that anymore. I will continue because it seems to work for me. But the dominoes' proper use I wonder about.

Apologies if this is just a nutty question but even though I bought the machine a year ago I have only recently started putting it to use.
 
From your 'alternate my end-grain' comment, I'll assume you're talking about table top glue ups or panel glue ups?

If you're getting the results you want with your current process, keep at it!

For table tops/panels, using dominoes are primarily for alignment for flatness, not strength of the joint.  Plunging a wider cut DOES offer flexibility in alignment of the joint if the plunging marks aren't spot on.

However, there is some personal satisfaction in cutting the tighter mortises, and tapping/clamping that joint closed for a perfect joint... it's just gratifying woodwork to get those joints to close.

If you're woodworking for enjoyment, do it whatever way you want.

If it's a job, or for production work, I'd consider the wider mortises as that will speed up assembly with the more forgiving tolerances of the joints while not sacrificing any strength.
 
I know that the fluted wood dowels (see image below), have the flutes pressed in and that the dowels expand when in the presence of moisture.  The moisture in the glue is enough to swell the dowels so that you have both glue and a mechanical aspect of the pull-out resistance.

I have tested this.  I dipped dowels in water for just a few seconds and then assembled the joint with no glue.  Left overnight, the expansion of the dowels was sufficient that I was not able to pull the joint apart.  An application of a rubber mallet was required to do so.

Has anyone done any testing to see how much the dominoes expand when exposed to water?  The fit only needs to be sufficiently tight for the joint to align correctly.  The glue will take care of the rest. 

With that data in hand, you can easily calculate how oversized you can make the mortises and still not compromise the joint.

fsc-dowels2-1.jpg
 
I use the narrow to wide Dominos because it gives me some wiggle room to tap the pieces into perfect alignment.

My biggest learning is to glue up 2 boards then another 2 etc. My worst disaster came with trying to glue up all the boards at one go. Also, I sand down some Dominos for a trial fit. The sanded Dominos are easy to extract yet give a good indication if there might be problems.
 
I compress the fluted dowels if the fit is too tight. The newly compressed dowels will expand back to their original size during the glue-up.

Couldn’t you just put the dominoes in your vise and compress it?  It sounds like it would be quicker and easier (and generate no dust).  It would expand back to its original size once it is glued (assuming a water-based glue).
 
Bertotti said:
Snip. I still alternate my end-grain on glues ups while seeing others don't do that anymore. I will continue because it seems to work for me. But the dominoes' proper use I wonder about.

Apologies if this is just a nutty question but even though I bought the machine a year ago I have only recently started putting it to use.

Common reasons some don't alternate the grain are: a) they don't know the benefit of doing it, or b) they don't do it because alternating the boards may produce an inferior appearance/grain pattern in the glued up board. For me, the final appearance is more important.
 
For myself if the project isn't very large I'll use the tight setting on all slots. For larger tables, panels, etc, I'll do tight all on one side, on the other the first one tight and then the others slightly wider.

And all mating surfaces get a coat of glue, not just one side. I see a lot of people gluing up panels and chopping boards, etc by putting glue on just one surface and clamping, but personally whether it's overkill or not I don't care, I like a coat on all surfaces giving a good squeeze out when clamped.
 
luvmytoolz said:
For myself if the project isn't very large I'll use the tight setting on all slots. For larger tables, panels, etc, I'll do tight all on one side, on the other the first one tight and then the others slightly wider.

And all mating surfaces get a coat of glue, not just one side. I see a lot of people gluing up panels and chopping boards, etc by putting glue on just one surface and clamping, but personally whether it's overkill or not I don't care, I like a coat on all surfaces giving a good squeeze out when clamped.

Same here. The trick is to get the minimal squeeze-out, which can be achieved through experience. Joint failure has never happened in my woodworking life.
 
ChuckS said:
luvmytoolz said:
For myself if the project isn't very large I'll use the tight setting on all slots. For larger tables, panels, etc, I'll do tight all on one side, on the other the first one tight and then the others slightly wider.

And all mating surfaces get a coat of glue, not just one side. I see a lot of people gluing up panels and chopping boards, etc by putting glue on just one surface and clamping, but personally whether it's overkill or not I don't care, I like a coat on all surfaces giving a good squeeze out when clamped.

Same here. The trick is to get the minimal squeeze-out, which can be achieved through experience. Joint failure has never happened in my woodworking life.
I agree with the concept, but for clarity I would want to hear “minimal squeeze-out along the entirety of the joint.”

I had an experienced picture framer come to work for me.  I always wanted to see squeeze-out on each miter.  I kept water and paper towels handy to wipe off the excess.

But the the new hire insisted that he had the skills to apply “just the right amount” of glue for full coverage with no squeeze-out.

But when I broke apart a frame he assembled, each miter was glue-starved in a portion of each. 

I fired him when he failed to follow my glueing protocols. 

I can guarantee that when there is no squeeze-out that you will find glue starved areas on most of your joints.

When someone says, “But I have never had a joint fail,” I add the missing adverb “yet”.

Miters are particularly susceptible to these failures over the years because of the seasonal movement of the wood.
 
These would help:

- Thin coat on each side, thin means not loading that results in glue running down

- When beading the glue, do it in a line, not in a zig zag manner.

"Yet" is unlikely to happen to me. Glue is only part of the equation. Consideration of wood movememt, understanding of the loading needs, and joint design, in some cases verified by a dummy test, are important factors.

None of my miter construction done over the past 20 years has failed. I resort to various strategies to reinforce the miter joints.

 
The picture framing business is all about efficiency.  We use underpinners instead of clamps and fast setting glues. (A very short open time is OK if all you are doing is gluing miters).

Twenty years of good miter joints is good. But not a large enough sample size to come to a real conclusion.  A busy picture framer will join 5 to 8 frames per day.  So a much larger sample size.

I use a glue brush for my joints.  I paint one surface for face grain and both surfaces for end grain.  For miters, both surfaces. (For miters, I apply glue to one surface and “kiss” them together and rub them back and forth before pulling them apart and examining the coverage.)

The reason miters are so vulnerable to seasonal movement failures stems from the fact that the outer perimeter of the frame is significantly larger than the inner perimeter. 

So if you have a 2” wide molding the outer length of the sticks are 4” longer than the inner length. That means when it shrinks in the winter, it tries to tear the outer part of the miter apart. 

When it expands in the summer, it tries to rip the inner part of the miter apart.

Since this cycle repeats each year, joint failure is always on my mind. 

Also, note that picture frame moldings are generally made from species of Asian lumber for which you can never seem to find any expansion data for.  Some of the species are practically unheard of to woodworkers.

Happily, expansion is smaller along the length of the molding than on the width or depth.

NOW_2_7_288.jpg

https://workshopcompanion.com/KnowHow/Design/Nature_of_Wood/2_Wood_Movement/2_Wood_Movement.htm
 
Packard said:
snip.
Twenty years of good miter joints is good. But not a large enough sample size to come to a real conclusion.  A busy picture framer will join 5 to 8 frames per day.  So a much larger sample size.Snip

It is more than large enough to reach a solid conclusion for furniture makers like me; in constant use since 2015:

[attachimg=1]

Picture frames are not my core woodworking interest.


Attachments

  • 3-way miters.JPG
    3-way miters.JPG
    24.5 KB · Views: 442
Yes, picture framers do not add any structural devices to the miters.  They depend on the glue only.  The underpinners only are functioning a permanently applied clamping device and adds very little to the joint strength.
 
If the DF500 came to existence at that time, I'd have used dominoes instead of circular discs to reinforce this large poster frame:

[attachimg=1]


Attachments

  • frame reinforced.JPG
    frame reinforced.JPG
    58 KB · Views: 446
ChuckS said:
If the DF500 came to existence at that time, I'd have used dominoes instead of circular discs to reinforce this large poster frame:

[attachimg=1]

Very clever.  I would not have thought of that.
 
Count me in the narrow-wide camp.

One Domino technique I find useful sometimes when assembling a glue up with multiple joints is to glue only one joint at a time but dry fit the other joints during clamping.  Domino machine makes this easy, fast and accurate and dry fitting extra panels helps with assembly alignment at the cost of efficiency.  This is particularly handy for boxes, I like building loudspeakers and some of them can have multiple boxes and brace panels inside the main box, pretty much impossible to glue in one shot so the slow methodical method works for my hobby builder workflow.

Domino also supports making alignment fixtures for glue ups.  Easier to send a photo than try to describe with words.  Here's a shot of a coffee table with angled legs that will connect to an H shaped frame on the floor.  No way I hit the alignment on top 4 joints of the legs without the plywood fixture that I dry fit to bottoms of legs while gluing the tops of the leg sub assemblies.  (maybe some of the pro guys here can make that happen, but I'm not that good at this [smile])


Attachments

  • IMG_4690.jpeg
    IMG_4690.jpeg
    140.6 KB · Views: 104
  • IMG_4702.jpeg
    IMG_4702.jpeg
    149.1 KB · Views: 89
Narrow - Wide (Middle) configuration for ALL applications except when corner alignment or when the max. structural strength is desired for a particular joint where a tenon in a narrow mortise is stronger than a tenon in a wide mortise.

The narrow-narrow configuration, except for the first mating mortises, must not be employed when using the cross stop accessory.
 
ChuckS said:
luvmytoolz said:
For myself if the project isn't very large I'll use the tight setting on all slots. For larger tables, panels, etc, I'll do tight all on one side, on the other the first one tight and then the others slightly wider.

And all mating surfaces get a coat of glue, not just one side. I see a lot of people gluing up panels and chopping boards, etc by putting glue on just one surface and clamping, but personally whether it's overkill or not I don't care, I like a coat on all surfaces giving a good squeeze out when clamped.

Same here. The trick is to get the minimal squeeze-out, which can be achieved through experience. Joint failure has never happened in my woodworking life.

As part of my scrounging for materials I often come across old furniture I re-purpose, and it's surprising how easy some of it is to disassemble as more often than not I find almost all the joints glue starved. A fairly high end sideboard assembled with Dominos I got last year, practically fell apart after some persuasion with a rubber mallet.

The Dominos must been assembled with just thoughts and prayers, as I was able to pull every single one of them out with pliers fully intact.

On the other hand I have furniture I've made 40 years ago that has never come apart, and when subjected to misuse has had breaks along the timber, not the glue line. I often wonder how long those huge end grain chopping boards last that you see youtubers assembling with a thin smear of glue on one side only.
 
luvmytoolz said:
The Dominos must been assembled with just thoughts and prayers, as I was able to pull every single one of them out with pliers fully intact.

That's funny, because it is often discussed how difficult they can be to remove, during a dry-fit situation.
Squeezeout is a touchy subject. I, along with many others, get mystified by the typical "YouTuber" who makes a complete mess doing glue-ups. These guys who smear glue, to the point of running over the edges, before they even turn the parts back to horizontal, and do that to both sides.....are just wasting it and making a mess. This also causes slippage and misalignment problems, not to mention potential for finishing problems later. If the glue layer is so thick that you can't see through it, you are likely to have way too much. A consistent line of pin-head sized beads is all you need. Running or dripping is excessive, wasteful, and requires more time for clean-up. I would imagine the sponsors love it  [big grin]
This comes from years of experience in making things that have to survive a delivery truck ride and all of the "handling" it gets from that guy. The installers themselves are the next level of abuse. I can't say I have never had to fix anything, but the last one was because someone ran into it with a forklift.  [eek]
 
Back
Top