Dominos on Miters and Bevels

Gotoh

Member
Joined
Apr 16, 2014
Messages
34
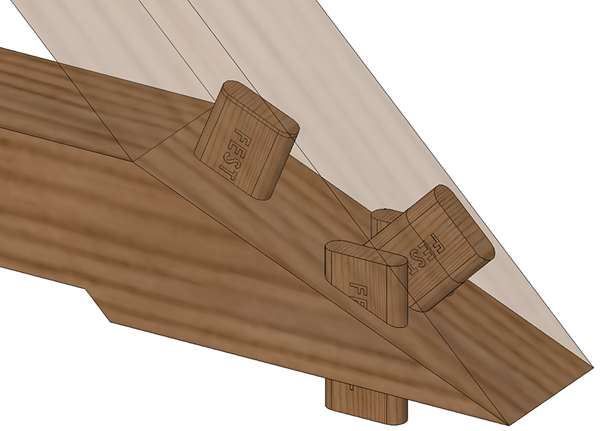
I've seen the demos of the various ways to join beveled cuts, but I haven't seen any examples of how you'd go about working with the sorts of angles you'd have to deal with in order to make something like a four-sided pyramid without blowing out of some edge somewhere. I can imagine eyeballing it, but given the way the Domino's fence works, I'm not seeing anything about it that would make a task like this foolproof enough to be easily repeatable.

Anyone done any tricky polygons they'd like to share?
 
epicxt said:
Check out the Angle Madness videos on Paul Marcel's site halfinchshy.com

I'm not at all confident that I've watched the entire series, but I have gone through a number of those and didn't see anything quite as severe as a solid pyramid being built. Is there one episode in particular that I might have missed?
 
Hmm...maybe not.  I was mostly referring to the process that Paul uses to figure out the compound angles for the project and the setup blocks that he used to set the fence on the domino to the exact angles needed.  As far as building a triangle-based pyramid I don't really recall seeing anything out there detailing that task specifically.  I'll be watching this thread for your progress! :)
 
Sadly the series isn't done yet! :)  cuz I really want that cabinet in its place right now!  I'll just say "out of control day job" and leave it at that though I've been recording the next episode for awhile now.

The one you want is this episode on Dominoing the Drawer Tiers.

If you accurately set your bevel on the table saw and cut a block like I did, it becomes very easy to accurately set your Domino fence and to verify it is accurately set.  Computing the angle is another thing.

Since you'll be setting your table saw bevel to cut the sides of the stock for the pyramid, use that to cut the setup block.

Ensuring your bevel setting is accurate is another thing; the bevel gauge on the table saw has big lines and big pointer.  I've heard those digital bevel gauges are pretty accurate.  The one I had showed angles to the hundredths place, but the box (not the device :) stated ±0.2º.  Make sure yours is ±0.1º
 
Thanks guys. I've definitely checked out both of those things, but I'm still not seeing mitered corners meeting at really acute angles. Maybe the more severe example of a three-sided pyramid being constructed out of 3/4 ply makes it easier to visualize? I just don't see any way to reliably sink a domino (or nail, or screw, or anything straight for that matter) in there without going right through the outer surface--which presupposes you've already made a clamping fixture of some sort that can hold it together long enough to do so. Maybe if you cut them way down so they were just little nubs for registration during gluing or something.

The sale's definitely what's got me considering the purchase, but I'm just a hobbyist who tends to make a lot of small, odd things that have nothing to do with cabinets, so I'm not certain it's actually gonna make my frequently peculiar tasks $800 worth of easier.
 
This is offered for your thought because the domino is versatile and does allow for adaptation.

When using the domino the depth of plunge is vital in a miter.  By default using the settings on the tool and also common sense the mortises and work needs to be performed close to the heel of the joint where the wood is thicker.

In practice you can move that operation closer to the point of the joint thru the use of owner supplied solutions that will limit the plunge depth (pvc pipe on the arms of the domino, and also by shortening the length of the domino "biscuits".  Of course the strength might be affected thru a shallower depth, but in relativity you might really just be using the domino as a locating device.

Peter
 
You're over thinking it too much. Regardless how odd the angle or even compounded, the tenons are still perpendicular to the face of the joint. So the Domino joiner is simply pressed against the miter face when plunging. The fence gives you the second (or even rotational) reference.

What you are seeing in the Zig Zag chair is different because those are locking tenons. They are deliberately not perpendicular to the miter face, and this is what permits them to be used in a locking manner.

Locking-lo.jpg
 
Rick Christopherson said:
You're over thinking it too much. Regardless how odd the angle or even compounded, the tenons are still perpendicular to the face of the joint. So the Domino joiner is simply pressed against the miter face when plunging. The fence gives you the second (or even rotational) reference.

Sure, but a line drawn perpendicular to the face of the joint has virtually no room to extend outward before it pierces the exterior face of the adjoining piece, especially as you inch closer to the apex of the pyramid. Having a hard time seeing how a domino that short would bring anything to the structural table--the glue's going to be doing pretty much all of the work, at which point it seems like you might as well not even bother with the domino.

[attachimg=#]
 

Attachments

  • AcuteMiter.png
    AcuteMiter.png
    10.7 KB · Views: 1,324
Gotoh said:
Rick Christopherson said:
You're over thinking it too much. Regardless how odd the angle or even compounded, the tenons are still perpendicular to the face of the joint. So the Domino joiner is simply pressed against the miter face when plunging. The fence gives you the second (or even rotational) reference.

Sure, but a line drawn perpendicular to the face of the joint has virtually no room to extend outward before it pierces the exterior face of the adjoining piece, especially as you inch closer to the apex of the pyramid. Having a hard time seeing how a domino that short would bring anything to the structural table--the glue's going to be doing pretty much all of the work, at which point it seems like you might as well not even bother with the domino.

[attachimg=#]

Alignment.

The domino in these cases is a fastener, not really structural. Depending on angles and thickness of wood, you might be forced down to a 4mm domino, not known for their strength. Depending on the purpose of the project, perhaps a finger joint or box joint instead?  A lot of glue surface there.
 
bkharman said:
Alignment.

That's about what I figgered. Wouldn't really be more of a time saver than a pin nailer in this sort of case.

Still a mighty tempting sale, just have to ponder whether or not I have enough boxy projects coming up to make it worth more than the asbestos abatement I need [mad]
 
Gotoh, If you move the green domino in your picture down about half the distance to the edge, then the whole domino would be hidden inside the joint. Also, you can cut off dominos to make shorter ones. If your joint can't take a 40mm domino then make a 20mm domino that will fit. You may be losing some area where you can place the tenon, but you have a long jointing area so you can use many of them.

Does this make sense?
 
Yep. No part of that lil 30 second Illustrator doodle was to any sort of scale; just showing the two possible orientations that I can imagine. I'm sure it's possible to use them, but once you start custom machining individual dominos the time saving aspect is lost in my opinion.
 
Back
Top