derekcohen
Member
- Joined
- Jun 22, 2008
- Messages
- 1,060
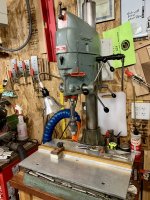
Mario Turcot said:[member=4358]derekcohen[/member] How did you like your table. Do you feel you have enough clamping capability?
I am at drawing mine and any input is welcome [wink]
Hi Mario
I have not used the drill press much since building the table ... I am travelling in Europe presently. What use has been positive.
I'll post again once it has been in use for a while.
Regards from Berlin
Derek