DW735 Planer setup

DynaGlide

Member
Joined
May 16, 2017
Messages
1,697
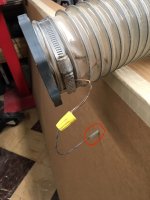
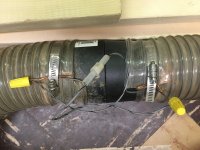
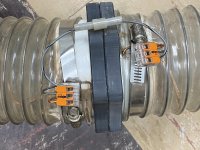
Just wanted to share how I set up my new planer. Not having a dust collector meant some jury rigging was involved. It only took one nasty shock before I installed a grounding pigtail. I use the alligator clip so I can easily move the hose/trashcan when not in use.

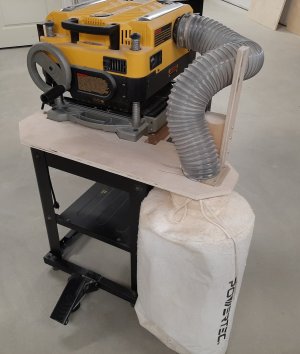
I've only tested it out on a 2x4 but it all seems to work well. The netting was necessary to keep the lid from lifting up. It's one of those cyclone lids from Woodriver. The ratchet strap is a temporary solution just to figure out where I need to install some eye bolts. The dust right bag is there to catch anything that might want to escape the trash can like when it starts to get full.

Matt

i-xWS9GtX-L.jpg


i-q7C5qFD-L.jpg


i-ZrmVtwF-L.jpg


i-J7GB3h7-L.jpg
 
“The dust right bag is there to catch anything that might want to escape the trash can like when it starts to get full”

Great idea to add the bag, it is more important that catching overflow. The bag allows the air being pushed by the Dewalt blower to pass through (like on all dust collection systems). Otherwise the back pressure of the closed system would end up blowing chips out from the planer itself making a huge mess. A second bag wouldn’t hurt but might not be worthwhile.
 
Funny how 1 good, full strength shock can grab your attention.  [poke]

I did something similar to ground the DC hose but used the internal wire spiral in the hose to ground the system. That way the external copper wire issue can go away.

For attaching additional lengths of DC hose, a Molex connector is attached to the internal spiral wire. So when adding DC hose just connect the Molex connectors and the ground path will be continuous back to the grounded item.

[attachimg=1]

Here's the original hose connector fitting before I changed over to Magports. Again, the Molex jumper bridges the 2 hoses.

[attachimg=2]
 

Attachments

  • 6436.JPG
    6436.JPG
    814.5 KB · Views: 940
  • 3562.JPG
    3562.JPG
    1.7 MB · Views: 906
[member=44099]Cheese[/member]

I chose the hose I have because it's cheap, short, and holds its shape very well. It doesn't have an internal wire. I may come up with something better.

Only problem I have with your setup is I don't see a WAGO connector where that wire nut is  [big grin]
 
DynaGlide said:
[member=44099]Cheese[/member]
Only problem I have with your setup is I don't see a WAGO connector where that wire nut is  [big grin]

Now that's funny because I was thinking the same thing... [smile]...sitting here thinking I should go downstairs and clean up those connections because this was done a long time ago. First is to use Wago 441 connectors and the 2nd would be to shorten the Molex ground wire. The old style bayonet connections needed 3"-4" of additional wire so they could be disconnected, the Magports don't require that.
 
DynaGlide said:
[member=44099]Cheese[/member]

Only problem I have with your setup is I don't see a WAGO connector where that wire nut is  [big grin]

Had the same thought. I went thru a few on the last round of ceilings fans and am forever a changed man.

Regarding planer shavings, I just point the outlet towards the flower beds...

RMW
 
The nice thing about the DW735 is that the internal blower is all you really need.
I fixtured the bag directly to my stand.  The bag is retained on a 6" wood disc with a reverse taper (dovetail). 
Takes up less floorspace, but the nice thing about your setup is that the chips drop into the pail rather than the bag.
 

Attachments

  • DW735.jpg
    DW735.jpg
    502 KB · Views: 278
[member=65451]Steve1[/member] My original plan was to dump into the bag. But someone here ( [member=72312]Rick Herrick[/member] ) cautioned me about how much of a PITA it is to empty it and how nasty the outside gets from all the dust that hits it. So I changed my plans. Now I think 99% of the stuff will go to the trash can and only get to the bag when the trash can fills. Even if it does hit the bag I can shake it back into the trash can.
 
Yep.
Inlet/outlet on my bag is 6", which is not terribly big, so sometimes the shavings have a hard time coming out.  A bag with, say, a 12" inlet would dump easier, but is a little more trouble to mount.
And, yes, debris does get on the outside.  I think from when I put the inlet into a garbage bag to dump it.  Does not look so bad in the photo, but for sure outside top gets ugly debris stuck to it.
 
Well thanks to [member=65062]DynaGlide[/member]  [poke]  and [member=8712]Richard/RMW[/member]  [poke]  I finally succumbed to their peer pressure and decided to clean up the interface connection when lengths of 4" diameter duct hose are connected to each other. This looks a bit nicer.  [smile]

[attachimg=1]

[attachimg=2]

Looking at the last photo, it would be fairly easy to eliminate the Molex connector entirely and complete the ground circuit by using one of the magnets on each Magport. Just align the 2 appropriate magnets and connect the hoses, nothing else would need to be done.
 

Attachments

  • 6434.JPG
    6434.JPG
    582 KB · Views: 768
  • 6438.JPG
    6438.JPG
    368 KB · Views: 755
How would you accomplish that. The magnets are only exposed on the face, so you would drill a hole on the back side and stab a wire in to contact the magnet. How would you ensure a good electrical connection is maintained.

I have MagPort flanges and on mine the magnet is set a fraction of a mm below the flange face so it does not make direct contact with the opposing magnet. This is to prevent the magnets from being fractured when the flanges are brought together. My MagPort flanges are a few years old, maybe they have changed the design.

You could use some alarm tape, or even metal foil tape like that used on ductwork. Cut a strip about 1/2" wide and let it fold over on to the face of the flange. On the back side of the flange you could connect it to a wire using alarm window foil connectors which let your transition from the self-adhesive foil to a wire conductor. Copper foil tape like that used for leaded glass work can be used too.
https://www.amazon.com/Seco-Larm-SS-202Q/dp/B018NQ7EN8
https://www.amazon.com/dp/B0716MMXQG
 
Bob D. said:
1. How would you accomplish that. The magnets are only exposed on the face, so you would drill a hole on the back side and stab a wire in to contact the magnet. How would you ensure a good electrical connection is maintained.

2. I have MagPort flanges and on mine the magnet is set a fraction of a mm below the flange face so it does not make direct contact with the opposing magnet. This is to prevent the magnets from being fractured when the flanges are brought together. My MagPort flanges are a few years old, maybe they have changed the design.

Hey Bob, I'd start with a thin copper washer that I could solder the wires to and place it under, yet in contact with the magnet.

I'm not aware of the depth the magnets are set below the pvc surface, however that would be part of the "discovery" phase.

Two magnets could be the preferred method for the continuance of the grounding line...however that can be fraught with implementation difficulties such as you've outlined.

So, after thinking about this issue, I'd suggest 2 simple round metal contacts that are proud of the pvc surface and that are held in contact by the remaining 6 magnets

 
I believe the magnets are 10x3mm. I made some blind
flanges a while back and that was the size I used IIRC.

I modified my stand many years ago to let me collect chips.
I moved the shelf down to the bottom and built a box that
fit in the stand. The top of the box is covered with a furnace
filter to let the air escape. The exhaust from the DW735 is
piped into the box.

Everything fits within the footprint of the planer. No can taking
up space to drag around. When I need to move the planer it all
goes in one action. If I want to take the planer outside to some
other worksite just wheel it out the door and it can operate
stand-alone sends chips into the box. When I am using it in the
shop I hook up the duct collector to the box and it grabs the chips
from there.

It's worked well for over 12 years. I keep saying I'm going to build
a better one but somehow never get a round to it.


Attachments

  • MagneticBlindFlg.png
    MagneticBlindFlg.png
    91.9 KB · Views: 124
Back
Top