DW735 shelix install, requesting some help....

Rick Herrick

Member
Joined
Feb 7, 2020
Messages
812
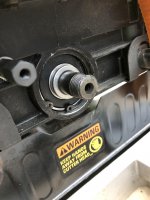
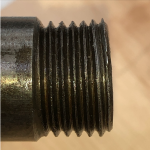
Started the upgrade today with the OEM sized head.  Had several issues but this one is a show stopper.  I either got a head with the end threads messed up, or I messed up when putting it into the machine.  I can't get the nut to go over those threads.  On a scale of 1-10 for being a mechanic, I am a solid 1.5 so kind of lost here.  Is there a tool or process that I could attach to the threads, closer to the machine, and back it out to re-cut the threads?  Thanks for any suggestions.
 

Attachments

  • helix.jpg
    helix.jpg
    127.6 KB · Views: 354
The lead thread on the shaft has some rough spots on it that are probably making engagement of the nut more difficult.  The first thing to try is putting a bit of lube on the shaft thread then placing the nut squarely against the end of the shaft then turning it counterclockwise, you should feel a step in the axial position of the nut each time the lead thread on the nut passes the lead thread on the shaft.  As soon as you pass that step going counterclockwise, reverse the rotation of the nut to clockwise and it should engage the first thread of the shaft squarely.  If you can continue to rotate the nut onto the shaft do so, if it sticks or jams you will need to clean up that lead thread.  I would be inclined to contact the supplier to request a replacement but you can also use a small fine triangular file to clean up those rough edges on the shaft lead thread.  Go very slowly keeping the file parallel to the thread pitch and just clean off the burrs, don't file the thread profile.  Good luck!
 
Seems there are many types of thread files so I need to figure out the correct one.  Remember, I am the 1.5 mechanic.  I assume I need to take the head back out of the machine to clean these up but had hoped not to as the snap ring pliers I had bought for this were terrible so need to replace those as well.

I did go CCW on the nut hoping to feel/hear that drop but no go.  I am not convinced I didn't get a bad one but I doubt I can convince Holbren to replace it.  But I will look into that tomorrow.

I have seen a couple of items on Amazon that you can clamp on to the good threads and then you can rotate it to repair the bad ones.  Those would also require removing the head.
 
Rick your options are a threading die, a thread file or a small triangular file. Do you by chance have a set of small Nicholson needle files?

An assortment will look like this.

[attachimg=1]

[attachimg=2]

If so, select one of the small triangular versions and very gently smooth the first thread as it looks like the culprit here. The idea is to smooth the surface and give it a smooth lead-in so the nut will go on easily. Once the nut is on the thread, you can use the nut as a sort of die and carefully run it back and forth using some lubricant and it will help straighten the threads and smooth the surface.

Also check the nut because there may be something wrong with it, again you want smooth lead-in thread surfaces on both items.

Not having a needle file/small triangular file, you can also do some thread smoothing work with a small piece of emery cloth. Start with about 180 grit to remove the major issues then use 400 for the final smoothing.

Good luck...nothing worse than bunged up threads. [crying] [crying]
 

Attachments

  • Nicholson Needle Files 1.jpeg
    Nicholson Needle Files 1.jpeg
    21.6 KB · Views: 679
  • Nicholson Needle Files.jpeg
    Nicholson Needle Files.jpeg
    137.5 KB · Views: 730
Thanks Cheese.  I don't have a set like that, just the more generic pack of three that are much larger.  I did find a pack of Nicholson files with 6 files.  I can give that a try.  The nut appears fine as it still goes on the original head just fine.  I will try again tomorrow with better light and fresher eyes.  Thanks for your help.
 
You should look at getting a thread gauge and then a tap and die set. Use the thread gauge to determine the thread pitch and spacing and the use that die to recut the existing threads. You won't need to remove the head as it looks to have enough room to spin the cutter around and around and rethread it.
 

Attachments

  • thread gauge.jpg
    thread gauge.jpg
    58.5 KB · Views: 252
At the simple end of the suggestions, looks like the beginning of the first thread is pushed in a bit. You probably don’t need to file it off just push it back out.

The edge of the head of a drywall screw will probably fit that tread and it is harder than the threaded steel. Just put it in the groove and rub back and forth until the wave is removed from that first thread. Shone able to get the nut on then.
 
I hope you compared the threads on the end of the two cutter heads. Old and new they should line up perfectly if not they are different threads. Just a suggestion in case it slipped your mind.Best to know for sure before you do any work on the new head that is undoable.
 
Drafted a note to Holbren this morning asking for guidance.  Wasn't sure if sending email to them (as seller) as opposed to Byrd but I opted for Holbren first.  I do like the idea of taking a dry wall screw to it, gently.  But I will wait on a response before I do anything.
 
Rick, If I were you, I would call Byrd directly and speak to Becky. I have purchased two of their heads recently and they have been a great help. Their number is 1-800-441-2973. She is located there at their manufacturing facility, she is extremely knowledgable and has immediate access to all of their other experts.
 
Thanks Alan.  I did get a response from Holbren and they said they were already out of the head so a replacement would not happen for many moons.  As you suggested, they told me to call Byrd, which I did.  The lady on the phone said they would send me an 'oversized' nut to correct the issue.  I was a little dumbfounded as I could not understand how a bigger nut would fix this issue.  She went away and came back telling me they will send the nut and a die.  No more elaboration than that.  I got an email saying, whatever they are sending, is on the way so I am crossing my fingers.
 
Once you get the parts, if you have any doubts at all call them back and talk to Becky. Get her to talk you through it or put someone on the line with you that can. If you want you can also maybe get her to commit to a quick replacement if you can’t get this to work. When I bought mine the crate was damaged inside. The blocking they installed to hold the head securely in transit was broken so the head had moved around and based on the response that I got they are clearly used to some damage happening in transit. In my experience they seem to be very focused on making sure they satisfy customers.
 
Asking for more opinions here ...

I tried the drywall screw method while the head was in the machine and it appeared to be working, at least visually.  Tried to put the nut on and its just a no-go.  It is still tilted a tad.  Went ahead and took it out of the machine to get better pictures.  The threads look clear all the way around but the rod seems to be pushed in at the top.  If you think accordion, it is like the top is compressed while the bottom is expanded. 

Is this still fixable with thread chasers, etc? 
 

Attachments

  • dw735-thread.png
    dw735-thread.png
    1.3 MB · Views: 250
  • dw735-nut.png
    dw735-nut.png
    1.2 MB · Views: 253
Unfortunately, the photos show clearly that the threaded end of the shaft is bent.

But maybe that isn't a critical flaw. If the nut simply keeps the shgaft from moving laterally then the slight bend is of no consequence, as long as the nut can be installed.

If you don't want to go through the hassle of exchanging the piece then get the right die and rethread (or file). The second thread is distorted enough that it will have to be filed or rethreaded to get the nut on.
 
If I received a shaft that arrived in this condition there is no way I would accept it.

Return it for a good shaft. This will be nothing but trouble forever and you will cuss
yourself for not replacing it when you had the chance.
 
I get your point Bob.  I got too far into this before I realized I had an issue.  The instructions should be amended with something like "put old nut on new shaft before installing".  I would get it replaced but they are on a 6 month wait.  How I got this one as quick as I did is only because [member=44099]Cheese[/member] gave me the info on getting it from another distributor.  I sent the pictures to Byrd and they feel confident that the die they are sending will fix the issue.  I'll see how that goes before I ratchet up the complaint.
 
Back
Top