DW735 shelix install, requesting some help....

Bummer Rick…it was threaded at an angle. I’ve done that accidentally on small #6, 8, 10 & 1/4” threads but never on one this size.  Has Byrd seen this photo? It really is their manufacturing issue, Holbren in this case, is just the bearer of bad news.
 
I don't think it was threaded on an angle, it looks like the threaded end was bent in an impact.  Measure the thread pitch at the top and bottom to confirm but all of the top threads look compressed and I don't see how that happened except for an impact.  I would send in that pic and request a new head.
 
I did send those pics to Byrd and they are convinced this die that they are sending, will work.  I am not an engineer nor a machinist but I rather doubt its going to be fixed.  But I will give it a shot.  Looks like I have to wait until Saturday before it arrives though.
 
In a pinch, I fix industrial equipment for a living, I have cut a nut in half then clamped it onto a bad threaded shat in a good spot. Then turned it off over the bad spot to try and clean things up. Perhaps not the best choice and it does ruin the nut but when files and dies are not available and time is essential sometimes you make due. It actually worked well the few times I have tried it.
 
I got the die from Byrd today.  Less than happy with instructions and the die itself but that's water under the bridge.  I had to screw with it for a while but finally got in on the shaft and was able to clear the threads up.  But...

Got everything back together and ran a board through it 4-5 times.  Looked good and definitely quieter.  But heard a weird crunching noise on last run so I took it back apart.  The v-belt is shredded.  Everything went together fairly well but something felt wrong with the chain, sprockets and idler arm on that v-belt side.  Not exactly sure where I went wrong but thinking I had the sprockets facing the wrong way.  I cleaned them and the chain and I must have put them in backwards.  Got a new belt coming (expensive) but I have a few questions for anyone that is familiar.

1.  There is a chain on both sides and they look similar yet they have different part numbers.  I know I didn't get mine reversed but I would like to know the difference between the two.

2. I saw a video ( but can't find it now) where the guy suggested even the chain has to go on correctly meaning a certain side must be towards the machine.  Does that make sense ?

3. The knob on the front for the finish type ( 1 or 2 ) doesn't fully go to 2 but it does not seem stuck and watching the action inside looks fine.  Not sure if that's normal as I had never noticed that before.  Seems with only 1 motor and 1 belt, everything is tied together so any little thing out of order can cause other problems.

4.  There is that helical gear (removed from old shaft and placed on to new shaft) that goes into the control box.  How do you make sure it fits properly as you can't see it?  Just take it on faith that if the gear box goes on, its ok ?

Thanks for your patience, its nice to have a better understanding of what's inside this beast.
 
"...watching the action inside looks fine."

Does this mean the machine was open so you could see the linkage operate?
 
Bob, regarding the finish knob, position 1 or 2, yes, I had the top cover off and I can see the rod rotate between the two positions.  Really not much too it and it may not even be contributing to my issue, just curious.
 
Rick, usually a new, fully riveted chain can be used on sprockets in either direction because the sprocket profile and chain profile are symmetrical. The exception is a chain that's been in use for a while because a wear pattern will develop between the chain rollers and the sprocket teeth and you want to maintain the bedded in surfaces.

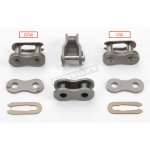
The other exception is for new & used chains that are connected together with a connecting link that uses a "C" clip or a cotter key. In those cases it's important to make sure the connector is rotating in the correct direction so that if it bumps accidentally against something, it doesn't loosen up and come off.

In this photo the directions are noted and you can easily see that if rotated in the wrong direction and if the spring clip hits something it will be removed from the connector link.

[attachimg=1]


Attachments

  • 1131311.jpg
    1131311.jpg
    187.2 KB · Views: 361
I found no c-clips.  Turns out the gear box and pulley chains do have different part numbers and 1 has 1 more link that the other. 
 
Rick Herrick said:
I found no c-clips.  Turns out the gear box and pulley chains do have different part numbers and 1 has 1 more link that the other.

The no c-clips thing doesn't surprise me Rick, I'd expect this to be a fully riveted chain from the factory for the sake of simplicity and repair. It would also keep any chain stretch to a minimum. The good thing is you now know the reason for the 2 different part numbers and that there is a LH chain and a RH chain. [smile]

One extra link doesn't seem like much but in the world of roller chains it's huge. It's a make or break situation.

Keep us posted when you receive your drive belt.
 
Rick Herrick said:
But heard a weird crunching noise on last run so I took it back apart.  The v-belt is shredded.

I did the same thing when I first got my byrd shelix head. The belt shredded :( When I put the new one on I made sure it was seated properly and everything has been fine thankfully. The belts are really tight and hard to get on. I pried it on with a flat head screwdriver.
 
I had ordered the $50 OEM belt but it wasn't coming any time soon so I poked around Amazon again and found the cheapo knockoffs.  Reviews were so-so but I figured I had nothing to lose as I had the real one coming and I got it in one day.  It came in today and it was a real bear to get on.  The method of rolling the pulley and pushing with your thumb didn't work.  Some YT videos showed guys using a trigger clamp to stretch it.  I tried that and it came close but I couldn't get it on the shaft neatly and I was worried I would screw up my threads even worse so I gave up on that idea.  Found another YT where the guy put the socket on the nut and used that to rotate the shaft as you try to push the belt on.  That actually worked pretty good.  I still had to futz with both ends to get it on to the grooves completely, but its working now.  So far so good so I will just see how much mileage I get out of this belt.  It was 2 for $20 so its cheap to try out.
 
I did not pit the nut on when tapping the shift in, amd I used a hammer so I found myself in exactly the same position.  For the next person looking for help, the die you need is a M16 X 1.5

Byrd said if I couldn't locate one they would send me out one from their shop and I would have to send it back.  Seems like a common enough mistake.  Maybe instead of a nut driver they should include some follower / pusher material I'm the package?
 
In my case they did send me the die.  I am not experienced in using taps/dies but I eventually got it working.  Good luck.
 
Gib said:
....Seems like a common enough mistake.  Maybe instead of a nut driver they should include some follower / pusher material I'm the package?

That's a great idea...the simple inclusion of a metric acorn nut would remind the customer to install it on the cutter head before assembly. In quantities of 100 pieces, it can't be more than a $1.50 item. Seems like a simpler solution than keeping extra nuts on hand to send to the customer for the customer to return later.  [eek] [eek]
 
Back
Top