Edge jointing a countertop with the TS75 (or TS55)

semenza

Festool Moderator
Festool Moderator
Joined
Jun 24, 2007
Messages
10,363
Location
Fingerlakes Region NYS
      So the topic of jointing by splitting the saw kerf between two boards comes up fairly often and has been shown before in posts and videos.  I was just building a countertop last week and decided to take pictures and post the topic again  because I think what I am using for a method may have some variations in this case.

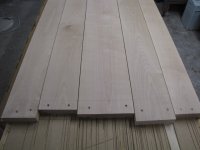
     The end result of this build is for a 36" x 54" island top.

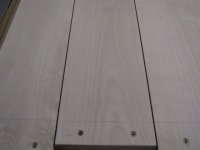
   Whenever  you are jointing like this you need to make sure that none (neither) of the boards move. So they need to be clamped down or secured by something. In this case I have them screwed down to my cutting table in the layout  for the entire top. The screws are in the excess waist portion that will be cut off later. If you are going to do any planing with them still screwed down make sure the screws are well countersunk. A temporary surface such as a sacrificial sheet of plywood will work for this.  It needs to be well supported. Clamp the guide rail too.  Any movement of any part of this set up  can show up in the joints.

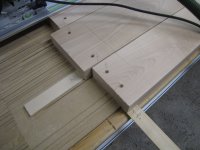
   I have placed shims in spots to even up the surfaces and make small adjustments in twisted boards.

   In my experience  I have found that you need to use the Fine  blade on the saw even though it is not intended for ripping.  The other blades may give a decent cut but it is generally not good enough to get satisfactory results for jointing. A sharp and clean blade makes it  turn out better as well.  When pushing the saw along the rail .... smooth, steady and not too fast is the key. Any wiggling from halting or changing handgrip etc. may show up in the joint. Especially since sometimes the board surfaces are not exactly even where they meet.

   If you plan to do the glue up on the same surface be sure to thoroughly  vacuum the kerfs.  Any chips or dust left in the kerf and the boards will not fit together tightly.

   I don't think it shows in the pictures but I like to rub a pencil along the very edge of the boards in a couple spots where the cut will be made. This is just a way to verify that the rail was actually set in the right place to split the kerf. If the pencil mark along the edges is gone, then the saw removed material from both pieces.

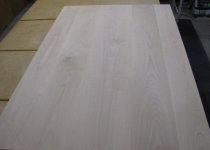
    The joints are tighter than they appear in the sixth picture.  The boards are not exactly even (surface to surface height) yet and light is creating small shadows at the uneven edges.

     A little rough planning in the last picture. Pencil marks and millimeter depths written on the board  to indicate where to start , stop, and adjust planning depth as on the go.

[attachimg=#]

[attachimg=#]

[attachimg=#]

[attachimg=#]

[attachimg=#]

[attachimg=#]

[attachimg=#]

Seth
 

Attachments

  • IMG_4545.JPG
    IMG_4545.JPG
    87.5 KB · Views: 4,072
  • IMG_4552.JPG
    IMG_4552.JPG
    87.9 KB · Views: 3,772
  • IMG_4553.JPG
    IMG_4553.JPG
    70.9 KB · Views: 3,801
  • IMG_4550.JPG
    IMG_4550.JPG
    69.5 KB · Views: 5,873
  • IMG_4549.JPG
    IMG_4549.JPG
    82.7 KB · Views: 3,655
  • IMG_4547.JPG
    IMG_4547.JPG
    105 KB · Views: 3,803
  • IMG_4548.JPG
    IMG_4548.JPG
    90.5 KB · Views: 3,873
This technique was shown in the Festool training class I recently attended for door panels.  At first it made sense, but then I'm wondering why is it necessary.  Your cutting the piece with a straight edge and it's the same straight edge for all of them.  The blade is 90 degrees.  I don't see why cutting them independently would not yield the same result.

The explanation given to me is the blade may move during the cut.    Is this the case or are there other reasons?
 
I was just at a Roadshow event and Allen explained that wood grain could cause small variations.  Perhaps having the blade captured on both sides helps with this and if there is any variations they are affecting both pieces at the same time.

Peter
 
CarolinaNomad said:
This technique was shown in the Festool training class I recently attended for door panels.  At first it made sense, but then I'm wondering why is it necessary.  Your cutting the piece with a straight edge and it's the same straight edge for all of them.  The blade is 90 degrees.  I don't see why cutting them independently would not yield the same result.

The explanation given to me is the blade may move during the cut.    Is this the case or are there other reasons?

What if your blade is not exactly perpendicular to the face? The error will be doubled when you glue the pieces together and over a wide panel can be very noticeable. This technique overcomes this problem. I prefer the technique of match planing where you flip one board end to end to get the same result (you only have to clamp one board down at at time), but Seth's technique is an excellent one.
 
What you need to think about is jointing vs. cutting.  Based on your reasoning, jointing should never actually be necessary.  But what it does is remove any irregularities from your cut.  Doing it this way makes jointing unnecessary because it matches your irregularities.  Granted, these irregularities will be minimal, but let's say that, like me, you have neither a jointer nor an 8' rail.  Using 2 short rails and joiners, this technique is invaluable.
 
     By cutting them at the same time and splitting the kerf it works even when there are small variances in the boards. Such as twist, warp etc. Anything that might make the  surface not consistently flat and square to the board edge.  The saw running on the track will only be as true as the board surface that the track is sitting on. Cut them separately  and each may be slightly different depending on the two boards surfaces causing the track and saw to "tilt" a bit in a different direction giving two different cuts. When you put them together  you may not have precise contact at all points. By splitting the kerf the two sides of the same cut are  almost guaranteed to meet exactly.  

     It is certainly possible to end up with a match  by cutting separately but less of a guarantee.

    Also keep in mind that this technique is especially useful when a large jointer is not available for truing and flattening boards.

Seth
 
question for seth:

I have little experience with planing and almost all of the experience I do have is just with doing edges.  For the differences you have here, do you find that planing gives you a better end result, or just speeds up the process? This would be vs. using for example the ETS 150/5, which I know you love (and which I just bought, and yes, I love it, too).
 
MahalaHomecraft said:
question for seth:

I have little experience with planing and almost all of the experience I do have is just with doing edges.  For the differences you have here, do you find that planing gives you a better end result, or just speeds up the process? This would be vs. using for example the ETS 150/5, which I know you love (and which I just bought, and yes, I love it, too).

 I find that I get less chance for dishing by using the planer first.  When sanding it is easy to focus on just getting the edges to meet  creating more up down undulations in the surface. I like to plane large differences first then I go to the Rotex. If I had a belt sander with a really good sanding frame (  [poke] Festool please bring it to the USA  [wink] ) that would also be in the mix or  maybe take the place of the planer in most cases.

  I do find that it is also significantly faster than just going with the Rotex.

 I used to do this type of thing with the ETS150/5 when it was my only sander. Which does  give a nod to the range of tasks the ETS 150 /5 can handle. Definitely slow though.

 I am by no means a plane or planing expert.

Seth
 
index.php


Masking tape works to keep the boards "together". So little wood is removed when sharing the kerf between two boards that there is no significant additional movement of either board. Sometimes I add a shared sacrificial end stop to resist any tendency of a board (especially the outboard board) to slide forward.
 
The masking tape is a good idea  I'll have to try that .  One thing I like about the screws is that they will hold the boards in position down tight to shims.

I also like that the having the whole top laid out at and secured at once that way you can go right to the basic planing with no additional set up.

Seth
 
It finally sunk in that you use the screws to tame warped boards prior to jointing with the saw.
Good idea! The masking tape is only good with nice flat stock.

I'll keep the screws in mind when I don't have enough thickness left for further flattening.
 
Thanks for sharing Seth! Although the technique has been mentioned before you did a really good job of illustrating it in detail. I need to make some maple slab doors and I think this might be a valuable technique.
 
Michael Kellough said:
It finally sunk in that you use the screws to tame warped boards prior to jointing with the saw.
Good idea! The masking tape is only good with nice flat stock.

I'll keep the screws in mind when I don't have enough thickness left for further flattening.

There you go  [thumbs up] 

Although the taming can only go so far. And you really can't  force them flat or untwist them with the screws.  But you can shim the spaces underneath at edges and corners. Then when the screws go in they are at least held in position without rocking.  Same goes for the rough planing, they are kept in alignment on the topside.

Seth
 
Hey, thanks for this. really great update. do you happen to have a closeup photo of the board fitting together after the cut? i see a few dark spots, i can't tell if they're a difference in height or a gap in the joint.
 
duburban said:
Hey, thanks for this. really great update. do you happen to have a closeup photo of the board fitting together after the cut? i see a few dark spots, i can't tell if they're a difference in height or a gap in the joint.

It is height and pencil along the edge. Here are pictures after glue up. Obviously you can tell the boards from one another due to grain and color, but the joints really couldn't  come together any more.

The first picture is the island top after glue up and sanding.

[attachimg=#]

-----------------------------------------------------------------------------------------------------------------
These two are of another one that I am working on today.  Still some sanding to go on this one.

[attachimg=#]

[attachimg=#]

Seth
 

Attachments

  • IMG_4579.JPG
    IMG_4579.JPG
    35.8 KB · Views: 3,167
  • IMG_4583.JPG
    IMG_4583.JPG
    62 KB · Views: 3,007
  • IMG_4585.JPG
    IMG_4585.JPG
    41.5 KB · Views: 2,966
Seth -

Nice work! 

All -

I'd like to view a video of this process, but all of the links I've found in the forums seem to be dead.  Anyone aware of functioning link to a video?

Thanks!

Ross
 
Seth,

What do you find easier and faster for edge jointing for glue ups using the TS 55 like you show here or the CMS? Since Im shop bound and not on site would the CMS give the same great results?
 
jobsworth said:
Seth,

What do you find easier and faster for edge jointing for glue ups using the TS 55 like you show here or the CMS? Since Im shop bound and not on site would the CMS give the same great results?

CMS? You mean edge jointing with a router bit in the table?  For lighter smaller stock I use my router table to edge joint. I do find that to be faster and a bit smoother with less chance for problem. But for long and or heavy boards I find the saw method better. And in the case I used above it allows me to deal with warps and twists as long as they are not real bad ones.

Seth
 
Back
Top