FestitaMakool
Member
Hi, this topic may also affect OF-2200 and OF-1010
As a new owner of the CMS-OF, this is my first encounter with the lift which is operating my OF-1400 EBQ pre-owned 2012 MY.
At first I thought the router felt a bit stiff to compress. I did apply PTFE dry lubricant and this helped a bit.
Now, mounting in the router table I did look into it again.
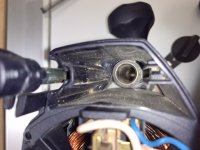
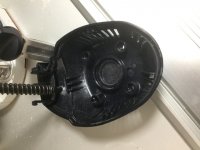
First I thought why can’t the spring be removed? So I did, unscrew the four screws on the top of the router, this reveals the motor with brushes exposed and the column that can be locked with the knob. Inside there is a captured “T” rod that holds the spring from jumping out when you remove the “bonnet” of the router. There are two catches on the T rod that need to compress with a narrow small screwdriver (see my red in the photos) carefully pry the catch while holding the T with the other hand, first one side, then the other. Then the spring lifts out with the T rod.
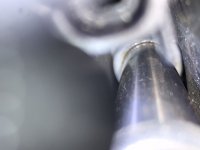
In short, I washed the columns with WD40, now that I realised (also after studying exploded views on ekat) it would certainly not hurt. It now moves very smooth on the columns.
The T rod has a small “bullet” on top wich catches a matching hole on the “bonnet this is what takes the force of the spring when mounted (see photos, pointing with tip of screwdriver)
I am now going to try it out without this spring, as the other require a lot more dismantling, but intention was to remove only one spring. As it happens, the spring that can easily be removed is also on the opposite side of where the lift engages - so the directional force from the lift is now only compressing the spring right under it. The column where the spring can easily be removed is now only a slave. Perfect [big grin]
Mounted upside down, the tension that the remaining spring gives seems absolutely perfect. Gravity helps here, as when upright it “sits” on the spring where you set the depth, with slight lift when compressed all the way down.
This whole operation takes only 2 minutes. So when using handheld it would take minimal effort and 4 screws out and in again to complete remounting the spring and “T” rod.
I cannot se why Festool didn’t prepare their routers for table use, such as an easy way (although this IS easy) to remove one spring for table use.
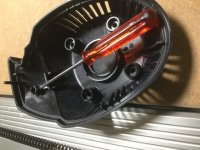
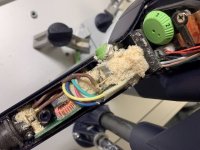
And a note; my router had seen almost no use, if none particular at all. But there where a build up of saw dust inside the handle (see photo). It may have been used in-table without dc, but if you do, and are comfortable with such maintenance, I advise to check your router inside the handle in particular.
As a new owner of the CMS-OF, this is my first encounter with the lift which is operating my OF-1400 EBQ pre-owned 2012 MY.
At first I thought the router felt a bit stiff to compress. I did apply PTFE dry lubricant and this helped a bit.
Now, mounting in the router table I did look into it again.
First I thought why can’t the spring be removed? So I did, unscrew the four screws on the top of the router, this reveals the motor with brushes exposed and the column that can be locked with the knob. Inside there is a captured “T” rod that holds the spring from jumping out when you remove the “bonnet” of the router. There are two catches on the T rod that need to compress with a narrow small screwdriver (see my red in the photos) carefully pry the catch while holding the T with the other hand, first one side, then the other. Then the spring lifts out with the T rod.
In short, I washed the columns with WD40, now that I realised (also after studying exploded views on ekat) it would certainly not hurt. It now moves very smooth on the columns.
The T rod has a small “bullet” on top wich catches a matching hole on the “bonnet this is what takes the force of the spring when mounted (see photos, pointing with tip of screwdriver)
I am now going to try it out without this spring, as the other require a lot more dismantling, but intention was to remove only one spring. As it happens, the spring that can easily be removed is also on the opposite side of where the lift engages - so the directional force from the lift is now only compressing the spring right under it. The column where the spring can easily be removed is now only a slave. Perfect [big grin]
Mounted upside down, the tension that the remaining spring gives seems absolutely perfect. Gravity helps here, as when upright it “sits” on the spring where you set the depth, with slight lift when compressed all the way down.
This whole operation takes only 2 minutes. So when using handheld it would take minimal effort and 4 screws out and in again to complete remounting the spring and “T” rod.
I cannot se why Festool didn’t prepare their routers for table use, such as an easy way (although this IS easy) to remove one spring for table use.
And a note; my router had seen almost no use, if none particular at all. But there where a build up of saw dust inside the handle (see photo). It may have been used in-table without dc, but if you do, and are comfortable with such maintenance, I advise to check your router inside the handle in particular.
Attachments
-
 05056C4B-F635-428B-B802-EE8948A19C1C.jpeg86.3 KB · Views: 559
 -
 9208BDB9-29DB-4F42-99D6-2325D2BDF541.jpeg48.6 KB · Views: 460
 -
 D984D600-227B-4911-B91F-5BCD36A6C398.jpeg119.8 KB · Views: 465
 -
 80F5E035-1E30-4286-BB70-A86ED984134B.jpeg134.4 KB · Views: 453
 -
 5A6D3BCA-F8D7-4A2B-A3B4-E3F993FD082B.jpeg106.8 KB · Views: 503
 -
 2DA28BF7-C0FF-4E3C-985A-BE3CDB019C4A.jpeg73.2 KB · Views: 447
 -
 05799032-EC80-4724-AEB9-47F5A0A563B6.jpeg103.3 KB · Views: 549