MrToolJunkie
Member
- Joined
- Jul 6, 2009
- Messages
- 2,961
Hi everyone,
Just got back from my visit to the in-laws this week where I made a table for my mother-in-law. Here is a link to the original thread:
http://festoolownersgroup.com/festool-tools-accessories/minimal-tools-for-end-table-build/
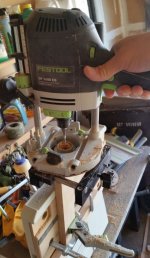
Since I had limited space in my car to bring the tools with me that I would use, I limited myself to my C12 drill, my new OF1400 router and guide-rail stop, my Rotex 150 and my Carvex with guide-rail base (and the tilting base, but I did not use). I brought an 800 mm guide rail with me, my marking-measuring tools, some clamps, my mortising jig, a few router bits and a few other odds and ends. I packed everything I needed for the journey into a Sys-Midi (all four tools fits in it with several accessories and router bits), my Sys-MFT (which ended up being my sole work-surface for all cutting, routing and sanding) and Sys-Storage. That was it. Other than a pack of jigsaw blades I needed to buy, I did not need to buy any other tools. I forced myself to use what I brought with me and to think through some of the challenges I encountered along the way. This project took me roughly 4 days from start to finish and that included time going to the store to buy lumber, finish and a few other supplies. I made this out of Cherry and it is finished with a Minwax Tung Oil Finish.
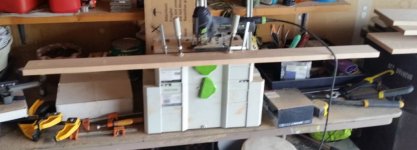
This first pic shows you my workspace (sorry, this one is a little blurry):
View attachment 1
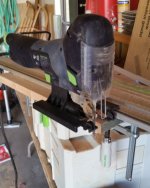
My primary tool for sizing my stock was my jigsaw. I used the Carvex to handle the bulk of my ripping and cross-cutting and while it worked pretty well at this task, I did find it could be finicky to give me repeatable and accurate results every cut. I did not have an issue with square cuts, but I did find cutting straight with the guide rail or with my square for cross-cuts was inconsistent. I think that the issue may be partly technique and partly not aligning the bases parallel with the blade when I swapped them out. I ended up using my router and guide-rail stop on all final cuts, but the jigsaw did do the job. I really liked how light-weight the saw is and how cool-running the machine was, even after hours of cutting. It never got hot, which was great.
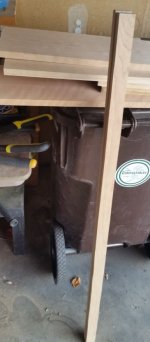
Ripping with the guide-rail base:
View attachment 2
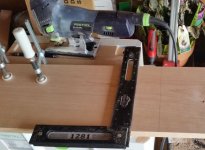
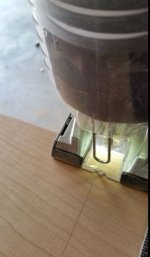
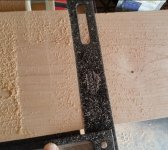
Cross-Cutting using a square as a guide and the end result of many cuts (almost perfect, but small gap at start of cut):
View attachment 3View attachment 4View attachment 5
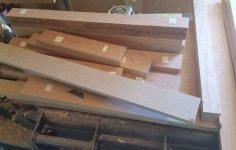
So here is a pic of some of the stock milled for the legs (final size was 1 1/2 inches square). This is straight off the saw and pretty close to be the right size. I milled them slightly oversize and then trued them up with the OF1400, templates and a template bit with a top-mounted bearing:
View attachment 6
View attachment 7
View attachment 8
I trued most edges with my router and a spiral bit and it worked great using the guide rail and rail stop. I can say that one of my favorite features of all Festool routers is the center lines on the base. It makes it so easy to line up the router to your cut for perfect results. Not having a jointer or tracksaw proved to be no issue using this method.
View attachment 9
I also use a rule-stop to help set my guide rail for cuts and to ensure it is parallel to an edge. This works well from either the back or splinter-strip side of the rail.
View attachment 10
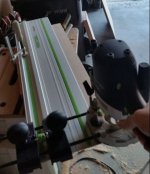
I had no room to bring my Domino, so I used my router and my Mortise-Pal jig to cut all the mortises for loose-tenon joinery. Sadly this company is out of business and the jig is no longer available, but since I am fortunate enough to have one I put it to good use. A shop-made jig or two edge-guide would have worked just as well. Also, the Sys-MFT proved to be invaluable holding material for these cuts. I opened the lid, added lots of clamps and other things for ballast and a small board to keep the lid open at 90 degrees and made all the cuts, no problem.
View attachment 11
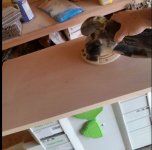
I used my Rotex for all sanding and I brought with me a few sheets of paper in each grit from 50 - 400 so I could sand the sequence. Once again the Sys-MFT aided the sanding process and on the larger panels I did not even need to use clamps as the rubber strip on the top secured the boards.
View attachment 12
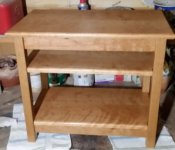
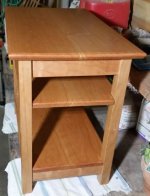
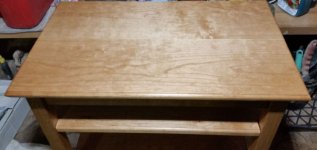
Here are a couple of pics of the completed table:
View attachment 13
View attachment 14
View attachment 15
My mother-in-law helped design it and helped with the overall measurements. She was happy with the end result, so I am happy. It is not perfect by any means, but it does go to show you that you do not need to have a shop full of tools to make a piece of furniture and with a little creative thinking and trying some new techniques you can push the tools to new uses you might otherwise not try. I am not saying this is how I would want to build every piece, but it can be done.
My biggest wish was adequate dust extraction -- as in I had none. I have been so used to working with my CT that I forgot how much sawdust these tools create on a typical project. Next time I would find some way to cram a CT-Mini into the vehicle or just buy one there to use. I had a dust mask, but I was covered in sawdust each day and it was a mess to clean-up and stay organized.
Thanks!
Just got back from my visit to the in-laws this week where I made a table for my mother-in-law. Here is a link to the original thread:
http://festoolownersgroup.com/festool-tools-accessories/minimal-tools-for-end-table-build/
Since I had limited space in my car to bring the tools with me that I would use, I limited myself to my C12 drill, my new OF1400 router and guide-rail stop, my Rotex 150 and my Carvex with guide-rail base (and the tilting base, but I did not use). I brought an 800 mm guide rail with me, my marking-measuring tools, some clamps, my mortising jig, a few router bits and a few other odds and ends. I packed everything I needed for the journey into a Sys-Midi (all four tools fits in it with several accessories and router bits), my Sys-MFT (which ended up being my sole work-surface for all cutting, routing and sanding) and Sys-Storage. That was it. Other than a pack of jigsaw blades I needed to buy, I did not need to buy any other tools. I forced myself to use what I brought with me and to think through some of the challenges I encountered along the way. This project took me roughly 4 days from start to finish and that included time going to the store to buy lumber, finish and a few other supplies. I made this out of Cherry and it is finished with a Minwax Tung Oil Finish.
This first pic shows you my workspace (sorry, this one is a little blurry):
View attachment 1
My primary tool for sizing my stock was my jigsaw. I used the Carvex to handle the bulk of my ripping and cross-cutting and while it worked pretty well at this task, I did find it could be finicky to give me repeatable and accurate results every cut. I did not have an issue with square cuts, but I did find cutting straight with the guide rail or with my square for cross-cuts was inconsistent. I think that the issue may be partly technique and partly not aligning the bases parallel with the blade when I swapped them out. I ended up using my router and guide-rail stop on all final cuts, but the jigsaw did do the job. I really liked how light-weight the saw is and how cool-running the machine was, even after hours of cutting. It never got hot, which was great.
Ripping with the guide-rail base:
View attachment 2
Cross-Cutting using a square as a guide and the end result of many cuts (almost perfect, but small gap at start of cut):
View attachment 3View attachment 4View attachment 5
So here is a pic of some of the stock milled for the legs (final size was 1 1/2 inches square). This is straight off the saw and pretty close to be the right size. I milled them slightly oversize and then trued them up with the OF1400, templates and a template bit with a top-mounted bearing:
View attachment 6
View attachment 7
View attachment 8
I trued most edges with my router and a spiral bit and it worked great using the guide rail and rail stop. I can say that one of my favorite features of all Festool routers is the center lines on the base. It makes it so easy to line up the router to your cut for perfect results. Not having a jointer or tracksaw proved to be no issue using this method.
View attachment 9
I also use a rule-stop to help set my guide rail for cuts and to ensure it is parallel to an edge. This works well from either the back or splinter-strip side of the rail.
View attachment 10
I had no room to bring my Domino, so I used my router and my Mortise-Pal jig to cut all the mortises for loose-tenon joinery. Sadly this company is out of business and the jig is no longer available, but since I am fortunate enough to have one I put it to good use. A shop-made jig or two edge-guide would have worked just as well. Also, the Sys-MFT proved to be invaluable holding material for these cuts. I opened the lid, added lots of clamps and other things for ballast and a small board to keep the lid open at 90 degrees and made all the cuts, no problem.
View attachment 11
I used my Rotex for all sanding and I brought with me a few sheets of paper in each grit from 50 - 400 so I could sand the sequence. Once again the Sys-MFT aided the sanding process and on the larger panels I did not even need to use clamps as the rubber strip on the top secured the boards.
View attachment 12
Here are a couple of pics of the completed table:
View attachment 13
View attachment 14
View attachment 15
My mother-in-law helped design it and helped with the overall measurements. She was happy with the end result, so I am happy. It is not perfect by any means, but it does go to show you that you do not need to have a shop full of tools to make a piece of furniture and with a little creative thinking and trying some new techniques you can push the tools to new uses you might otherwise not try. I am not saying this is how I would want to build every piece, but it can be done.
My biggest wish was adequate dust extraction -- as in I had none. I have been so used to working with my CT that I forgot how much sawdust these tools create on a typical project. Next time I would find some way to cram a CT-Mini into the vehicle or just buy one there to use. I had a dust mask, but I was covered in sawdust each day and it was a mess to clean-up and stay organized.
Thanks!
Attachments
-
 Mobile Workspace 1.JPG60.2 KB · Views: 315
 -
 Carvex Ripping with Guide Rail.JPG52.6 KB · Views: 211
 -
 Cross-cutting with Square 1.JPG70.9 KB · Views: 187
 -
 Cross-Cutting with Square 2.JPG43.7 KB · Views: 171
 -
 Cross-cut End Result.JPG93.6 KB · Views: 167
 -
 Rips for table legs.JPG43.1 KB · Views: 169
 -
 Making Templates for Sizing legs and rails with OF1400 and Guide Rail-Stop.JPG40.5 KB · Views: 172
 -
 Double-Stick Tape on work and Top Mounted Template Bit Yields perfectly sized parts.JPG72 KB · Views: 153
 -
 Truing Edes with OF1400 and Guide-Rail Stop.JPG44.5 KB · Views: 155
 -
 Setting Guide Rail to cut-line with a Rule-Stop.JPG57.3 KB · Views: 161
 -
 Cutting Mortises with OF1400 Mortise-Pal Jig and Sys-MFT.JPG73.5 KB · Views: 218
 -
 Sanding with Rotex no clamps needed with Sys-MFT.JPG40.2 KB · Views: 142
 -
 Completed Table 1.JPG30.2 KB · Views: 291
 -
 Completed Table 2.JPG37.6 KB · Views: 263
 -
 Completed Table 3 Top.JPG68.4 KB · Views: 181