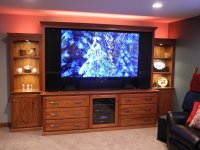
It was time to finish the basement and turn it into some useable living space. A "home theater/family room" was part of the project. I have always preferred an wood entertainment center to the spartan wall mount and decided to put the Festool collection to use. A large (70 Inch) flat panel TV is a design challenge, especially in a smaller space. Here we go.
Goals:
1. Build a surround for the TV and Components (Amp, Front Speakers, DVD, ect.).
2. Incorporate some useable storage.
3. Still have 10 fingers and a marriage at the end of the project.
14 months later and it's done. As always, I'm glad I did it, but if I had known what I was getting myself into, I not sure I would have done it.
Trying to find examples of similar plans was difficult. Home theaters tend to be fall into two categories, massive over the top super theaters or simple TV and "da speakers". I wanted to fall somewhere in between.
[attachimg=1]
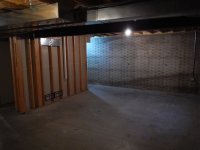
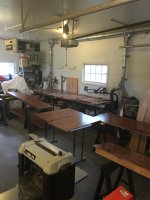
The Starting Point.
An unfinished space with concrete walls. A contractor handled the drywall and general finish work. You can see the blue tape showing the location of the TV. After the contractor got the rough framing and insulation done, it was time to add the wiring and "blocking" to support the TV mount.
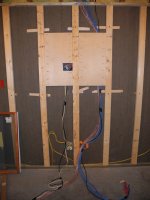
[attachimg=2]
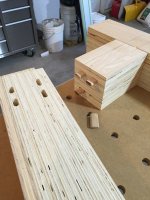
The TV is a 70 Inch unit and not light. I wanted something substantial to anchor the bracket into. I'm a big fan of baltic birch plywood. Some scraps were sized to fit between the framing members and pocket screwed in. I won't get into the wiring, other then than the final unit will have a full Dolby Atmos sound system with 11 speakers and two subwoofers. There are multiple Cat6 Network drops for tall the units.
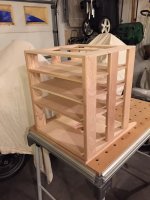
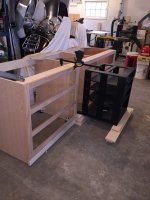
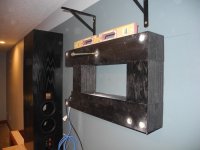
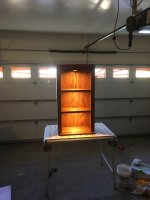
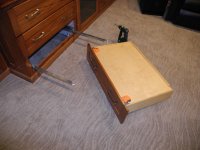
All of this is going to take a lot of wire and generate some heat. I have had to access the rear wiring of these systems before and I wanted an easy method to get at mine. My solution was what I call a cage.
[attachimg=4]
The Cage
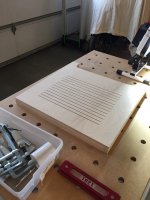
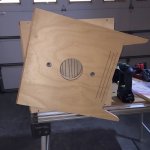
I plunge cut slots in the shelves with the TS 55 for cooling air flow.
[attachimg=3]
More to follow.
Goals:
1. Build a surround for the TV and Components (Amp, Front Speakers, DVD, ect.).
2. Incorporate some useable storage.
3. Still have 10 fingers and a marriage at the end of the project.
14 months later and it's done. As always, I'm glad I did it, but if I had known what I was getting myself into, I not sure I would have done it.
Trying to find examples of similar plans was difficult. Home theaters tend to be fall into two categories, massive over the top super theaters or simple TV and "da speakers". I wanted to fall somewhere in between.
[attachimg=1]
The Starting Point.
An unfinished space with concrete walls. A contractor handled the drywall and general finish work. You can see the blue tape showing the location of the TV. After the contractor got the rough framing and insulation done, it was time to add the wiring and "blocking" to support the TV mount.
[attachimg=2]
The TV is a 70 Inch unit and not light. I wanted something substantial to anchor the bracket into. I'm a big fan of baltic birch plywood. Some scraps were sized to fit between the framing members and pocket screwed in. I won't get into the wiring, other then than the final unit will have a full Dolby Atmos sound system with 11 speakers and two subwoofers. There are multiple Cat6 Network drops for tall the units.
All of this is going to take a lot of wire and generate some heat. I have had to access the rear wiring of these systems before and I wanted an easy method to get at mine. My solution was what I call a cage.
[attachimg=4]
The Cage
I plunge cut slots in the shelves with the TS 55 for cooling air flow.
[attachimg=3]
More to follow.