Epoxy and Finish

Mario Turcot

Member
Joined
Nov 26, 2017
Messages
1,288
Disclaimer: First time using epoxy + pigments.

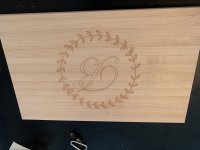
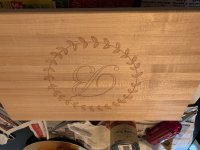
I carved an indoor sign and want to fill the carved text with Epoxy. I will be using Ecopoxy UVpoxy. The final finish will be 3-5 coats of danish oil. The carved letters are 4mm deep and about 3/16" width.

Q: Do I need to heat the epoxy to make sure it sit correctly at the bottom?

Q: Should I apply a first coat of sealer or Danish oil prior to pouring the epoxy?

Thanks!
 
1. No need to heat, but brush on a layer of UVPoxy before pouring to prevent micro bubbles from forming.  You can hit it with a hair dryer or heat gun after you pour to pop any surface bubbles.

2. Don't finish the inside of the letters as it could interfere with the adhesion of the epoxy, but it's not a bad idea to seal the face before pouring, it can prevent the over pour from absorbing into the wood.
 
Slightly off topic, I’ve been interested to try this. What ‘starter kit did you buy?

Cheers

Ben

——————————
dusty.tools
 
DustyTools said:
Slightly off topic, I’ve been interested to try this. What ‘starter’ kit did you buy?

Cheers

Ben

——————————
dusty.tools

Found a local store selling
EcoPoxy_UVPoxy_1400x.jpg


I will give it a try on the weekend  [smile]
 
I’ve done some work with white oak and West Systems epoxy. I found out that applying the CLEAR epoxy directly to the oak darkened it significantly.

My solution was to brush on 2 coats of GF clear water based poly first before I applied the epoxy.

I’ve also had no luck using a heat gun (200º - 1200º) to pop the air bubbles in the epoxy. My go-to item for that task is a Mapp/propane torch.
 
Mario Turcot said:
DustyTools said:
Slightly off topic, I’ve been interested to try this. What ‘starter’ kit did you buy?

Cheers

Ben

——————————
dusty.tools

Found a local store selling
EcoPoxy_UVPoxy_1400x.jpg


I will give it a try on the weekend  [smile]

Thanks!

I found their website a little unclear. No beginner’s guide!
 
[member=44099]Cheese[/member] I hear a lot about West system. Good stuff, unfortunately at -35 C I had to find a local store  [eek] Total boat is another one that seems to be pretty popular. If I'm going to use a lot of epoxy I will also give a try to ArtResin, new product that look to be a cheaper option.

[member=67145]DustyTools[/member] agree, not much info. I bought it at the same place I get my lumber and they do demos. You might want to look locally if you can find such information. I'm visual and after seeing a demo, everything become crystal clear  [big grin]

Here a good how to video that fit pretty much any epoxy.
eopxy
 
Hey Mario, here's an example of the color change I mentioned with that white oak project.

Photo 1. West epoxy being applied directly over the oak. There's a significant change in color.

[attachimg=1]

Photo 2. West epoxy being applied over 2 coats of GF water based poly. Just a very subtle change in color. Don't be confused by the yellowish lighting, as it's the same oak top, it's just that the lighting is whacky.

[attachimg=2]

Photo 3. The finshed countertop with 1.5-2.0 mm of West epoxy over the entire surface.

[attachimg=3]
 

Attachments

  • 5116_S.JPG
    5116_S.JPG
    708.6 KB · Views: 1,397
  • 5155_S.JPG
    5155_S.JPG
    743.1 KB · Views: 1,429
  • 5328_S.JPG
    5328_S.JPG
    732.1 KB · Views: 1,370
That top is very nice  [cool]

I get what you are saying. For my application I will be filling pockets not the whole surface. Like Ryan said previously make sense, applying a light coat of Danish oil on the top surface to protect it from that effect you are reporting.  [big grin]
 
Mario Turcot said:
I get what you are saying. For my application I will be filling pockets not the whole surface. Like Ryan said previously make sense, applying a light coat of Danish oil on the top surface to protect it from that effect you are reporting.

Ya Mario, what I was trying to get across is that while we may view clear epoxy as a neutral material, it does indeed wet the surface of the wood and it will therefore change it’s hue. Some will like the change, some will not like the change.

Interestingly enough, some of these epoxies are honey hued while others are more clear. West produces both variants. Photo 1 in my previous post is an example of West 105 & West Special Clear 207 hardener. So it is clear yet it darkens the wood considerably.

Just like oil based vs water based clear coats, there’s a venue for both of these approaches.
 
This may be semantic to some but applying a clear finish to sanded wood doesn’t change the true hue of the wood it reveals it.

Anything that alters the reflective properties (of anything) changes the appearance. The same effect shown in Cheese’s photos results from simply wetting sanded wood with clear water. The water temporarily reduces the reduces the millions of light reflecting surfaces to just one so you can see the true color of the wood and get an approximation of the appearance after a clear finish is applied. If the epoxy darkened the wood more than the GF poly it’s because the poly dried to a less than glossy finish producing a more diffuse reflection of the light than the extremely glossy wet epoxy.

When looking at sanded wood keep in mind that you are seeing has a milky filter over it. Deduct that filter in your mind, wipe it with alcohol (raises the grain less than water) or give the wood a swipe with a very sharp plane to get to the true color.

 
Michael Kellough said:
This may be semantic to some but applying a clear finish to sanded wood doesn’t change the true hue of the wood it reveals it.

Anything that alters the reflective properties (of anything) changes the appearance. The same effect shown in Cheeses photos results from simply wetting sanded wood with clear water. The water temporarily reduces the reduces the millions of light reflecting surfaces to just one so you can see the true color of the wood and get an approximation of the appearance after a clear finish is applied. If the epoxy darkened the wood more than the GF poly it’s because the poly dried to a less than glossy finish producing a more diffuse reflection of the light than the extremely glossy wet epoxy.

When looking at sanded wood keep in mind that you are seeing has a milky filter over it. Deduct that filter in your mind, wipe it with alcohol (raises the grain less than water) or give the wood a swipe with a very sharp plane to get to the true color.

Micheal, I totally get what you mean. Most of the time when using epoxy, people are looking for that glossy mirror look. In my case it's not exactly true.

I have a question if you have any experience with epoxy. Here is the steps I plan to execute;

1- Sand the sign up to 120 grits,
2- Apply a Danish oil coat, buff and let it dry 24hrs,
3- Pour in the epoxy (with pigments) to fill the text and logo (two different pigmentation),
4- Sand the excess of epoxy (I understand that will remove the glossy),
5- Apply 3-5 coats of Danish oil

Anything different you would do or add?
 
[member=62097]Mario[/member] the big question concerns the epoxy. Will the meniscus of epoxy be concave or convex? That will determine whether you sand the wood a lot more later or struggle sanding the epoxy while trying to avoid sanding the wood.

I’d try to get a concave epoxy surface if the wood is thick enough to withstand the extra sanding. If it isn’t, try to get a convex meniscus and then start scraping before the epoxy completely sets. There is a window of time when you can be productive (aggressive with the scraper) without risk of loosening the epoxy in the cavity.

Machine sanding epoxy should wait at least a day or you get a lot of corning on the paper. I prefer a Norton product for sanding sticky stuff. Not sure if there is a Festool equivalent.

Norton ProSand

I thought the initial sanding at 120 was coarse but you’ll probably do a good bit mor sanding after the epoxy sets so I’m not sure that or the initial coat of oil matters. 120 is way to coarse for an oil finish imo but maybe you want texture rather than beautiful wood figure? If going for wood grain texture I’d hand sand with the grain or better yet get this inexpensive machine Porter Cable Restorer and this Nylon Abrasive Wheel . The combo does a great job of knocking down the soft early growth and leaving the hard stuff and the dust collection is pretty good. (The machine is not actually made PC. The inventor/manufacturer pays PC for using the brand name etc.) The nylon abrasive will scuff up the epoxy but you could re-sand the epoxy (probably sitting a little proud by then) with abrasive on a rigid backing so you miss the wood. The machine is pretty easy to handle so you can minimize scratching the epoxy.

Good luck!

 
Michael Kellough said:
[member=62097]Mario[/member] the big question concerns the epoxy. Will the meniscus of epoxy be concave or convex? That will determine whether you sand the wood a lot more later or struggle sanding the epoxy while trying to avoid sanding the wood.

I’d try to get a concave epoxy surface if the wood is thick enough to withstand the extra sanding. If it isn’t, try to get a convex meniscus and then start scraping before the epoxy completely sets. There is a window of time when you can be productive (aggressive with the scraper) without risk of loosening the epoxy in the cavity.

Machine sanding epoxy should wait at least a day or you get a lot of corning on the paper. I prefer a Norton product for sanding sticky stuff. Not sure if there is a Festool equivalent.

Norton ProSand

I thought the initial sanding at 120 was coarse but you’ll probably do a good bit mor sanding after the epoxy sets so I’m not sure that or the initial coat of oil matters. 120 is way to coarse for an oil finish imo but maybe you want texture rather than beautiful wood figure? If going for wood grain texture I’d hand sand with the grain or better yet get this inexpensive machine Porter Cable Restorer and this Nylon Abrasive Wheel . The combo does a great job of knocking down the soft early growth and leaving the hard stuff and the dust collection is pretty good. (The machine is not actually made PC. The inventor/manufacturer pays PC for using the brand name etc.) The nylon abrasive will scuff up the epoxy but you could re-sand the epoxy (probably sitting a little proud by then) with abrasive on a rigid backing so you miss the wood. The machine is pretty easy to handle so you can minimize scratching the epoxy.

Good luck!

Micheal, thank you for your detailed information. It's much appreciated  [big grin]

If I understand correctly, epoxy is harder to sand so i should go concave. The sign is made of 3 x 3/4" laminated boards, so plenty to sans if I need. The goal is to get a nice wood figure. one of the sign is Sapele and the other is Padauk. My initial sanding at 120 was to remove the excess of epoxy only. What I want is to get the pigmented epoxy to highlite the text. The shiny effect will come from the oil. This is my first attempt so I will adjust if I don't like it  [wink]

Thanks again.
 
I just did something like this in the last week and today. I used clear epoxy as I was going for a subtle look on some serving/cutting boards. I used artresin and went for a concave epoxy, then sanded it flush, which I didn’t find it hard, and it didn’t seem to alter the finish. I’ll find out on the next one (the B) in a couple days after the resin is cured.
 

Attachments

  • 70C854D9-AED5-4297-A3B1-3F6647A625A7.jpeg
    70C854D9-AED5-4297-A3B1-3F6647A625A7.jpeg
    1.9 MB · Views: 434
Gjarman12 said:
I just did something like this in the last week and today. I used clear epoxy as I was going for a subtle look on some serving/cutting boards. I used artresin and went for a concave epoxy, then sanded it flush, which I didn’t find it hard, and it didn’t seem to alter the finish. I’ll find out on the next one (the B) in a couple days after the resin is cured.

Nice  [big grin] please let me know how easy to use are ArtResin productS. How long you waited before sanding?
 
I waited 24 hours to sand off the artresin. Used 80 grit to start. It took a couple minutes. I used danish oil from Lee Valley. The first picture is prior to the oil. The second is after one coat. I’ll do two more with a day between coats.
 

Attachments

  • 8B027DDC-5F09-4116-8099-285686A55AFE.jpeg
    8B027DDC-5F09-4116-8099-285686A55AFE.jpeg
    2.7 MB · Views: 380
  • 931BDC33-D51F-46F5-BC54-33AF341AA96A.jpeg
    931BDC33-D51F-46F5-BC54-33AF341AA96A.jpeg
    2.8 MB · Views: 386
Took a while but I finally get together everything required to pour the epoxy.

Can you guess what this will reveal.
[attachimg=1]

Applied 1 hour ago.

The product is super easy to use and poured in like melted butter. I had to make a few pass with the butane torch to remove bubbles. Not that I have too since it will be sanded flush but I was curious how the bubbles would disappear.
 

Attachments

  • epox.jpg
    epox.jpg
    119.3 KB · Views: 1,159
There still may be some small voids after you sand it Mario. If that’s the case just fill them with epoxy and resand.
 
Back
Top