I was just using the Granat 40 grit. I was doing spot fixes, not stripping the entire floor and it was often more about sanding spots of polyurethane that made little high spots. But I think in a few places I sanded down some small peaks in the concrete itself.
You are using an out of date browser. It may not display this or other websites correctly.
You should upgrade or use an alternative browser.
You should upgrade or use an alternative browser.
Essential starters for a Rotex 90?
- Thread starter sprior
- Start date
nclemmons
Member
It is a strong sander. In rotary mode, I've sometimes wished for a side accessory handle like the RO150.
It's great with the Festool polishing compounds and pads for buffing out tabletops with scratches, countertops and even cars.
An interface pad is also a great choice and foam backed pads up to 4000 grit.
A real workhorse for sure. One of my most used Festool sanders.
It's great with the Festool polishing compounds and pads for buffing out tabletops with scratches, countertops and even cars.
An interface pad is also a great choice and foam backed pads up to 4000 grit.
A real workhorse for sure. One of my most used Festool sanders.
I don't want to hijack a thread, but figured this was better than creating another one with some duplicated information. My current sander is the Pro5 only. I like the sander and use it often. However, I have a large(ish) panel glue up currently (58x15) that I'd like to have something more aggressive for. That said, as there could be 5000 questions, I'm looking for the best option. I'm not too overly concerned about the price differences between the 90, 125 and 150. Also, if you think there is a better sander for me to complement the Pro5, I'm all ears.
Thanks,
Kevin
Thanks,
Kevin
I think it says a lot that when I bought the RO90 I thought the first project it'd be used for is detail sanding a cedar Adirondack chair, and the first project I'm actually using it for is sanding epoxy patch flush on a concrete floor - and yes it can do either of those jobs depending on the mode you use.
The 90mm head might be a bit small for a large panel so maybe get one of the bigger ones, but the Rotex seems like a great compliment for the Pro5.
The 90mm head might be a bit small for a large panel so maybe get one of the bigger ones, but the Rotex seems like a great compliment for the Pro5.
Sanderxpander
Member
- Joined
- Sep 19, 2017
- Messages
- 413
I wouldn't recommend the RO90 for anything "large-ish" unless it's one-time and you intend it for other uses. The pad size is too small to make it quick and in Rotex mode it's also too aggressive to make a larger surface flat.
smirak said:I don't want to hijack a thread, but figured this was better than creating another one with some duplicated information. My current sander is the Pro5 only. I like the sander and use it often. However, I have a large(ish) panel glue up currently (58x15) that I'd like to have something more aggressive for. That said, as there could be 5000 questions, I'm looking for the best option. I'm not too overly concerned about the price differences between the 90, 125 and 150. Also, if you think there is a better sander for me to complement the Pro5, I'm all ears.
Thanks,
Kevin
For "large(ish)" work, get the 150 unless you want to keep the same sandpaper size as your current Pro5. The 150 is an absolute beast for stripping large surfaces. I can't imagine the 90 would stay as level as you'd like and not dig in, though I don't own one myself to know how bad it would be.
nvalinski said:smirak said:I don't want to hijack a thread, but figured this was better than creating another one with some duplicated information. My current sander is the Pro5 only. I like the sander and use it often. However, I have a large(ish) panel glue up currently (58x15) that I'd like to have something more aggressive for. That said, as there could be 5000 questions, I'm looking for the best option. I'm not too overly concerned about the price differences between the 90, 125 and 150. Also, if you think there is a better sander for me to complement the Pro5, I'm all ears.
Thanks,
Kevin
For "large(ish)" work, get the 150 unless you want to keep the same sandpaper size as your current Pro5. The 150 is an absolute beast for stripping large surfaces. I can't imagine the 90 would stay as level as you'd like and not dig in, though I don't own one myself to know how bad it would be.
Thanks for the reply [member=67061]nvalinski[/member]...I'm sure this has been hashed out ad naseum, but what benefit would I get for the 125 vs the 150 and vise versa? Assume the 90 is out of the question. I'm certainly happy spending the additional $100 for the 150 if it gets me "better".
Kevin
[member=64271]smirak[/member], the 150 gets you an additional 40% more surface area on the pad, which presumably means you'll be able to work 40% quicker. The increased area also makes it slightly easier to keep it flat over a 125. I don't think there are any major weight reductions going with the 125, so it really is entirely up to if you want to introduce another sandpaper size into your lineup. Personally, I ended up using both 5" and 6" when I had a Bosch 5" and then acquired an RO 150. The Rotex convinced me to switch entirely over to 6" when my Bosch died, but it's not much more than an upfront expense to obtain more sandpaper of a different size.
guitarchitect
Member
- Joined
- Feb 6, 2017
- Messages
- 76
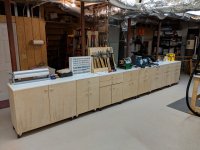
sprior said:Just a week after I got my RO90 I decided that since almost everything in my workshop is on wheels I should clear it out and redo the concrete stain floor. So the RO90 got called into duty with 40 grit paper to sand down any rough spots in the concrete or places where I had drips of stuff like polyurethane. That thing's a beast.
The before picture:
View attachment 1
An hour later cleaning almost everything out all by myself:
View attachment 2
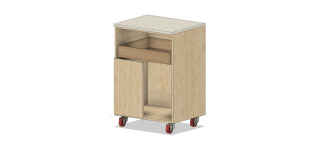
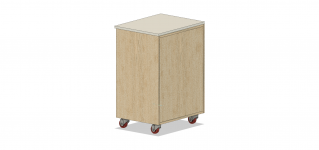
My new weapon:
View attachment 3
this makes me curious, is there any danger to doing general shop cleanup without the AS hose? I'm assuming what shows in the Empty picture is the non-as hose? I'd like to make a systainer-based thien separator for my CT26 so that i can use the CT as a general shop vac, but was worried about not having a full Antistatic chain through the whole thing. (and no, i won't be purchasing the new cyclone separator... it's not a true cyclone and costs 480CAD!)
also, a side question, whats the footprint of your grinder stand? I'm about to embark on the same build!
The hose you see in the picture is from the Festool Universal Cleaning Set and is non-antistatic. Besides being lots cheaper than an AS hose it is a lot more flexible, supposedly the new AS hoses are less stiff, but I haven't tried them yet. I would assume it's safe to use the non-antistatic hose otherwise Festool wouldn't sell it. I do notice that static cling causes dust to stick to the outside of the plastic hose sections from the set, but I assume that's because they are plastic.
I've standardized on a workshop cabinet size and the grinder cabinets (there are two of them in the picture) are that size. I make them from one sheet of 3/4" plywood with 1/2" ply for the drawer boxes, 1/4" for the drawer bottoms, and melamine for the top. The double locking casters I use are 100mm from floor to top of plate. I use 3/4" ply for the back and fasten everything together with dominos since it has to be structurally sound standalone. I make the doors and drawer fronts from one piece that I cut from the original piece of 3/4" ply and I make the cuts such that the grain matches through the doors and drawers (yeah, that kinda nuts). The drawer boxes are 100mm high, the drawer fronts are 130mm high. I use the LR32 system for the shelf holes and hinges. I've been lazy for the last few cabinets and cut the pieces for the drawer boxes including the through and stopped dados for the drawer bottoms on the X-Carve CNC.
I can't remember the other dimensions offhand, but if you like I'll post a cutlist (except for the drawer boxes) and CAD drawing sometime tonight/this weekend.
guitarchitect
Member
- Joined
- Feb 6, 2017
- Messages
- 76
sprior said:The hose you see in the picture is from the Festool Universal Cleaning Set and is non-antistatic. Besides being lots cheaper than an AS hose it is a lot more flexible, supposedly the new AS hoses are less stiff, but I haven't tried them yet. I would assume it's safe to use the non-antistatic hose otherwise Festool wouldn't sell it. I do notice that static cling causes dust to stick to the outside of the plastic hose sections from the set, but I assume that's because they are plastic.
I've standardized on a workshop cabinet size and the grinder cabinets (there are two of them in the picture) are that size. I make them from one sheet of 3/4" plywood with 1/2" ply for the drawer boxes, 1/4" for the drawer bottoms, and melamine for the top. The double locking casters I use are 100mm from floor to top of plate. I use 3/4" ply for the back and fasten everything together with dominos since it has to be structurally sound standalone. I make the doors and drawer fronts from one piece that I cut from the original piece of 3/4" ply and I make the cuts such that the grain matches through the doors and drawers (yeah, that kinda nuts). The drawer boxes are 100mm high, the drawer fronts are 130mm high. I use the LR32 system for the shelf holes and hinges. I've been lazy for the last few cabinets and cut the pieces for the drawer boxes including the through and stopped dados for the drawer bottoms on the X-Carve CNC.
I can't remember the other dimensions offhand, but if you like I'll post a cutlist (except for the drawer boxes) and CAD drawing sometime tonight/this weekend.
sure that'd be awesome - sounds like a good system! I've just built myself a small shop (11x24) so it would help give me a head start... i'm going to build wilmots' workbench on one wall and some upper cabinets above, but still need a few multi-function ones at a consistent height. i've got a bunch of random cabinets built out of the cheapest spruce ply from my old 8x14 shop, but it's about time I wipe the slate clean!
Here are the plans I work from.
Additional hardware needed is 4 euro style hinges, 4 casters, 4 drawer slides (21" full extension), and 4 knobs.
I edge band the front edges of the top, bottom, and sides of the carcass. Then I edge band all 4 sides of the drawer fronts and doors, plus the top edges of the drawer box as well as all four edges of the melamine top. I fasten the casters with 1/4" carriage bolts with a nut, lock washer, and regular washer - I then cut the bolts to final length with a Dremel cut off wheel.
Attachments
guitarchitect
Member
- Joined
- Feb 6, 2017
- Messages
- 76
sprior said:Here are the plans I work from.
Additional hardware needed is 4 euro style hinges, 4 casters, 4 drawer slides (21" full extension), and 4 knobs.
I edge band the front edges of the top, bottom, and sides of the carcass. Then I edge band all 4 sides of the drawer fronts and doors, plus the top edges of the drawer box as well as all four edges of the melamine top. I fasten the casters with 1/4" carriage bolts with a nut, lock washer, and regular washer - I then cut the bolts to final length with a Dremel cut off wheel.
Looks awesome! What make of casters do you get? Regrettably up here in canada it's hard to find a good bang-for-the-buck caster that won't flatten over time. I prefer the polyurethane tires but at 3" the locking swivels are $20+
Similar threads
- Replies
- 18
- Views
- 5K
- Replies
- 8
- Views
- 4K
- Replies
- 8
- Views
- 1K