Gene Davis
Member
- Joined
- Jan 19, 2008
- Messages
- 95
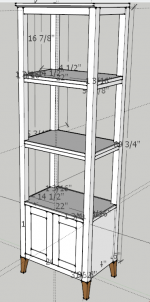
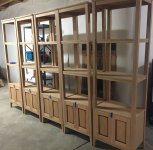
A copy of a design by Ethan Allen. I have no imagination. This is a run of five of them, all for personal use.
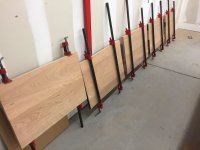
Dominos everywhere. About 50 in each. Even sequenced, the glue-ups were tough. Had to use Titebond Extend in the last sequence, with so many pockets and tenons to glue.
The CDX ply you see screwed to the end of the piece is one of two such, screwed on so the assemblies can be moved around on the shop floor without getting marred. Tops will go on last, after I get my router bit for doing the elongated countersunk screw holes.
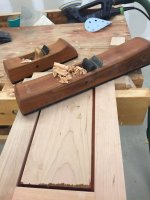
The top of the bottom box and the two intermediate shelves are veneer plywood, all parts edged with solid wood. All glued on oversized, then cut close with hand planes to the surface, and seamed to flush with the RO 125. Gotta be careful to not go through the veneer. I am done with edging veneer plywood for a while.
Spent a full day hanging and trimming the ten inset doors. Each piece gets a pair of them, each leaf approximately 10 w x 15 h. Tedious. Hang all doors oversize and close to a net zero fit in openings, then mark for trimming, and do in steps to creep up on perfection. Am using no-mortise hinges so it's not the same as using euro hinges with 3-way adjustment.
The doors are joined with one 8x50 domino per butt, and no matter what I do, I get a little misregistration at some joints. If it is more than a few thou, I plane first with razor-sharp hand tools, before I go to sand with the RO 125. If I was a pro, I would just send everything through a 52-inch Timesaver. Nothing like big time power and grit to get that perfect flatness.
Dominos everywhere. About 50 in each. Even sequenced, the glue-ups were tough. Had to use Titebond Extend in the last sequence, with so many pockets and tenons to glue.
The CDX ply you see screwed to the end of the piece is one of two such, screwed on so the assemblies can be moved around on the shop floor without getting marred. Tops will go on last, after I get my router bit for doing the elongated countersunk screw holes.
The top of the bottom box and the two intermediate shelves are veneer plywood, all parts edged with solid wood. All glued on oversized, then cut close with hand planes to the surface, and seamed to flush with the RO 125. Gotta be careful to not go through the veneer. I am done with edging veneer plywood for a while.
Spent a full day hanging and trimming the ten inset doors. Each piece gets a pair of them, each leaf approximately 10 w x 15 h. Tedious. Hang all doors oversize and close to a net zero fit in openings, then mark for trimming, and do in steps to creep up on perfection. Am using no-mortise hinges so it's not the same as using euro hinges with 3-way adjustment.
The doors are joined with one 8x50 domino per butt, and no matter what I do, I get a little misregistration at some joints. If it is more than a few thou, I plane first with razor-sharp hand tools, before I go to sand with the RO 125. If I was a pro, I would just send everything through a 52-inch Timesaver. Nothing like big time power and grit to get that perfect flatness.