ETS 125 vs ETS EC 125/3 finishing/polishing clear epoxy resin?

bob38

Member
Joined
Aug 30, 2020
Messages
9
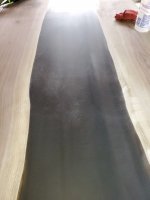
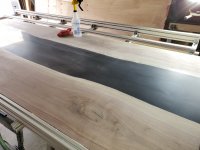
Hi, I'm a little new to the sanding world. I have a Rotex RO 150 and was attempting to finish a DIY river table with clear semi black epoxy resin in the middle.

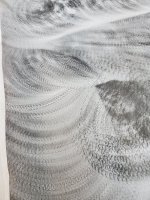
The Rotex 150 starts leaving very noticeable swirl marks in the resin around 320 grit. This needs to be a mirror finish with no swirl marks.

I was doing some reading on here and a few posters mentioned the 5mm orbit of the Rotex 150 not being designed for finish sanding.

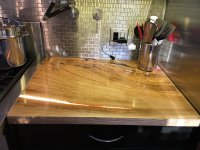
Would you recommend the ETS 125 for this or the ETS EC/3 125? The goal is the bring the resin up to 800 grit then polish with a rotary polisher.
 
The RO150 is the right tool for the job. Keep going higher in grit in orbital mode, then start polishing with it in Rotex mode.

If you are getting swirl marks turn the suction down, and lighten the pressure. 320 grit is just the beginning.

As I own an ETS EC 150/5 that would be my go to sander before to the RO150.
 
My vote is the ets 125. By far the most used sander in my shop for finish sanding. It has a very small stroke and almost never leaves marks for me. You could probably make it work with the rotex as peter said but I can't say enough about the ets.
 
MaineShop said:
My vote is the ets 125. By far the most used sander in my shop for finish sanding. It has a very small stroke and almost never leaves marks for me. You could probably make it work with the rotex as peter said but I can't say enough about the ets.
The 125mm sander pad is too small for a table. The ETS EC 125/3 can take a 150mm pad though.

Really one just needs to move up in grit quickly, especially on soft materials. Light pressure and turn the suction and speed down. Keep it smooth.

Edit: How you hold the RO150 can play a part in it too. Put the handle on it, then hold it from the hose at the rear loosely.
 
I've polished to 4000 grit with the RO150, great machine. I've also done it with the ETS 150/3 and the ETS150/5 EC. Its using the proper grit sequence and proper technique not the sander. Also when dealing with epoxy it should be fully cured to minimize problems. Depending on the epoxy it can several days to several weeks.
 
Peter_C said:
MaineShop said:
My vote is the ets 125. By far the most used sander in my shop for finish sanding. It has a very small stroke and almost never leaves marks for me. You could probably make it work with the rotex as peter said but I can't say enough about the ets.
The 125mm sander pad is too small for a table. The ETS EC 125/3 can take a 150mm pad though.

Really one just needs to move up in grit quickly, especially on soft materials. Light pressure and turn the suction and speed down. Keep it smooth.

Edit: How you hold the RO150 can play a part in it too. Put the handle on it, then hold it from the hose at the rear loosely.

To be sure a bigger pad is nicer for big flat surfaces, but we usually do about a dozen wooden countertops in our kitchens a year and the ets 125 is our go to sander and has worked really well for us. I have never felt like it was too small. Not saying it is the best solution for everyone, just saying we use them mon-fri and have had very good results.
 
I'm going to second the thoughts that you've got the right machine. A normal random orbit sander might leave smaller swirls, but it will still look hazy. I've typically gone up to 1500 grit with it, then transitioned to the polishing pad with polishing compound to get the effect I believe you're looking for.

The ETS EC is great, but not for this application.
 
Thanks for the updates. A few people mentioned the resin. It's been sitting for three weeks before I started sanding.

As for technique I'm not using any pressure at all just holding the sander evenly. I noticed it will try to jump around if you don't. I'm moving left/right then up/down over the same area very slowly.

The grit I started at 60 to remove the CNC lines and worked all the way up through every grit on the entire table. 60/80/100/150/180/220/320/400/500. Sander doesn't seem to leave noticeable marks until the higher grits. I'm using the Festool Granate sand paper. I may have skipped two grits 120 and 240.

I've also tried different speeds on the machine and it doesn't seem to change much outside of the material removal speed.

As for turning the vacuum down that's not really an option because I don't have an adjustable vacuum. It's just a regular shop vac. I did try it with no vacuum and it still did it.

I've seen a few guys saying the Rotex can do fine sanding. I should probably update my question, it's not really a matter to me if the machine can do it. I want the machine that's going to do it the easiest way because I'm obviously struggling with this thing at higher grits.

I added a photo showing what it's doing. I left the dust on the material. Made it easier to photograph the swirl pattern.

Should I just keep going to higher grits and see if it eventually starts sanding out?
 

Attachments

  • thumbnail_20200831_070310.jpg
    thumbnail_20200831_070310.jpg
    465.2 KB · Views: 404
At this point, I'd keep whatever grit paper you used in this photo on the RO 150 and sand it in the Rotex mode. After that step, the entire surface will then be dull and hazy but it will be uniform, that's what important, then just continue to go up to finer grits. For a mirror surface you'll probably need to go to 8000 or higher.

I did this countertop which is covered with a 2mm thick coating of West 105/207. I only wanted a matte finish on it to reduce the amount of everyday scratches that will be seen. I went to 2000 grit Platin to obtain a semi-matte finish. 

Here's a general photo of the finish, it does reflect a little bit such as the light switches, some of the individual tiles and the tool caddy.

Here's a close-up of the back-lit crack. If there were any scratches in the epoxy, this photo would show them as even the tiny air bubbles are visible. You can also see the under cabinet lighting reflected in the surface.

[attachimg=1]

[attachimg=2]
 

Attachments

  • 5328_S.JPG
    5328_S.JPG
    732.1 KB · Views: 1,778
  • 5309_S.jpg
    5309_S.jpg
    846.7 KB · Views: 1,832
bob38 said:
As for turning the vacuum down that's not really an option because I don't have an adjustable vacuum. It's just a regular shop vac. I did try it with no vacuum and it still did it.

Now there's a huge part of your problem. You really need a vac with adjustable suction to get the proper result.

1 - "I don't have an adjustable vacuum. It's just a regular shop vac" - your shop vac sucks so hard the sander starts to work like a vacuum cup, which prohibits movement and removal of dust. This creates swirl marks.

2 - "I did try it with no vacuum and it still did it." - now you create dust that does not get removed. It sticks to the pad and the surface, again, creating swirls marks.

You really need adjustable suction so that you can set the level in such a way that your sander can move freely and still get all the dust it creates removed.

And don't forget to wipe the surface between grits.
 
bob38 said:
As for turning the vacuum down that's not really an option because I don't have an adjustable vacuum. It's just a regular shop vac. I did try it with no vacuum and it still did it.
The amount of suction can play a HUGE part in the swirl marks. Shop vacs are often more powerful than a Festool version, and pull the sandpaper hard into the material.

There is an easy solution though. Bleed off the suction! Without knowing your country of origin it is a little harder to offer direct links. Would be good to put what country you live in. You could take a vacuum part that has a bleeder function built in and see if that lessens suction enough, but it may not. Any pipe that can be fitted inline of the hose at the vacuum side could be drilled out until you reach the desired suction. If you drill too much that is what duct tape is for, or you could bend up a piece of plastic into a cuff to make it adjustable.https://www.homedepot.com/p/RIDGID-...-RIDGID-Wet-Dry-Shop-Vacuums-VT2505/204220709https://www.homedepot.com/p/RIDGID-...ension-Wand-for-Wet-Dry-Vacs-LA2508/304753709

bob38 said:
Should I just keep going to higher grits and see if it eventually starts sanding out?
Yes, after you resolve the vacuum suction issue.

Edit: Also you should be using a hard pad with the RO150 if you are not doing so already. After applying a finish when switching to foam pads for polishing you have a few options. I use Chemical Brothers pads from Amazon, and 3M polish.
 
In addition to the stuff Peter linked to you can also use a Y connector at the vacuum end. Vac hose goes on one part and the other outlet you block off with cardboard or hard board or an end cap fitting and duct tape it on. Drill holes in the cover until you reduce the suction by about 1/2 to 1/3.

Also try using just rotary mode, not the random orbit mode.  Check the paper frequently. Sometimes the resin will build up on the paper and make a hard spots that will gouge the wood. Dust or blow off the work piece often to get rid off grit as well

Ron

 
rvieceli said:
Also try using just rotary mode, not the random orbit mode.  Check the paper frequently. Sometimes the resin will build up on the paper and make a hard spots that will gouge the wood. Dust or blow off the work piece often to get rid off grit as well

Ron
Super valid points!

You can check how fast your sandpaper wears out by feeling the old sheet and a new sheet. Even Granat does not last very long on hard materials. Can be minutes on Corian for instance.

Cleaning between grit changes is probably one of the most important things to do. Blowing it off is a great start, along with using a clean tack cloth of some kind to remove the previous grit.
 
You guys are like Festool sales men. I bought a CT 36.

I'm going to follow the advice from you guys and report back with the results
 
bob38 said:
You guys are like Festool sales men. I bought a CT 36.

I'm going to follow the advice from you guys and report back with the results
You are going to love the peace and quiet compared to a shop vac :)
 
Alright following everyone's advice in this thread. I brought the table up from 400/500/800/1200/1500. I also tried to leave on the Rotex setting on a small area and it seemed to leave less swirl marks which is odd. I still feel that this is not the correct sander for the job. This is being a real struggle for mediocre results.

This is what it looks like at 1500 which I think looks like garbage. It still has some swirl marks in it. I used the Festool vacuum on the lowest vacuum setting and even tried to pull some weight off the sander. Didn't seem to make much of a difference. The auto on/off on the vacuum is nice though.


Attachments

  • thumbnail_20200831_163010.jpg
    thumbnail_20200831_163010.jpg
    196.6 KB · Views: 402
One more photo. The long lines are not in the epoxy. It's semi translucent so you can see the aluminum extrusions supporting it from underneath.
 

Attachments

  • thumbnail_20200831_163056.jpg
    thumbnail_20200831_163056.jpg
    222.5 KB · Views: 365
Those little swirl “pig tails” are from the sander when used in the RO mode. Put the Rotex in the geared drive Rotex mode, reinstall some 400 grit paper and resand the area so that the pig tails are gone and there is a random, dull, uniform finish to the epoxy.

Vacuum and wipe the surface clean and then install some 500 paper. Repeat the process until you end with 2000 or 4000.
 
^Yup you need to step back down in grit and sand those swirl marks down. Depending on how the swirl marks look and feel I might be inclined to go back to 320 grit or even back to further if needed to 120 grit. Gotta judge that for yourself as you can touch and feel. 

With all this practice you are going to be great at sanding :)
 
Plus one on Cheese’s comments.

I’ll suggest that those are lower grit swirls and you’ve also probably got them in the wood too. You need to eliminate those swirls before you go to the next higher grit. I find it useful to set up a light across the surface at a low angle shining across the work piece to spot those things.

Keep the sander in geared rotary mode leave RO mode alone. It is helpful to have a set pattern when you sand. You also need a nice smooth motion when you move the sander. You can also get those swirls with any other sander as well.

Watch this video for the technique.


Maybe grab another piece of wood to practice on.

Ron
 
Back
Top