You are using an out of date browser. It may not display this or other websites correctly.
You should upgrade or use an alternative browser.
You should upgrade or use an alternative browser.
Extreme Fire Restoration - Workshop Guys Must Read!
- Thread starter Scott B.
- Start date
I have had two experiences with epoxy. The first was on a boat i was building right after I got out of the army back in '54. I knew the three guys who had developed the materials and the process. They gave me all of the aerials for "the right price." A cousin was also good friends with them and had better knowledge of the process than I. He helped a lot and when done, the boat hull with ask frame and 1/4" marine plywood was just about bullet proof.
Years later, i got a job to repair and level a dairy floor. We had to wait until all milk processing had been completed and the floor washed and rinsed before we could do any of our work. We had to work around and under heavy machinery and large tanks. Today i believe they use self leveling epoxy for such work. In those days, we only had trowel on type that was very thick and difficult to move around with our trowels. Mecause of the machinery and tanks, I had to basically crawl around on my belly. I was very difficult working that stuff at arms length and sitting across the floor to be sure it ws smooth and level. I ended up fairly smooth out in the open areas, but a lot of humps and valleys where the floor was close to the underbellies of those tanks and in close to the machines. BUT, the concrete was well sealed by the layer of epoxy.
we ended up working all night. milk trucks would start arriving around 6am and we had to be out of there before. My helpers were ok, as they got outside to breath fresh air with their part of the work. By the time i crawled out of there, i was as drunk as if i had partaken of a suds binge all nite long. I has started the job wearing a respirator mask, but that fogged up my glasses so i could see nothing. I finally just took that off, which was probably not very smart. I did survive and the epoxy ended up hard enough early enough, that no hold up to deliveries. The early work was only milk coming into the facility and pumped in by hoses from the tankers. We put down scraps of plywood and cardboard to protect from walking. By time carts are to be moved around and pallets of full milk containers (Glass bottles back then) with light protection from plywood, there was no hold up from my work. I don't remember the actual monetary deal i had for the job. I do recall that i about broke even and the dairy business was very generous in recommending me to others. did i ever follow up with more of that same type of jobs???
NO F-----G WAY.
Oh, and with fewer and fewer farms around locally, and other dairies upstate becoming more modernized, "my" dairy ended up closing their doors withing another couple of years. The building has had a couple or more facelifts and other businesses are in the building now. I think of that job every time i drive by and wonder how much of a project it was when somebody had to remove the layer of epoxy. It certainly was not a putty knife and peal type project. There were some holes in that old concrete floor that were three or four inches deep along with cracks out from some of those holes. It had to have been a pretty solid mass.
That floor you [member=19511]Scott B[/member] did came out beautiful. How do you apply such a finish today? I have never watched since that nite i crawled around on my belly with my chin barely above the finish i was applying.
Tinker
Cheese
Member
[member=13337]Scott B.[/member]
A bunch of questions:
How do you apply the SW epoxy? I'm assuming it's rolled on.
Does it have any tendency to self-level if it is applied heavily enough?
Any experience in applying it over typical basement asphalt tiles? Will it level itself enough to not telegraph the joints between the tiles?
Any experience with the longevity of the coating when applied to a concrete floor in an detached, unheated garage?
- Joined
- Nov 24, 2011
- Messages
- 1,958
Bob Wolfe said:Are these epoxy products rated for exterior applications?
Bob
There are epoxies that are formulated for exterior use. The ones being discussed here are not.
- Joined
- Nov 24, 2011
- Messages
- 1,958
Cheese said:[member=13337]Scott B.[/member]
A bunch of questions:
How do you apply the SW epoxy? I'm assuming it's rolled on.
Does it have any tendency to self-level if it is applied heavily enough?
Any experience in applying it over typical basement asphalt tiles? Will it level itself enough to not telegraph the joints between the tiles?
Any experience with the longevity of the coating when applied to a concrete floor in an detached, unheated garage?
Good questions, [member=44099]Cheese[/member], and I see [member=550]Tinker[/member] was wondering the same...
1. Yes, cut and roll application. Can be sprayed, but not interested in the cleanup.
2. Definitely self leveling. If you lay it too heavy in too warm of a drying condition it could tack and orange peel (leave roller texture) before having time to lay down.
3. Not sure what you mean by basement "asphalt tiles". Don't know if I have seen that before.
4. Yes, as long as it is applied in reasonable temps and can cure properly, it does fine in a cold garage with cars driving on it. We've done a bunch. Prep is key.
As I remember my two experiences with epoxy, temperature was a very important factor in the application both times. When doing my boat, i was working in the garage underneath the house. There were a couple of days when the temp got too high and we were advised to either do the job at nite, or wait for a cooler day. It was during mid summer and we got impatient. after a couple of days of waiting, we did the application. The first coat where we applied the fiberglass mesh went on ok. The second coat went on fine. The third, and finishing coat did give us some problems. we got a few bubbles that had to be sanded with patches added to make smooth. The patches were applied much the same way I learned a few years later to do do dry wall cement over nail holes. I also remember the dust from sanding Epoxy was not the most pleasant material i have ever sanded. The cloud was not great, as in those days, we knew nothing about power sanders, at least i didn't.
When I worked on the dairy floor, it was all trowel on and only a couple of swipes with the plaster trowel and it was done. No time for fussing around. a lot of swirls under those tanks. I had to stop to clean up trowels very often, as i remember. The work was done mostly in the night, so heat was not the biggest concern. If it was hot, we knew we would have had trouble. The business owner, as I remember, allowed us flexibility to change schedule if we expected too cold or too hot temps. It was a 7 day a week business, so we had to plan a little ahead. The worst part of that application was to mix quickly, get material to two of us applying, work quickly and try to keep our tools clean. I had been advised not to use my best trowels, so i bought a bunch of real cheeeepies. I did not get involved with cleaning my tools. i was too busy crawling on my tummy under those tanks. My helper did most of the out in the open troweling. (I am the sort of slave driver who never put anybody onto a project I would not do myself. Dumb [unsure])i remember I was not in very good shape when the job was finished. The fumes were a real hazard. My knees and back were in pain. (back problem was always a very debilitating problem for years. i knew how to work for some prevention, but a wrong twist could real lay me up for a few days.) I was not happy with the finished job from a stand point of proud it looked so nice. The owner was happy the job was done. None of us were happy with the appearance, especially me. About the only thing from my point of view was the floor was smoother when we finished than it had been before we started. There were no ankle breaking holes. a few toe stubbing wrinkles maybe; but those were under machines (mostly pumps) and tanks.
The job did not look anything like the floor samples from Scotts work.
As i write, I just thought of another application for epoxies was much easier for me to apply. The company i used to buy most of my concrete products, cement and lime from was a small operation. The owner of the biz was very imaginative and always thinking of new ways to do things. I bought some of my flagstone and marble from him fore fireplace facings. He had developed a method for epoxy to make flat stones out of the material. He used stone dust from various sources to make swirls in the clear and semi opaque material that he poured and vibrated into forms to make 1" thick "stones". He also developed a mastic to apply to the backing surface that could be worked over a wider temperature range than most previous materials to work with epoxy. I never worked with his manufactured epoxy stones, but I remember that most uninitiated might not know the difference between his epoxy stones and real stones. Those of us who had worked with real stone knew, without too much scrutiny, the difference. The business moved upstate soon after he developed his artificial stone and I soon got away from installing marble, slate and tile facings on fireplaces, floors and walls. I did, recently, need some information about a single project and i called his office. It seems that not only he has gone on to the greatest quarry, but so have both of his sons. i was talking with his grandson who, i understand (from others) is breaking in his son to the biz. Wow. A lot can happen in 39 years.
BTW: off topic::::: the small project I needed to kow about: I have a piece of marble (Tennessee Cragmar) left over from a large job I did in 1963 a little before i turned 39. The stone is 1-3/4 thick by about 24" square. I want to have it slit and polished into two stones so i can make two small tables of some kind for both of my kids. I can get the stone cut across into any number of pieces, but nobody knows of, or has equipment, to split the stone into two slabs. It is a solid piece with no visible seams anywhere. It is already polished on the top and one edge (a leftover from a final change on a very large project). I have even tried to contact the quarry where the stone originated, but they are no longer in biz. The company I got the stone from is long gone. Every one else I have contacted just looks at me like..... Well, let us not delve into that portion of the subject. If anybody just happens to read this, and has an idea of a service who would tackle such a job, would be most grateful for such info. Even if only splitting the stone is possible. I can get it polished (no, i would not think of doing the polishing with my RO 150. i know it has been discussed but I have seen the cloudes of dust from polishing stone when done dry.) I am in south western Connecticut. I would be willing to drive a couple hundred miles to get the job done. Not interested in sending via UPS or other delivery service. Anywhere within a couple hundred miles of D.C. or somewhere close to Cleveland area (Medina). Anywhere in Vermont (I have tried a couple of quarries in Northern VT.)Those are all places I would possibly be visiting within the next 39 years before i get to be 40. The Cleveland area, i only get to once every ten years or so. The last trip, i did not drive. Not so likely again (the driving part).
Got to get going. My day job is turning green. leaves are starting to pop out and forsythia is turning yellow.
Tinker
Tinker,
Here is a suggestion for your stone - Luck Stone Centers. They operate numerous quarries and do their own fabrication as well as purchasing non-native materials. They have two fabrication centers, one in Northern VA. Here is their website: http://www.luckstonecenter.com
Peter
Here is a suggestion for your stone - Luck Stone Centers. They operate numerous quarries and do their own fabrication as well as purchasing non-native materials. They have two fabrication centers, one in Northern VA. Here is their website: http://www.luckstonecenter.com
Peter
Cheese
Member
Thanks
[member=13337]Scott B.[/member] for the reply.
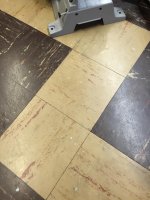
The tile I'm talking about is a product that was very popular in the 50's & 60's because it was cheap and durable. An asphaltic based material with a dose of asbestos added to it because back then they could. My thought was rather than trying to remove the tiles, I'd scuff the surface very very lightly with a ScotchBrite pad to remove any dirt and to give the surface some tooth. Then I'd roll on the Armor Seal. I just don't want the tile joints to telegraph through.
[attachthumb=1]
[attachthumb=2]
[member=13337]Scott B.[/member] for the reply.
The tile I'm talking about is a product that was very popular in the 50's & 60's because it was cheap and durable. An asphaltic based material with a dose of asbestos added to it because back then they could. My thought was rather than trying to remove the tiles, I'd scuff the surface very very lightly with a ScotchBrite pad to remove any dirt and to give the surface some tooth. Then I'd roll on the Armor Seal. I just don't want the tile joints to telegraph through.
[attachthumb=1]
[attachthumb=2]
Attachments

Peter Halle said:Tinker,
Here is a suggestion for your stone - Luck Stone Centers. They operate numerous quarries and do their own fabrication as well as purchasing non-native materials. They have two fabrication centers, one in Northern VA. Here is their website: http://www.luckstonecenter.com
Peter
[member=1674]Peter Halle[/member]
thanks for the tip. i knew if i checked a woodworking toy site i would get info about stone work. I will send off an E-mail to their facility close to Leesburg. We have a best friend who lives in Leesburg not more than a mile or so from Luck Stone shop. He has to be a good friend. He put up with me yelling at him nearly every day he worked for me while in high school and college. that was for five or six years. i even got to yell at him a bit while i was coaching him in soccer. And we are still friends. I know the area a little bit. I also am familiar with Purcelville just a little north of the Luck Stone facility. I had a cousin who lived there. The mantle on my fireplace was a post we found somewhere close to, or in, Purcelville. The area close to Leesburg has bult up considerably since back in the 70's when we were down there 3 or 4 times a year. Used to be all farm land, but somebody scattered condo seed in the fields and those things are still sprouting all over the fields.
I will let you know if Luck can help me with my stone
Tinker

Stephen B
Member
- Joined
- May 6, 2013
- Messages
- 2,469
[size=14pt]
Scott this has been a great thread to follow.
Given the quality of work being produced by you and the team, and the extent of that work, this family must have great insurance cover.
This has hardly been a 'quick fix'!!
Congratulations.
[size=10pt]
PS. Did you guys have a heated discussion half way through the video? [big grin]
(I know it is only an affect of the time lapse but the discussion looked 'animated'!)
- Joined
- Nov 24, 2011
- Messages
- 1,958
Thanks! Yes, it did take quite a bit of time for me to educate the adjustor last September when our pricing blew the template. That is not unusual, and it does take considerable resources to pull off a job like this. Fortunately, the homeowner has been realistic about laying out the schedule for the project, and wants things done right. It has been a good project, a few bucket list items checked off my list.
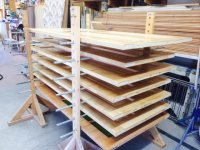
how long do you let those boards dry after spraying until you move the pile?
Is that the only spray point? or do you spray at one point, go to the next point and spray there while the boards at first point dry?
You do move prtty fast. maybe you generate enough wind the boards dry quickly. [cool]
Tinker
Is that the only spray point? or do you spray at one point, go to the next point and spray there while the boards at first point dry?
You do move prtty fast. maybe you generate enough wind the boards dry quickly. [cool]
Tinker
- Joined
- Nov 24, 2011
- Messages
- 1,958
Tinker said:how long do you let those boards dry after spraying until you move the pile?
Is that the only spray point? or do you spray at one point, go to the next point and spray there while the boards at first point dry?
You do move prtty fast. maybe you generate enough wind the boards dry quickly. [cool]
Tinker
Hi [member=550]Tinker[/member]
Good questions. We move the boards pretty immediately from the spray horses to the drying rack. They stay in the drying rack at least overnight, and sometimes several days depending on product.
Thought of you today, got the lawn tractor and wagon out today. Will probably drop a tree or two tomorrow and start bucking next years firewood. Happy that spring his finally come.
It did not appear that you were taking any pains to keep thumbs and/or fingers away from the surfaces. Was a second coat going to be applied? Was the paint being sprayed oil or water based?
When we redid our bathroom about 4 years ago, the painter used fast drying joint cement on the dry wall. Three coats in one day. WOW! He painted wood paneling and trim with water based. That was dry the same day. The only problem with the water based, we have three walls with wood (Ash)paneling and one is the wall we hang our bath towels on. My towel gets wetter and the water based paint is wearing off to bare wood from the wetness. I don't know what brand the paint was.
The ash paneling is reused from when i did the last remodel about thirty years before. It was some refinished that i had gotten from the lumber yard here in town. we used the same wood on a wall in out kitchen. The only place oon a total of four walls showing any sign of wear is under my bath towel. Is there a WB paint (water based I am guessing was the original for the refinished wood since the painter used WB paint on the job four years go)that will hold up to almost daily wetting from a towel? There is almost no abrasion involved, just moisture.
BTW: I watched your vids about the Bosche and Metabo sanders for grinding and polishing concrete. It is tough to believe how clean those work on concrete and stone without water to keep the dust down. There are so many new products on the road now since i got out of the business nearly 35 yrs ago. Those concrete sanders are kicking out what appears to be "0" dust. Unheard of i think back in the '70s and earlier. At least I never saw them. Wood Floor sanders managed to catch dust but concrete polishers I had used needed water or lots of ventilation AND taping over windows, doors and heat ducts. With water, there was a lot of cleaning up of floor afterwards unless in a shop where the water was constantly flushed away.
Tinker
Similar threads
- Replies
- 21
- Views
- 14K
- Replies
- 14
- Views
- 19K
- Replies
- 7
- Views
- 5K