Farm Table

jethreaux

Member
Joined
Mar 9, 2016
Messages
24
I'll try to break this into several posts. I've tried posting this twice now, and the entire thing disappeared when I hit "Post" each time.

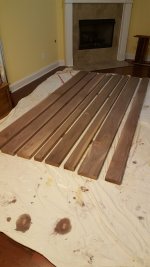
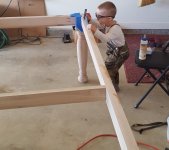
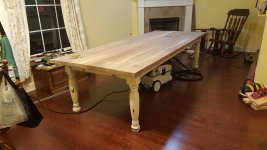
My wife decided we need a 10'x4' table for our family of 6. Top needed to be 2" walnut and it had to look worn. After pricing a table like that, I decided to build it myself. My woodworking experience consists of building one deck and starting on a cedar chest after my oldest daughter was born (I've joined two boards and she is now 5). My Tools: older Delta table saw and an ETS 125 sander. This should be no problem, right?

[attachimg=1]
I had my local woodworking store joint and domino the boards
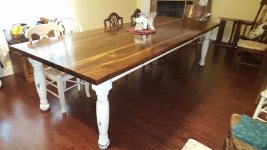
[attachimg=2]
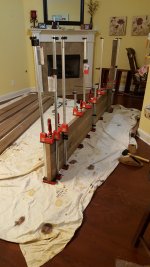
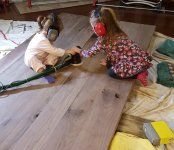
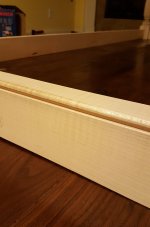
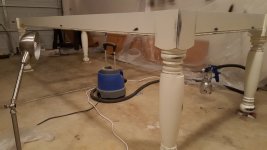
I glued the boards up in three sections and then glued those together. I wish more dominoes had been used. Several of the boards were not perfectly flat. Sanding them flush too a long time with my ETS 125.
 

Attachments

  • 20160215_170447.jpg
    20160215_170447.jpg
    2.2 MB · Views: 1,144
  • 20160215_183707.jpg
    20160215_183707.jpg
    2.7 MB · Views: 1,135
[attachimg=1]
No job is too hard if you can find someone else to do it. Notice the box Klingspor sanding paper, don't buy it. Half the sheets were bad due to being stacked abrasive against abrasive in the box. This causes damage during shipping and swirls in the wood. Festool packages theirs abrasive against Velcro loops. No damage. It did seem Festool's 120g was not equivalent to Klingspor's 120g. Does this vary between all manufacturers?

[attachimg=2]
Beaded Edge. WOW!!! Huge difference in using this CMT bit compared to using Ryobi bits that came with my router. That bit cut through hard maple with ease.

[attachimg=3]
Quality Control is tough around here. I chamfered the back edge of the apron. Apron and legs are maple.


Attachments

  • Sanding.jpg
    Sanding.jpg
    264.4 KB · Views: 1,026
  • Beaded Edge.jpg
    Beaded Edge.jpg
    296.7 KB · Views: 1,021
  • Quality Control.jpg
    Quality Control.jpg
    161.2 KB · Views: 1,026
Very nice!  I build farm tables, probably like the ones you didn't like the price of.  I wouldn't worry too much about the top not being perfectly flat. It's almost impossible to make a truly flat top from reclaimed lumber unless you were to plane all the patina and character out of the wood. When working with reclaimed wood sometimes you need to go against some the "proper" woodworking principles. Tilt your sander on edge, hit the edge with a bench plane, etc. I have a domino, but I usually don't use it for 2" glue-ups.  I use a few cambered clamping cauls, glue it and clamp it up. Good luck with the rest of the project.
 
Hi!

Very cool project and thank you for sharing these wonderful pictures along with it!

Kind regards,
Oliver
 
adorable kids! how much did all that 8/4 walnut run you if you dont mind?
 
[member=37561]#Tee[/member]
I believe it was $11/BF and it took around 100BF including waste.
 
[attachimg=1]
I painted the base brown

[attachimg=2]
Then antique white, and sanded through to make it look worn.

The finishing on the table base is probably what I'm most proud of on this project. It came out pretty much exactly as I envisioned it, and I've never done anything like this before. Thankfully I let my wife talk me into buying the spray system.
 

Attachments

  • Distressed.jpg
    Distressed.jpg
    113.4 KB · Views: 750
  • Brown.jpg
    Brown.jpg
    141 KB · Views: 746
Great job on the Table!!!!  I think I see an RO 150 on its way to your house in the future... 

[big grin]
 
[member=6237]deepcreek[/member] if my kids don't fight over it after I'm gone, I've failed

[member=7493]Sparktrician[/member] hopefully there will be a lot of Festool's headed my to my house, but TS75 and the Domino are first in line.
 
Beautiful job on the table base.  Looking forward to the finished product.  Thank you for sharing.  Bill
 
Just out of curiosity, how much does that table Weigh?  You'll need the crew to grow up and eat their Wheaties before you move it.
 
[attachimg=1]
I finished by wiping on Arm-R-Seal because I was told this is the hardest one to screw up. I did two coats on the bottom and have done 4 on top. I will do at least one more on top. I like it, but after looking back at these photos, I think I may have liked it a little lighter in color. Oh well, the wife loves it so I do too. The painters tape around the edges was supposed to block any drips. Waste of time and tape. I sanded the edges later anyway. Still learning.

[attachimg=2]
Pre-finish. There was a slight crown on the top. I guess I caused that during glue up. I was able to get most of it out by clamping 3 2x4's at the end then installing the figure 8's to hold the table top to the base. It is fairly flat now. My son spilt milk on it the other day, and it didn't all run to one side.
 

Attachments

  • Finishing.jpg
    Finishing.jpg
    176.1 KB · Views: 708
  • Almost Finished.jpg
    Almost Finished.jpg
    228.5 KB · Views: 714
Sparktrician said:
Just out of curiosity, how much does that table Weigh?  You'll need the crew to grow up and eat their Wheaties before you move it.

Somewhere around 400 pounds. The top weighs more than 300 pounds. It took myself and four former friends to lift it. Maybe they will forgive me after I have them over to eat at the table.
 
[attachimg=1]
I'm glad I did this instead of buying one. I'm sure a professional would have done a better job, but I'm pleased with how this turned out. It took me a long time. I bought the wood at the end of January. I averaged 5-7 hours of work on this table per week. I basically finished the table the first week of June, but will probably put 1 or two more coats of arm-r-seal on top at some point. As you can tell from the pictures, I built most of this in my house. That was my main reason for buying the ETS125 and CT26. I read all the propaganda and joined the cult. Festool's dust control with the ETS125 can not be overstated. I was also pleased with the Earlex HVLP system. It was easy enough for a true rookie to handle. Also, I will stick with Festool sandpaper moving forward. I chose to buy mismatched chairs from different antique stores around town, and my wife's grandmother gave us four from an old table she had. We sat 10 adults and two children around the table on Mother's day (used plastic table cloths since the top was still bare wood) with all the food lined up down the center of the table (this is why the table had to be 4' wide). There was plenty of room to spare. Of course there are flaws all over the place, but non-woodworkers won't notice.
 

Attachments

  • Finished Resized.jpg
    Finished Resized.jpg
    103.4 KB · Views: 673
jethreaux said:
[attachimg=1]
I'm glad I did this instead of buying one. I'm sure a professional would have done a better job, but I'm pleased with how this turned out. It took me a long time. I bought the wood at the end of January. I averaged 5-7 hours of work on this table per week. I basically finished the table the first week of June, but will probably put 1 or two more coats of arm-r-seal on top at some point. As you can tell from the pictures, I built most of this in my house. That was my main reason for buying the ETS125 and CT26. I read all the propaganda and joined the cult. Festool's dust control with the ETS125 can not be overstated. I was also pleased with the Earlex HVLP system. It was easy enough for a true rookie to handle. Also, I will stick with Festool sandpaper moving forward. I chose to buy mismatched chairs from different antique stores around town, and my wife's grandmother gave us four from an old table she had. We sat 10 adults and two children around the table on Mother's day (used plastic table cloths since the top was still bare wood) with all the food lined up down the center of the table (this is why the table had to be 4' wide). There was plenty of room to spare. Of course there are flaws all over the place, but non-woodworkers won't notice.

WOW!!!  Thats a trip to hernia hall, for sure.  [big grin]  You'd better fix à big and good spread for those friends... 
 
Beautiful result.

BTW, on the sandpaper, Festool uses the European grit standard, which differs slightly from the American one -- that may account for the differences you were noticing with the Klingspor.  It's not a huge swing at the lower grits, but it can create issues if you switch between papers on the same grit.
 
Back
Top