Farmhouse style cooktop cabinet

semenza

Festool Moderator
Festool Moderator
Joined
Jun 24, 2007
Messages
10,357
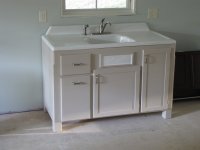
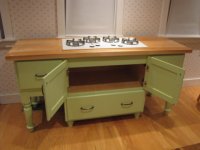
The latest build. I came up with this design based on some ideas from another job. This is also where the countertop that I pictured in this edge jointing thread ended up.

[attachimg=#]    [attachimg=#]

Seth
 

Attachments

  • IMG_4612.JPG
    IMG_4612.JPG
    46.5 KB · Views: 1,256
  • IMG_4619.JPG
    IMG_4619.JPG
    69.8 KB · Views: 1,275
Having grown up in Farm Country (lower Berkshires of Massachusetts), i never experienced an old farmhouse with floors level/flat enough for all 8 legs of a cabinet to sit evenly.  I guess "Farmhouse style" is descriptive as a suggestion.

That is a fine job.
Tinker
 
Nice job on the cabinet, Seth.  I'm concerned about having the left rear leg sitting right on the duct grate.  Is there enough play in the connection to be able to slip the cabinet one way or the other in case one needs to clean the duct? 

 
Seth  What a fantastic job this is, love the whole country effect for the cook top. Nice Job my friend
 
Hi Seth,

What a beautiful piece of furniture like cabinetry.  My compliments !

May I ask, for the centre doors, are they mitred ?  How do you cut the grooves in the rails and stiles for the panel ?  What did you use for the panels.

If I was building this, I probably would have used the same door style throughout. 

Keep up the great work !

Brian

Fall River, Nova Scotia, Canada
 
Love the design. Is the cupboard under the cook top functional and does it have a pull tray?

I would have considered an induction cooktop instead of gas for the top, much more effective for cooking the flat surface increases the usable space. Did the switch recently and would have a hard time going back to gas. We love cooking and induction is the way to go.

Bruce
 
   Yes, I did the painting.

  "farmhouse" is a suggestive description. The floor is a new one over old. It didn't look all that flat but I didn't need any shims under the legs  :o

   I grew up in an old farm house. The kitchen addition is really old too and has always (?) / still has a 2+" drop from one end to the other. When something spills you know exactly where to run with a towel  [blink]

   It will move far enough to get into the grate. It is a simple and accessible connection if it needed to be disconnected.


Seth
 
  I just liked the mixed style of fronts for interest sake. The doors are not mitered.  Rail and stile done with a regular tongue and groove set on the router table. 6mm plywood for the door panels. The 6mm plywood is a perfect fit in a 1/4" groove.  The drawers fronts are MDO with solid wood edging.

  Here is another with a similar style.

      [attachimg=#]

Seth
 

Attachments

  • IMG_4111.JPG
    IMG_4111.JPG
    389.1 KB · Views: 1,126
BMH said:
Love the design. Is the cupboard under the cook top functional and does it have a pull tray?

I would have considered an induction cooktop instead of gas for the top, much more effective for cooking the flat surface increases the usable space. Did the switch recently and would have a hard time going back to gas. We love cooking and induction is the way to go.

Bruce

The cupboard is functional. No roll-outs, shelves, or dividers. But it is a simple  box with a flush (to the interior) face frame and a variety of things could be easily added including conversion to regular drawers.  The customer will let me know if additions are wanted. Cooktop was customers choice.

[attachimg=#]

Seth
 

Attachments

  • IMG_4621.JPG
    IMG_4621.JPG
    77.5 KB · Views: 1,096
BMH said:
Love the design. Is the cupboard under the cook top functional and does it have a pull tray?

I would have considered an induction cooktop instead of gas for the top, much more effective for cooking the flat surface increases the usable space. Did the switch recently and would have a hard time going back to gas. We love cooking and induction is the way to go.

Bruce

Back in the late 60's or early 70's, back when i was only 38, THE BOSS & I bought an early induction stove.  Even when using the recommended cookware, it took forever to heat anything, let alone cook with it.  A friend found out we were getting rid of the stove.  Even tho we told them of our problems, they "Just had to have it." We gave it to them free of charge.  It took them just two weeks of struggle before they got rid of it. 

We are told those cooktops are much better now; but for us, we were cured, no matter how slick and smooth the tops are.
Tinker
 
Very nice Seth, I like the country style.

The color.

I never would of thought that that particular color would look that good.

But it does it works dood.
 
Here is a day light picture. The others are at night with the room lighting. I would say that the color generally appears in between the two.

[attachimg=#]

Seth
 

Attachments

  • IMG_4609.JPG
    IMG_4609.JPG
    58.1 KB · Views: 1,015
I like it, Seth.  What was the paint color name?  I used something similar on a little side table I refinished
 
SRSemenza said:
   Yes, I did the painting.

...with the pads? how did you do the legs? What kind of paint was it? The top looks good too!. What did you coat the top with? Is that maple?
Maybe with all these questions I bring you out the chatty Seth.... [big grin]
I like the color.

 
Sherwin Williams multi-purpose primer (tinted). SW Pro Classic Trim and Doors, Acrylic Latex, Gloss. The color was a custom match. It is in SW system under the name Green Glass. I don't know if that means just at the store I use or SW nation wide?  It falls some where between SW6715 (Lime Granita) and SW 6716 (Dancing Green) .

I used the pads for most of it and a Purdy 2" Nylon Polyester angle brush on the legs.  Painted the main cabinet upside down. That made it easy to make a continuous sweep / stroke all the way around the legs.  I  think  the topic of getting fuzzies from the pads was talked about in another thread. I combat that by brushing two pads together  pretty roughly before use which seems to get rid of almost all the loose fibers. They are not perfect but for me they put the paint on much smoother, faster, and sometimes in one coat (as in this case) than a brush. I sanded the primer with 320 Granat. Spray set up .... someday.

The top is birch. finish is one coat satin polyurethane and one coat semi-gloss polyurethane. Very , very, light 400 grit (Brilliant) sanding in between by hand. Basically one careful  sweep with the abrasive with the grain. Just enough to knock off rough spots.

[attachimg=#]

Seth
 

Attachments

  • IMG_3969.jpg
    IMG_3969.jpg
    49.9 KB · Views: 881
Thanks Seth.
SRSemenza said:
Spray set up .... someday.

You don't need it, it looks like you are doing fine without it.  [big grin]

Happy Thanksgiving.
Tim
 
Tim Raleigh said:
Thanks Seth.
SRSemenza said:
Spray set up .... someday.

You don't need it, it looks like you are doing fine without it.  [big grin]

Happy Thanksgiving.
Tim

Thanks. 

Its the time it takes compared to a spray set up.

Seth
 
Back
Top