Fence-only router table fence options?

smorgasbord

Member
Joined
Jan 7, 2022
Messages
1,059
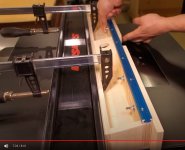
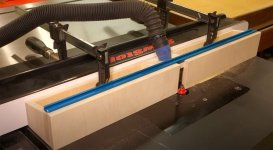
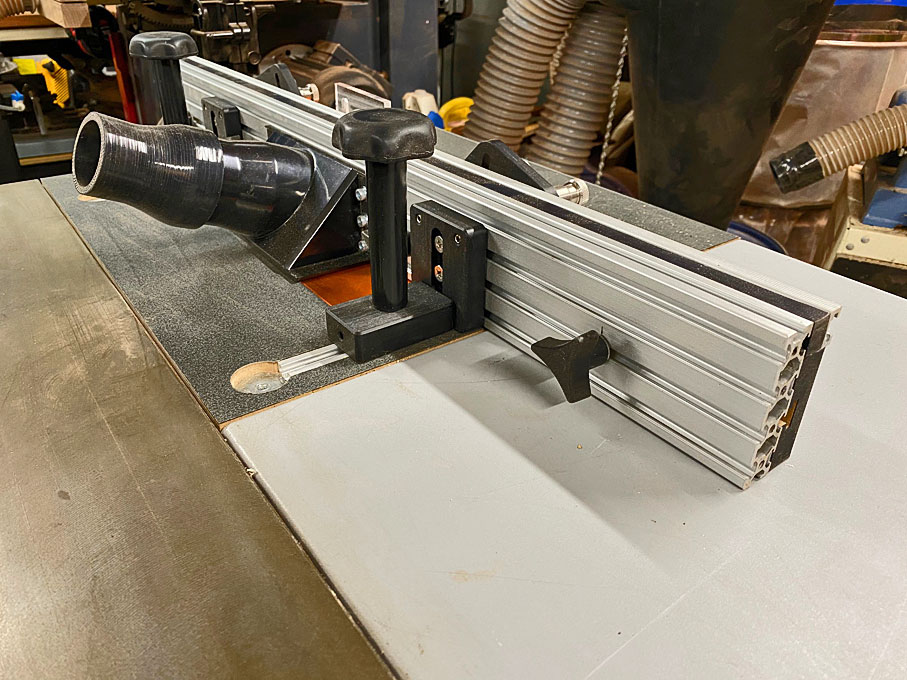
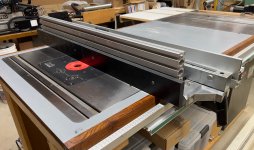
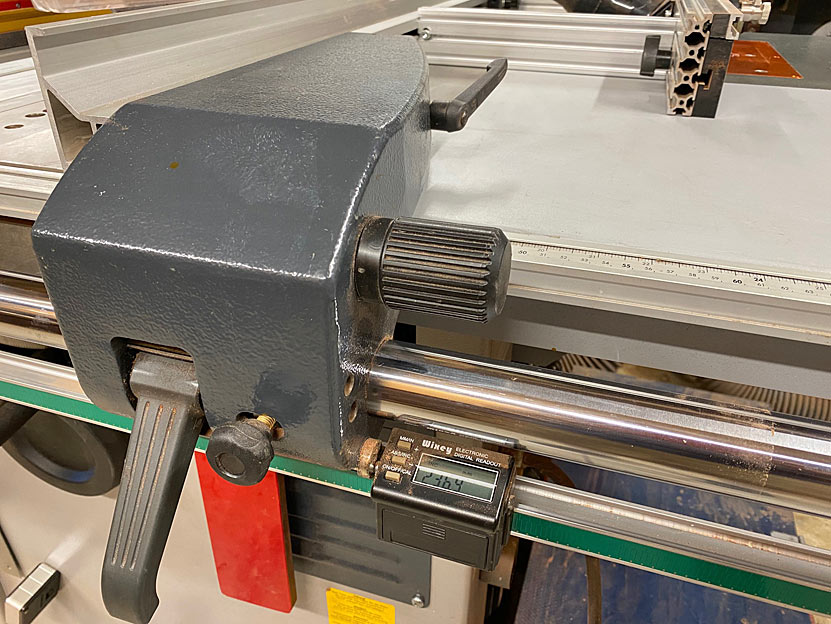
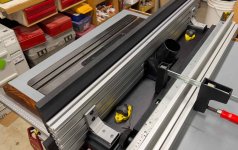
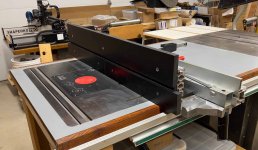
I've been using a shopmade router table fence on my router in a tablesaw extension wing for years, and it's been OK. What I like the most is that it's attached to the other side of my tablesaw fence, which has a Wixey DRO so adjusting it is accurate and repeatable.

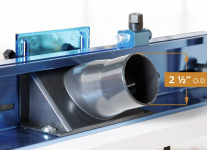
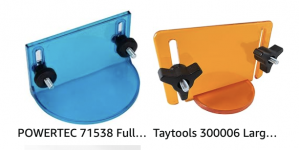
But, my shopmade fence doesn't have good dust collection or a facility to add feather boards.

The ones out there including:
• The Incra Wonder Fence (https://www.incrementaltools.com/ProductDetails.asp?ProductCode=WONDERFENCE37 $270 now)
• The Infinity (https://www.infinitytools.com/professional-router-table-fence-accessories $300 + $90 for height extension kit)
• The JessEm (https://www.amazon.com/JessEm-Mast-R-Fence-Router-Table-Fence/dp/B0855JSYYS at $350)
• The Rockler Pro Max (https://www.rockler.com/rockler-router-table-promax-fence at $195).

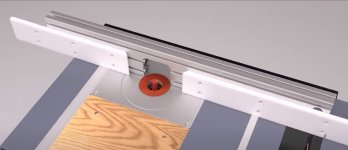
There are probably others, too. But, a lot of the cost of these fences is their ability to offset infeed and outfeed fences for edge jointing, which I don't need as I have a nice jointer.  And I don't need micro-adjusting since I have the Wixey DRO.

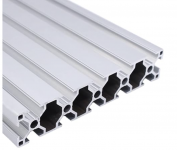
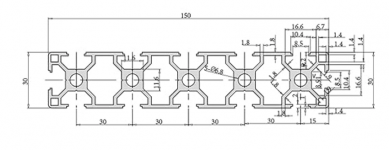
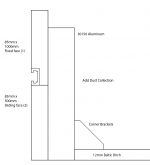
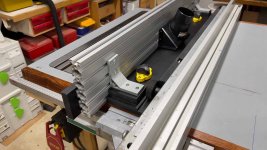
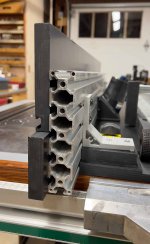
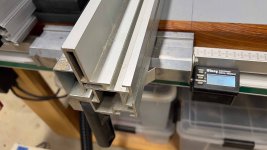
I'm thinking of just buying some aluminum extrusions fromhttps://makerstore.cc/product-category/linear-rail/v-slot-linear-rail/ and putting something together with a cut-out for big bits, dust extraction port, and sliding faces for adjustable zero clearance.

Anyone got recommendations on plans or inspiration images/video, or even a recommendation for spending money on a pre-built fence?
 
I went through the same exercise and settled on Incra clean sweep rings, home made router box,  and their wonder fence.

I found the rings collect almost all of the dust in many ways the fence never could, like dados. The fence was completely not necessary for dust collection. So I just use the regular incra fence without the wonder addon and no fence dust collection

I also really liked the LS positioner that's part of that system. Not sure I would trade that but I never had the wixey either.
https://www.incrementaltools.com/INCRA_6_pc_CleanSweep_MagnaLOCK_Ring_Set_p/inc-csmlringset.htm

 
Yeah, I do need to get around building a under-table router enclosure. I already have a JessEM router lift (retro-fitted to metric), so I'm stuck with JessEm's plastic insert plates, but I could easily drill some holes for dust collection or just use larger holed inserts since they don't perform a zero-clearance function anyway.

My problem with the Wonder Fence is that there's so much engineering in the two calibrated wedges to offset the faces, something which I can't imagine ever doing. And I could easily build something like this:
[attachimg=2]
[attachimg=1]

From:=shared

Or similar, and then add something for vertical panel support.

EDIT: Here's another example using an aluminum extrusion as the "main" fence, with a hole cut out for bit recess/dust collection and two moveable HDPE plates attached to the front. There's also a T track above the HDPE.

[attachimg=3]


Attachments

  • Fence.jpg
    Fence.jpg
    325.2 KB · Views: 1,165
  • Fence2.jpg
    Fence2.jpg
    356.6 KB · Views: 1,148
  • Fence3.jpg
    Fence3.jpg
    166.5 KB · Views: 1,056
The one I use, after doing the same thing, is from Taytools. Model 300015
It's a heavy extrusion, with sliding sub fences. It comes with a featherboard, stop block, dust port, attachment hardware, and a much lower price. $109
 
Crazyraceguy said:
The one I use, after doing the same thing, is from Taytools. Model 300015
It's a heavy extrusion, with sliding sub fences. It comes with a featherboard, stop block, dust port, attachment hardware, and a much lower price. $109

Thanks, I think that one is this:https://taytools.com/products/deluxe-32-long-router-table-fence

That's similar to a Powertec version:https://www.amazon.com/gp/product/B0C339PG7C/

Which is a little bit more money, but has a real flip stop. I can't tell if the TayTools one has a T-slot on the top of the fence - looks like it might.

 
So, I'm back to thinking about building my own fence. I found this 80mm x 150mm aluminum extrusion on Amazon:
[attachimg=1]
with these dimensions:
[attachimg=2]

And then I'd notch a rectangular hole in the bottom middle for bit clearance, with a dust port on the back, kind of like these:
[attachimg=3]
[attachimg=4]

And then since the extrusion is 150mm tall, I'd have two movable sacrificial faces (phenolic covered baltic birch ply) at the bottom, with a fixed face spanning the whole length above. I'd recess a T-Track into the bottom of the fixed face. Here's a cross-sectional view:
[attachimg=5]

Right now I don't have a T-Track at the top of the fence - not sure what I'd use that for anyway (and since it's so high a flip stop wouldn't be practical, so I'd just have something on the face-mounted T-track if I ever needed that). I have routed panels on edge, so if anything, I'd mount an extension to the top of the extrusion that went up another 75mm or so with an adjustable horizontal member to support panels on edge (like the Wonder Fence or Infinity Tools version).

I haven't shown how this attaches to the back of my tablesaw fence because that's not of interest to anyone else (I have an Inca 12" tablesaw) and I've already figured that part out.

Any thoughts on this design are welcome!


Attachments

  • AlumExtrusions.png
    AlumExtrusions.png
    387.3 KB · Views: 891
  • AlumDimensions.png
    AlumDimensions.png
    125.8 KB · Views: 870
  • Notch.png
    Notch.png
    563.2 KB · Views: 881
  • DustPort.png
    DustPort.png
    1.1 MB · Views: 886
  • FenceCrossSection.png
    FenceCrossSection.png
    72.2 KB · Views: 870
My router table fence is also built into the outfeed of a tablesaw, in my case a Hammer K3 slider. The build write up with details is here:http://www.inthewoodshop.com/Powered Tools and Machinery/RouterTableAdventure.html

Dust extraction uses dual hoses out of a Festool CT26e to suck from behind the fence and from the route bit.


Router fence connected to the rip fence. This enables the use of the fine adjuster on the rip fence...


Regards from Perth

Derek
 
derekcohen said:
My router table fence is also built into the outfeed of a tablesaw...

Thanks much for that! Questions:

1) You show the Milescraft dust collection setup, but in your blog article, you say you weren't happy with that and switched to the router OEM's dust collection attachment. I've been looking at that Milescraft thing, and am worried about how well that rubber dohickey stuck to the bottom of the table insert plate works. Can you talk more about what you didn't like about it?

Note that I'm not using a plunge router with a Router Raizer, I have an old Porter-Cable 3HP 7538 router base in a JessEm Mastr Lift II. Without a plunge mechanism and stops to get in the way, would it work better for me? I'm also looking at the PowerTec version, which is similar in terms of splitting the hose and has this undertable collection dohickey:
[attachimg=1]

Note I don't want to build a box around the router, since that would make it hard to get at the speed control of the router.

2) What do you think is the ideal height for the face-mounted T-Track? If I use featherboards, it could be pretty high above the table, but if I use something like the JessEm guides you're using, I assume there's some height restriction. I chose to have my sacrificial fences at a 85mm height, with the T-Track just about that, but I could easily change that height. Part of my consideration was that I wanted the T-Track to be high enough that the tallest bit wouldn't hit it, so 85mm seemed about right. I do have one spiral bit with a 100mm cutting height, but I bought that to make mortises in an entry door (before the Domino was even invented), and haven't used it since. And, if I needed to do that on the router table (maybe for edge jointing?) I could just put on thicker sacrificial faces.

Any other comments on my design? I want to use the 30150, which is thicker and taller than the 2080 you used, so I should have more capacity? Have you done any table routing with the stock on edge? What about a coping sled?

thanks again.


Attachments

  • Screenshot 2024-01-02 at 11.58.28 AM.png
    Screenshot 2024-01-02 at 11.58.28 AM.png
    728.4 KB · Views: 845
I do not have a "face-mounted T-track" as you refer to it. There are two reasons for wanting one, and I mention here what I do instead:
http://www.inthewoodshop.com/Powered Tools and Machinery/NoMitreGaugeTrack.html

The table has a couple of bolt holes..


.. enabling the positioning of a featherboard at varying depths ...


The fence would never be square to a track to use a mitre gauge and, if something like this is needed, I use a backup block behind the work piece running along the fence.


Regarding a box, this is the underside of the table. No box needed with the double hose doing a prett decent job. No doubt a box would up the game ...


The hose fitting for the Elu 177e router (an oldie but goldie) ...


I did try out the Milescraft, but it did not fit well

Regards from Perth

Derek
 
derekcohen said:
I do not have a "face-mounted T-track" as you refer to it.

Sorry if I'm not using the correct terminology, but I'm talking about the T-Track with the RED arrow, mounted to the face of the fence, to which the guard and the JessEm guides are mounted:
[attachimg=1]

The T-Track marked in GREEN is a top-mounted T-Track. Presumably that is mostly used for for a flip stop.

I'm torn on whether I need/want a top-mounted T-Track, as I could mount a non-flip stop to the face T-Track if needed. I do want to have a height extension, but I'll mount that to the top of my 30150 extrusion once I design it.

My question is on the best height above the table for the face-mounted (or whatever the correct terminology is) T-Track. Too low and it might interfere with a tall bit. Too high and the guides/guard may not be able to be lowered enough. So far, I've designed the bottom of the T-Track to be 85mm above the table.


Attachments

  • FenceTracks.jpg
    FenceTracks.jpg
    162.3 KB · Views: 814
Yes [member=77266]smorgasbord[/member] that's exactly the one. It does have a T-track in the top and on the face (for the featherboard) It also has spacers to hold the featherboard away from the fence.
You are right, it is not a flip stop, more like an end-stop (or start) for controlling a stop-dado.
 
smorgasbord said:
derekcohen said:
I do not have a "face-mounted T-track" as you refer to it.

Sorry if I'm not using the correct terminology, but I'm talking about the T-Track with the RED arrow, mounted to the face of the fence, to which the guard and the JessEm guides are mounted:
[attachimg=1]

The T-Track marked in GREEN is a top-mounted T-Track. Presumably that is mostly used for for a flip stop.

I'm torn on whether I need/want a top-mounted T-Track, as I could mount a non-flip stop to the face T-Track if needed. I do want to have a height extension, but I'll mount that to the top of my 30150 extrusion once I design it.

My question is on the best height above the table for the face-mounted (or whatever the correct terminology is) T-Track. Too low and it might interfere with a tall bit. Too high and the guides/guard may not be able to be lowered enough. So far, I've designed the bottom of the T-Track to be 85mm above the table.

The extrusion used is 8020, which is 80mm high and 20mm wide. This determined the height if the fence. As it happens, this was much the ideal fit for the sub-fences (from Timbecon in Perth) which are phenolic-coated (UHMW polyethylene) - slick and hard-wearing. The track was added above the fence, front-facing, and flush with the sub-fence ...

RouterTableAdventure_html_m3300e7f.jpg


Regards from Perth

Derek
 
So, I decided to build my own. Here's a teaser of my progress after today:
[attachimg=1]

[attachimg=2]

When I finish (hopefully tomorrow, although some hardware is still on the way), I'll post more details.


Attachments

  • IMG_3877.jpg
    IMG_3877.jpg
    1.2 MB · Views: 728
  • IMG_3878.jpg
    IMG_3878.jpg
    122.3 KB · Views: 845
I'm looking for a guard that attaches to the T-slots on the face of the fence that sticks out to cover the bit. Something like these:
[attachimg=1]

But made from polycarbonate, not acrylic. Anyone got a link, otherwise I'll hit up my local Tap Plastics to make one up.
 

Attachments

  • Screenshot 2024-01-15 at 1.57.12 PM.png
    Screenshot 2024-01-15 at 1.57.12 PM.png
    162.7 KB · Views: 654
A while back I connected the router table fence directly to the rip fence of the K3 slider ...

1.jpg


This makes it possible to use the micro-adjuster for the rip fence, which also has a Wixey DRO. For those with a mitre track, it would maintain the fence parallel to the track.

A few details ...


Regards from Perth

Derek

 
OK, my fence build is pretty much done. Like my earlier fence, which I built in like 30 minutes, it uses what I call a "bridge" board that has some wood glued to it on the right and the fence itself is attached at the left. I clamp the bridge board to my tablesaw fence, which has a Wixey DRO. But, I've made many improvements over my earlier quickie.

View attachment 2

This one is built around a 30150 aluminum extrusion for the support fence, which is 30mm thick and 150mm tall. I particularly wanted the extra height for on-edge routing. I got some phenolic-covered 18mm plywood from MakerStock, which seems pretty decent. It's a smoother surface than melamine, it's black instead of white, and the core is many layered plywood instead of MDF/particle board, so hopefully it'll hold up better. Note that the phenolic covering is pretty thin, but seems thicker than the melamine I've used previously.

[attachimg=1]

Here's a view showing the back of the fence:
[attachimg=3]

The clamp holds the bridge board to the back of the rip fence so I can micro-adjust. Since I have a SawStop cast iron table embedded in my tablesaw wing, I added a couple of MagSwitch magnetic holddowns to hold the fence in position. My rip fence is attached only at the front and I use just one clamp, so with vertical featherboards I was worried about the router fence lifting. Plus, once the fence is in position, I can decouple it from the tablesaw rip fence in case I need to use that for ripping without disturbing the router fence (although with the DRO restoring a previous position is pretty easy). I got the MagSwitch 150s, which seem pretty strong, but the 235s are probably more secure, although more than twice the price. Note that these MagSwitches are designed to fit into a full ¾" thick board, so with the 18mm plywood I use to shim it up a bit, which I did with a couple washers where they bolt to the bridge board.

A couple construction notes here: Although MagSwitch says to just use a 40mm bit to drill the hole, I used my CNC to rout the chopped off mortise that fits the actual shape of the switch closely, preventing rotation even without screws. And I used dominos to attach the clamp board to the bridge board, but got impatient with glue drying and added some screws from the bottom up, too. The clamp board is notched since the other side of my rip fence as some protrusions. One advantage to this notching is that it firmly locates the router fence front and back relative to the table.

I used some "40" angle rail attachment brackets to hold the aluminum extrusion at right angles to the bridge board. If you look carefully at the L bracket closest to the camera, you can see a feeler gauge shim where the bracket attaches to the bridge board. This was needed to get my fence properly perpendicular to the table at the front - the rear is spot on without shimming. I think this might be due to putting glue on the blocks that were needed to get the L bracket holes to align with the extrusion. But even the cyno glue I used doesn't really stick to the phenolic, so I'm really relying on the screws doing through the block into the bridge board here.

Here's the business side of the router table fence:
[attachimg=4]

You can see the JessEm lift plate, which has an old Porter-Cable #7538 3 router mounted. I haven't bothered to notch out my tablesaw wing for the router table's miter slots, since my only use for them is featherboards, not a miter gauge.

I've got 3 movable/removable fence surfaces: the bottom two are split in the middle for the typical bury the bit in the fence type routing. I had to notch out the 30150 aluminum extrusion to create a suitable holed for both bits and dust extraction. The plywood fence above has a T-Track mounted at the very bottom (for feather boards, stop blocks, and an exposed bit guard). My idea is that this stays put unless something happens to it. I forgot the exact height of the fence, but it's something just under 200mm.

I don't plan on doing any edge jointing, but I could easily add shims to the outfeed side of the lower split fence if I change my mind.

Note that since I chose the black phenolic covered plywood, I decided to get a black T-Track, and since the factory edge of the plywood was painted black, I painted all the edges black.

I should go through and see how much I've invested in this fence. The 30150 extrusion was about $76 from Amazon, the MagSwitch 150s were $80 from Taylor Tool Works, the sheet of plywood (2' x 3') was $64 shipped, and then some miscellaneous hardware (T-nuts, metric bolts, the L brackets). So overall, more expensive than the standard commercial fences, but less expensive than the fancy ones from Incra or WoodPeckers or JessEm.

I'm still looking for a polycarbonate bit guard. I believe polycarbonate is more shatter resistant than acrylic, which is why I'm looking for an alternate.
 

Attachments

  • IMG_3895.jpg
    IMG_3895.jpg
    102.7 KB · Views: 653
  • IMG_3894.jpg
    IMG_3894.jpg
    94.3 KB · Views: 15
  • IMG_3893.jpg
    IMG_3893.jpg
    164.1 KB · Views: 638
  • IMG_3892.jpg
    IMG_3892.jpg
    134.6 KB · Views: 641
I'd suggest you use Lexan for your guard. Much tougher and easier to work, with power tools, than acrylic. You can get it from Amazon. I used gel CA glue to put the pieces together and have had no issues. I suggest using painter's tape to mask off outside the glue lines in order to make the finished product look better.
Since you've mentioned dust collection, I also used Lexan to build a dust collection box under the table that captures the dust above the router motor air intake (inspired by one at SauterShop). First is a picture showing the sliding partition that captures the dust above the router motor when it's installed in the table. The second shows the box installed in the table in which the router moves up and down in the Jess-Em router lift. Note, the hose is not shown attached in either of these photos but you can see in the first one where the Festool hose fitting attaches to the "bottom" of the lift plate. I have a hose attached to the dust collection box and the back of the fence, using a splitter. It's not 100% dust collection, but it's several magnitudes better than what I had before.
Good luck with your project.
 

Attachments

  • IMG_1441.jpeg
    IMG_1441.jpeg
    1.3 MB · Views: 55
  • IMG_1446.jpeg
    IMG_1446.jpeg
    1.1 MB · Views: 53
Thanks - Lexan is a brand name for polycarbonate. I guess I can glue something up myself after all.

I've currently fitted MilesCraft's flexible rubber dust boot to my router table. The boot has velcro so it's easily removable. You put velcro strips on the underside of your insert plates (they gave me 3 strips and I can buy more pretty cheaply). I don't want to build a box around my router because I want easy access to the speed control on the router, which is on the head of the router itself. Doing this from scratch today would have me looking at the more integrated/electronic solutions with dedicated router/spindle motors and maybe even the electronic fence, but what I've got now seems pretty neat to me.

The MileCraft has a Y so that I can split the hose to run one leg to the fence mounted dust port, but so far the underneath dust boot does a good job. Only up spiral router bits would benefit from a tight insert plate, and I find that it I've got ¼" or more larger diameter insert plate the dust gets sucked out pretty well, even when using the split fence to hide part of the bit in the fence. Maybe for thick stock or tall bits the fence mounted dust collector would be more necessary.

Not sure the rubber dust boot is a keeper, though. It is a bit fiddly when changing bits and it might not hold up under use over time. But, replacement parts are cheap and available. That said, anyone have a good idea on how to fill the underside of the JessEm insert plates so that they're flat? If you know the JessEm plates, they've got ribs underneath, which is fine for strength, but a bear when you're trying to stick something to them. I was just thinking of using some epoxy to fill the spaces between the ribs, but maybe there's something better/easier?
 
Back
Top