Festool Domino Conundrum

DaveRR

Member
Joined
Nov 2, 2022
Messages
2
Hi All,

Wondering you someone can help me. I have recently purchased the festool domino df500 intending to use it on a new project. I foolishly ordered my wood (precut to my specifications) before really experimenting with the domino much.

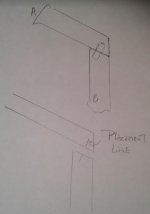
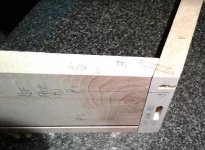
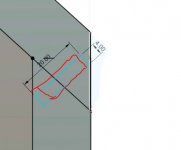
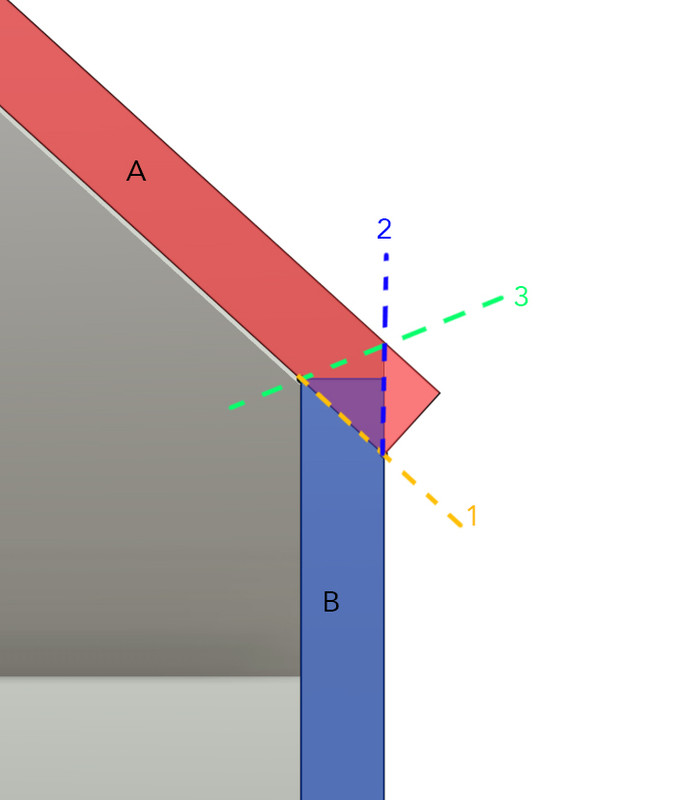
I need to join the two pieces of wood A & B in the image. My inital plan was to cut A along line 2 and B along line 1 and use the domino to join them together. Putting a mortice in the top of Piece B is no problem (planning to drill the mortice before cutting the angle) But having just been experimenting, it doesnt seem like I can put an angled mortice in a flat surface? Am I being an idiot or is this the case?

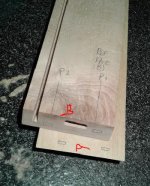
In hindsight I realise I should have ordered different lengths and done a cut along line 3. Anyway I can make this work without re-ordering pieces of wood?

Any help appreciated, apologies if its a really stupid question. Im guessing a jig might do it, but surprise the domino wont on it own.
DOMINO-copy.jpg


Dave
 
You can mill the mortises like this:

[attachimg=1]

Register the Domino fence against the respective reference face.
 

Attachments

  • df cond.JPG
    df cond.JPG
    15.4 KB · Views: 723
ChuckS is correct. However, it doesn’t look like a strong joint even with the Domino tenon. If this joint is going to see a lot of stress, a half lap or a spline would be stronger.
 
Don't know if it helps but here is a bookcase I made recently using through dominos as they wouldn't be seen, made some long dominos and cut them off after.

[attachimg=1]

[attachimg=2]

[attachimg=3]

[attachimg=4]
 

Attachments

  • dom 1.jpg
    dom 1.jpg
    75.2 KB · Views: 677
  • dom2.jpg
    dom2.jpg
    75.4 KB · Views: 677
  • dom 3.jpg
    dom 3.jpg
    64.3 KB · Views: 675
  • dom 4.jpg
    dom 4.jpg
    111.4 KB · Views: 680
When I looked at the sketch, I thought the pieces were rails. If they're actually  boards like those shown in Doug's photos, the marking and mortising would be different.

These are for non-through tenons (disregard the mortises and grooves previously cut on the boards):

1) Mark the placement lines (p1, P2, etc., depending on how wide the boards are) on the reference faces (the reference face is the face the Domino fence will rest on/register against)

2) The cuts on board A will be perpendicular to the board (i.e. the fence is set at 90* and rests on the edge of board A) - see the second pic in Doug's post, but the fence rests on the edge, NOT on the bevel as shown

3) The cuts on board B is cut with the Domino fence set for the angle of board B

[attachimg=1]
[attachimg=2]
 

Attachments

  • DF angles1.JPG
    DF angles1.JPG
    49.2 KB · Views: 660
  • df angles2.JPG
    df angles2.JPG
    45.7 KB · Views: 659
Hi Guys,

Thanks so much for all your responses.

Looks like I am building something quite similar to Doug S, with a more or less identical joint. Didnt occur to me I could position the domino like in Doug's 2nd and 3rd pic. Looks a little unstable but Im going to do some practice joints and give it a go.

Thanks too to ChuckS but I forgot to mention I am using 19mm boards so even with a 4x20 domino I think my angle is too sharp for that method
4x20.jpg
 
Dave,

I'm assuming for 19mm boards, you'll be using 6mm tenons.

If exposed tenons are acceptable, they can be the choice and will be marginally stronger than regular tenons in your case, as illustrated in Doug's post.

That said, if in the future you have a similar project that requires non-through tenons for aesthetics reasons, you can still do it with the procedures I outlined above using 6mm tenons (or 5mm x 30mm tenons). The trick is to cut the mortises just shy of 20mm depth (total), say 18mm, and use 6mm tenons that are trimmed to length.

To mill 6mm x 18mm mortises (9mm on each side), use spacers to restrict the plunge:

[attachimg=1]

[attachimg=2]

Regardless of what method to use, this "but Im going to do some practice joints and give it a go" is the best thing to do.
 

Attachments

  • DF500 plunge depths.JPG
    DF500 plunge depths.JPG
    127.7 KB · Views: 565
  • DF angles 5mm or 6mm.JPG
    DF angles 5mm or 6mm.JPG
    17.2 KB · Views: 550
I have done it both ways, parallel to the faces and perpendicular to the joint line. The choice of which way usually comes down to the angle. Parallel to the faces can be tricky to keep everything stable, since the bit will hit at an angle. Also, you have to do some experimenting to get the depth right, since part of the cut is wasted in the air. Sometimes you just have to shorten the Dominos, because you just can't cut deep enough with that partial air-cut. Not ideal, but it works.
This is at least art of the reason that I would like to get ahold of a DF700. They can cut considerably deeper, but only with the larger sizes. The adapter thing doesn't help with that because you still use the DF500 bits.
I have heard that someone makes a 6mm cutter in the long DF700 format, but I have never seen one.
 
This is where a biscuit joiner is preferred. What is required is a wide shallow spline and not a narrow deep floating tenon.

Regards from Perth

Derek
 
i wouldnt sweat it.

I think your over thinking it.

Remember its the glue that actually holds the joint together.

Yea the domino will help strengthen the joint and align the joint, but its the glue that holds it together.
 
Back
Top