Hey Guys,
Two or three weeks ago I posted a cart on here that I made to display and demo the Festool VAC SYS Clamping System. Well as do most things from Festool, after mulling it over for a while and seeing how effective and time saving the VAC SYS is one of the systems followed me home last week and I built my own cart and made a few changes that really fully unleash the potential for this system and also cleans up the look of the cart.
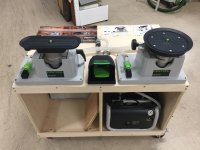
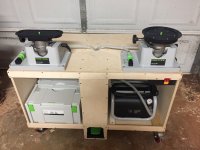
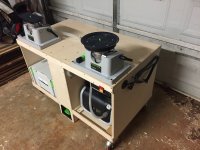
The first photo shows the store cart and the next two photos show my cart at home. As you can see the first cart has the foot pedal up on top which is fine for a simple store demo but in real world use really does eliminate the ability to free up both hands to grab a piece when placing it on or taking it off of the clamping modules. So, I made the cart six inches wider and made a center compartment that sits within 3/8" off the floor, allowing the cart to still roll freely and use the foot pedal for what it was intended.The center section which is to ultimately accommodate the foot pedal serves another function and that is it allows the plumbing to be neatly tucked away and hidden out of sight or from possible damage.
The other major change I made to the cart to make it more user friendly for everyday use is I added a "router table" switch so as not to have to bend over and cut the pump on every time I need it on. This also led to me adding some hooks on the right side of the cart to have a cord wrap for the "router table" switch.
Overall, I think I made a couple of adjustments that will lend itself to a very long term user friendly clamping/work station. I love my VAC SYS!![attachimg=1][attachimg=2][attachimg=3]
Two or three weeks ago I posted a cart on here that I made to display and demo the Festool VAC SYS Clamping System. Well as do most things from Festool, after mulling it over for a while and seeing how effective and time saving the VAC SYS is one of the systems followed me home last week and I built my own cart and made a few changes that really fully unleash the potential for this system and also cleans up the look of the cart.
The first photo shows the store cart and the next two photos show my cart at home. As you can see the first cart has the foot pedal up on top which is fine for a simple store demo but in real world use really does eliminate the ability to free up both hands to grab a piece when placing it on or taking it off of the clamping modules. So, I made the cart six inches wider and made a center compartment that sits within 3/8" off the floor, allowing the cart to still roll freely and use the foot pedal for what it was intended.The center section which is to ultimately accommodate the foot pedal serves another function and that is it allows the plumbing to be neatly tucked away and hidden out of sight or from possible damage.
The other major change I made to the cart to make it more user friendly for everyday use is I added a "router table" switch so as not to have to bend over and cut the pump on every time I need it on. This also led to me adding some hooks on the right side of the cart to have a cord wrap for the "router table" switch.
Overall, I think I made a couple of adjustments that will lend itself to a very long term user friendly clamping/work station. I love my VAC SYS!![attachimg=1][attachimg=2][attachimg=3]