I've recently been making a bunch of picture frames that require tight miter tolerances. I was originally thinking of getting one of those miter guillotine devices some framers use but based on my recent experience, I don't think they're necessary as I can get near perfect miters after a bit of practice and some discipline.
Milling
The first step is to get the lumber absolutely same dimensions, this usually means I cut close either using my TS-55 or my tablesaw followed by one or two passes on the planer on each side.
Cutting the miter
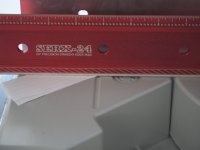
When using the kapex, be aware that the base sides and the rotating portion of the kapex base are not perfectly level, at least on mine. Below is what I mean:
View attachment 1
View attachment 2
I'm measuring 0.3mm height difference which means for a piece of wood clamped on only one side, the cut will be off by approximately 0.23 degrees on the vertical. For this reason, I will place two to three pieces of paper/tape on the base sides if I need the cut as close to vertical as possible. I've seen suggestions that miters should be slightly beveled on the hidden side to allow for a tight fit on the face side. The .23 degrees should do it but it means cutting with the good face down and worrying about tearout so I don't do it that way.
I cut the miter twice. The first to get close (within the kerf of the blade to my cutline), then a second cleaning cut. This seems to work better for me than attempting the cut in a single pass. My theory is that the first cut may not be accurate due to stresses and contortions of cutting the longer pieces of wood into smaller pieces.
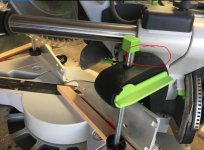
Lastly, use an angled stop clamped down tight to get exact lengths. Oh, and one more thing to watch out for, when doing the left side miters, watch out for the clamp hitting the saw track mechanism knocking it off kilter.
View attachment 4
Joining
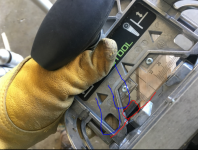
To strengthen the miters, I will usually stick a domino in between the pieces. Mis-registration issues here wil cause misalignment problems and it's where I usually screw up. I register the sides on the base support bracket. For smaller stock, ~1.25" or so, there's a flip up gizmo on the bracket that can be used to butt the wood against. However, it's very prone to sliding down ever so slightly causing the domino mortise to offset to one side. I've resorted to making sure I hold it firm against the domino base and using a wider setting for the matching hole. Below you can see my finger pushing the little alignment jig against the domino.
View attachment 3
Glue only assembly is easier to align since there's no chance of mis-registered mortices but I worry about the durability of the joint. For frames, the staple thing framers use would be easier but I didn't want to spend the extra $$ for a specialized tool.
I try to cut one or two extra pieces in case (when) I screw up, and if all else fails...hello sander [big grin]
Milling
The first step is to get the lumber absolutely same dimensions, this usually means I cut close either using my TS-55 or my tablesaw followed by one or two passes on the planer on each side.
Cutting the miter
When using the kapex, be aware that the base sides and the rotating portion of the kapex base are not perfectly level, at least on mine. Below is what I mean:
View attachment 1
View attachment 2
I'm measuring 0.3mm height difference which means for a piece of wood clamped on only one side, the cut will be off by approximately 0.23 degrees on the vertical. For this reason, I will place two to three pieces of paper/tape on the base sides if I need the cut as close to vertical as possible. I've seen suggestions that miters should be slightly beveled on the hidden side to allow for a tight fit on the face side. The .23 degrees should do it but it means cutting with the good face down and worrying about tearout so I don't do it that way.
I cut the miter twice. The first to get close (within the kerf of the blade to my cutline), then a second cleaning cut. This seems to work better for me than attempting the cut in a single pass. My theory is that the first cut may not be accurate due to stresses and contortions of cutting the longer pieces of wood into smaller pieces.
Lastly, use an angled stop clamped down tight to get exact lengths. Oh, and one more thing to watch out for, when doing the left side miters, watch out for the clamp hitting the saw track mechanism knocking it off kilter.
View attachment 4
Joining
To strengthen the miters, I will usually stick a domino in between the pieces. Mis-registration issues here wil cause misalignment problems and it's where I usually screw up. I register the sides on the base support bracket. For smaller stock, ~1.25" or so, there's a flip up gizmo on the bracket that can be used to butt the wood against. However, it's very prone to sliding down ever so slightly causing the domino mortise to offset to one side. I've resorted to making sure I hold it firm against the domino base and using a wider setting for the matching hole. Below you can see my finger pushing the little alignment jig against the domino.
View attachment 3
Glue only assembly is easier to align since there's no chance of mis-registered mortices but I worry about the durability of the joint. For frames, the staple thing framers use would be easier but I didn't want to spend the extra $$ for a specialized tool.
I try to cut one or two extra pieces in case (when) I screw up, and if all else fails...hello sander [big grin]