You are using an out of date browser. It may not display this or other websites correctly.
You should upgrade or use an alternative browser.
You should upgrade or use an alternative browser.
Finally finished… well, minus the "finish"
- Thread starter es07Eric
- Start date
nclemmons
Member
Nicely executed and photographed.
Can you show top photos? It looks like you did something other than breadboard ends.
Did you turn the legs as well?
Neil
Can you show top photos? It looks like you did something other than breadboard ends.
Did you turn the legs as well?
Neil
wow said:WOW! With your photography skills you could probably make one of my wood-butchering projects look good. And you have mad wood skills too.
A real renaissance man!
[not worthy]
wow, thank you! I assure you, the photography is definitely better than the woodwork; as photography is my main gig! Thanks again, much appreciated!
RL said:Very nice work. Clean and elegant. Why do you have to stain it? What about some blond shellac and wax instead?
Also, unless you are going for a very dark stain, I would have gone for a lighter-coloured handle, or perhaps a spindle drawer pull?
RL, thank you, thank you, thank you! I'm very new to this type of craft and while I'm confident of the photos, it's the content that I'm reserved about [embarassed].
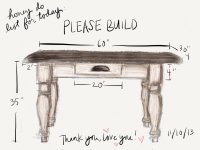
So, I've got to stain this one as it was crafted for an order; the next one I make will definitely have more of the natural wood tones as the focal point. The recipient has request the "Modern Rustic" look, and was going for the Pottery Barn, Restoration Hardware, West Elm-ish look. The top will be a dark stain, and (I cringe as I say this) a crackled pain finish/glaze on the aprons and legs. The desk was sold based on a drawing my wife made asking for me to make one for herself as seen here:
[attachimg=#]
neilc said:Nicely executed and photographed.
Can you show top photos? It looks like you did something other than breadboard ends.
Did you turn the legs as well?
Neil
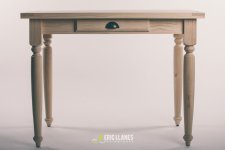
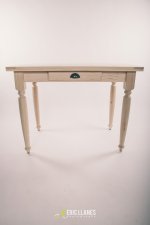
Neil, thank you on both accounts! I believe that is all I did, "breadboard ends" (you'll have to forgive my lack of woodworking terms as I actually had to googol that)! If there is anything above what was done, it can be seen in this FOG thread: Simple "craft desk/table"
As for the legs, no, I personally did not turn the legs, I had them turned by a friend that has a monster lathe; I did however have a go at it!
Thanks to all!
Cheers,
Eric
Attachments
tiralie
Member
- Joined
- Jan 26, 2010
- Messages
- 3,614
Looks good.
That will look interesting. What color will you make the aprons and legs?
LOL, I really love this drawing. The hearts are a nice touch. Was it a digital drawing, it kinda has that look?
Tim
es07Eric said:The recipient has request the "Modern Rustic" look, and was going for the Pottery Barn, Restoration Hardware, West Elm-ish look.
The top will be a dark stain, and (I cringe as I say this) a crackled pain finish/glaze on the aprons and legs.
That will look interesting. What color will you make the aprons and legs?
es07Eric said:The desk was sold based on a drawing my wife made asking for me to make one for herself as seen here:
LOL, I really love this drawing. The hearts are a nice touch. Was it a digital drawing, it kinda has that look?
Tim
nclemmons
Member
Eric - thanks for sharing the build photos from the other thread.
Looks like you overlapped the sides and ends. If those are glued, you could run into a cracking problem. In general, you will get expansion and contraction in wood. This movement happens ACROSS the grain more than with the grain. So your top can be expected to expand and contract across the glued up pieces. It looks like you overlapped those glued up pieces with another piece of long grain that is across the ends. So, you could see expansion or contraction on the width, but that end piece of wood will limit the movement due to the grain overlap. This can cause cracking.
Here's a simple example on the FOG of doing this with Dominos and dowels. http://festoolownersgroup.com/festool-how-to/loose-tenon-breadboard-ends-demonstration/
And another example using a tongue routed on the end grain and fitted into a groove. http://www.inthewoodshop.com/furniture/BreadboardEnds.html
In general, it's typical to either run the pieces full length with no end cap, or if you do an end cap, use a breadboard end. The breadboard end caps the ends of the field of boards but is only glued and doweled in the middle, allowing the pieces in the field to expand and contract.
Your table is not that large, so you may not see that much wood movement, but you could see a crack open up if you did not allow for the natural wood expansion and contraction.
Just a tip for the next build! Overall, nice job on the table!
neil
Tim Raleigh said:Looks good.
es07Eric said:The recipient has request the "Modern Rustic" look, and was going for the Pottery Barn, Restoration Hardware, West Elm-ish look.
The top will be a dark stain, and (I cringe as I say this) a crackled pain finish/glaze on the aprons and legs.
That will look interesting. What color will you make the aprons and legs?
es07Eric said:The desk was sold based on a drawing my wife made asking for me to make one for herself as seen here:
LOL, I really love this drawing. The hearts are a nice touch. Was it a digital drawing, it kinda has that look?
Tim
Tim, thank you!
As requested, it will be some variation of "Annie Sloan-ish" (method/style) antique white with a "crackle finish/glaze". Prior to the top coat of the aprons and legs, the entire piece will be covered in a medium brown; this will, in theory allow the brown to come through the manually distressed areas. Assuming all goes well!
Yes, it was done on an iPad using the Paper app by 53. The wife is quite versed in design across many mediums including digital!
neilc said:Eric - thanks for sharing the build photos from the other thread.
Looks like you overlapped the sides and ends. If those are glued, you could run into a cracking problem. In general, you will get expansion and contraction in wood. This movement happens ACROSS the grain more than with the grain. So your top can be expected to expand and contract across the glued up pieces. It looks like you overlapped those glued up pieces with another piece of long grain that is across the ends. So, you could see expansion or contraction on the width, but that end piece of wood will limit the movement due to the grain overlap. This can cause cracking.
Here's a simple example on the FOG of doing this with Dominos and dowels. http://festoolownersgroup.com/festool-how-to/loose-tenon-breadboard-ends-demonstration/
And another example using a tongue routed on the end grain and fitted into a groove. http://www.inthewoodshop.com/furniture/BreadboardEnds.html
In general, it's typical to either run the pieces full length with no end cap, or if you do an end cap, use a breadboard end. The breadboard end caps the ends of the field of boards but is only glued and doweled in the middle, allowing the pieces in the field to expand and contract.
Your table is not that large, so you may not see that much wood movement, but you could see a crack open up if you did not allow for the natural wood expansion and contraction.
Just a tip for the next build! Overall, nice job on the table!
neil
Neil,
Thank you for taking the time to be thorough, it's very kind of you and your input has been noted and greatly appreciated! As I stated earlier, about googling "breadboard" ends, I ran across one of Marc Spagnuolo early videos using a Domino XL to make a cypress table in the very same fashion that you have outlined above!
In my early construction post, you may or may not have seen the fine pencil marks; those marks are my alignment points for #20 biscuits. I hope that the expansion you are describing doesn't take too much of a toll on my table! I also went back and pinned the biscuits on both sides of the joint using a 18ga pin. In the future, I'll be sure to take this information into making a better constructed top!
Neil, thanks again for sharing!
Cheers,
Eric
Similar threads
- Replies
- 18
- Views
- 935
- Replies
- 22
- Views
- 1K