Finish Sanding and Different Grits

bryanjtx

Member
Joined
Feb 13, 2018
Messages
21
Hi all,
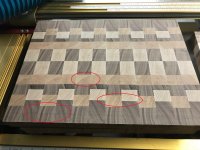
I have a question regarding finish sanding.  I made a batch of 5 end grain cutting boards and ran them through my drum sander with 120 grit sand paper.  I didn't realize till the end and I examined the boards closely that my sander made fairly deep scratches in the wood (see red ovals in the picture) so I did the following to buff them out

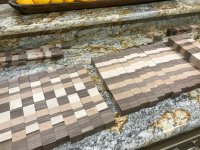
Started with 40 (tried 80 first, but the scratches wouldn't come out), then 80, 120, 150 and finished with 220 grit on my RO90 and ETS150 (I don't have all grits for either sander so used both with what I had on hand).  With 5 boards, this took a really long time. 

So my questions are:
1. Do I need to run through all these different grits to get a good finish sanding? (I don't have 180 otherwise I probably would have added this in as well)
2. How much sanding with each successive grit is needed?  Would, say 3 light passes on each grit work before moving to the next one?  How do I know when I've sanded enough on each grit?

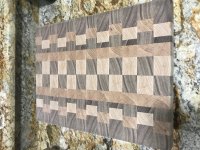
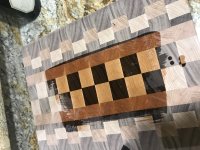
Pictures of the final sanded board and beginning mineral spirit coating also included.
Thanks for the input,
Bryan
 

Attachments

  • IMG_0816.jpg
    IMG_0816.jpg
    838 KB · Views: 444
  • IMG_0790.jpg
    IMG_0790.jpg
    974 KB · Views: 376
  • IMG_0972.jpg
    IMG_0972.jpg
    913 KB · Views: 370
  • IMG_0974.jpg
    IMG_0974.jpg
    704.9 KB · Views: 440
Id say that the drum sander will leave straight sanding marks like that due to its design. You will have to follow up with a RO up to 220-320 for applying a finish. anything higher is useless unless you want to polish the wood
 
In my opinion wrapping an abrasive around a hard drum is a bad design. Know of any hand sanding blocks made of metal?

120 abrasive only makes “120” scratches. Those deeper “scratches” are probably embossed ditches from kerns on the abrasive. Unless the abrasive is very poorly made with inconsistent grit size.

When there is no cushion behind the abrasive debris gets jammed into the grit and develops kerns that quickly get bigger and harder and press ditches in the work. They don’t actually remove the wood so you can steam them out or maybe just wipe the surface with water to expand the compressed wood. Steaming is better as it adds less moisture to the wood.

Back before the internet filled out I used to go to woodworking shows to see what was new or interesting. The best of that was meeting Paul Moore of Stockroom Supply, a Canadian abrasive supply company. Paul was a brilliant mechanical engineer with a great sense of humor with a deep understanding of how abrasive interacted with wood. He allowed that abrasive drum sanders are popular because they are similar in operation to planers but abrasives don’t behave the same way knives do. He said an abrasive should just kiss the wood not press into it. He said his simple surface sanding machine was all most woodworkers needed and after hearing his granular explanation I think he was right.

But I already had a drum sander and wondered if there was a way to reduce the negative aspects of sanding with a metal backup pad. I took his advice and added a layer of soft Velcro to my drum then wrapped with a little longer strip of abrasive. This allows the abrasive to expand away from the drum so it slides on the wood rather than hammering the surface and allows air to get behind the abrasive to cool it. This is not ideal on the drum sander because the feed system is compromised but the abraded surface is so much better that the extra attention to guiding the work is worth it.
 
Please tell me you meant...and used...mineral oil and not mineral spirits. I don't want a mineral spirits soaked cutting board in my kitchen. Neither the smell nor the taste would be pleasant.

As for your sander, I think Michael is right. That's something embedded in your drum or your feed rollers.
 
I make end grain, butcher block style cutting boards on a pretty regular basis and my drum sander always leaves linear scratches just like those shown here. They are the reason that I added a Rotex to my ETS EC. I usually run 80 grit in my drum and then go to 40 or 60 with my Rotex in geared mode. I find that I get the best results when I apply a light touch, take my time and let the sander do the work. Once I think I have removed the linear scratches I wipe the surface down with a damp cloth and visually check it again. I don’t leave the low grit until I am satisfied that those linear scratches are gone. Once I am satisfied I switch to ROS mode and hit it with the same grit one more time. After that I run through the remaining grits pretty quickly (usually two passes cross grain and two passes with the grain) but after each grit I wipe the board down with a clean damp wad of paper towels. I let it dry and keep going. Just damp enough to get any grit residue off the board and raise the grain a bit. The main tip is that I don’t leave the first (lowest) grit until those lines are gone.
 
Back
Top