Finishing MDF

koenbro

Member
Joined
Jan 21, 2017
Messages
89
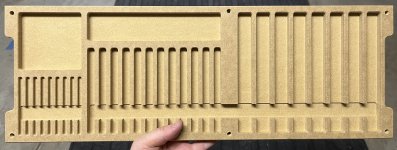
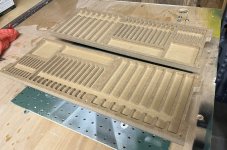
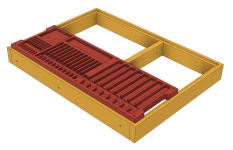
I need advice on finishing MDF. I made two trays to organize my drill bits (metric and imperial) inside a tool box drawer. They are out of 3/4" MDF. Will finish them with BM Advance, largely cause I have some on hand, and because I like how it lays down. I will spray with a Fuji turbine.

Do I need to do something before spraying the paint? Primer, sealant?

Thank you for any suggestion.

[attachimg=1]

[attachimg=2]


Attachments

  • IMG_2386.JPG
    IMG_2386.JPG
    787.4 KB · Views: 708
  • IMG_2384.JPG
    IMG_2384.JPG
    1.1 MB · Views: 2,462
Normally I hit MDF with diluted BIN shellac before any WB topcoat.  This is all exposed MDF 'edge', so definitely seal it :P

* Diluted PVA glue is also known to be an option and whether it bloats your MDF varies on quality.  Some people manage to do well with it.

 
woodferret said:
Normally I hit MDF with diluted BIN shellac before any WB topcoat.  This is all exposed MDF 'edge', so definitely seal it :P

* Diluted PVA glue is also known to be an option and whether it bloats your MDF varies on quality.  Some people manage to do well with it.

He definitely needs to seal all the machined edges, and probably the flat surfaces too. (Before the pandemic, I was able to get MDF with a calendared surface where it was rolled between polished rollers under pressure.  That made the flat surfaces ideal for paint.  But lately I have not seen the calandared MDF, so the flat surfaces have to be sealed too.)

Likewise, dewaxed shellac primers such as Seal Coat and B-I-N are my go to sealers.  But when I tried to spray Advance over the shellac based primers I ended up with a crazed finish that looked like colored shattered glass.  So I would not use shellac in this instance.

Since this is a fairly small item, I think I would buy a rattle can of an appropriate primer from Rustoleum or Krylon.  Indeed, if the right color is available, I would be tempted to use a rattle can of oil based enamel.  Rustoleum has a new (and improved) nozzle for their rattle cans.  This looks like a one-can job to me.

Once it is sealed, the Advance will work fine.

The machined portions of mdf behave much like wood when exposed to moisture.  It raises the “grain” and gives the finish an appearance resembling painted 60 grit sandpaper. 

As an aside, can you tell us what this is used for?  A lot of machining was involved.
 
Packard said:
Likewise, dewaxed shellac primers such as Seal Coat and B-I-N are my go to sealers.  But when I tried to spray Advance over the shellac based primers I ended up with a crazed finish that looked like colored shattered glass.  So I would not use shellac in this instance.

I use EMTech WBs and was told to dilute the BIN down to half strength with alcohol and only one very thin coat.  Crazing being the concern as well.
 
woodferret said:
Packard said:
Likewise, dewaxed shellac primers such as Seal Coat and B-I-N are my go to sealers.  But when I tried to spray Advance over the shellac based primers I ended up with a crazed finish that looked like colored shattered glass.  So I would not use shellac in this instance.

I use EMTech WBs and was told to dilute the BIN down to half strength with alcohol and only one very thin coat.  Crazing being the concern as well.

Thanks for that information.  The paint store thought I was nuts when I mentioned it. 

I like to use wipe on for SealCoat.  But that gets absorbed so quickly by the MDF that I doubt that one coat will actually seal the surface.

The first time I painted a MDF object where I had used a router for an edge treatment, I was appalled by the rough texture that resulted in the finished product. 

Just looking at the photos in the original post, the thought of having to sand all those troughs is dismaying.  I mean, how would you sand them?  It would be easier to just machine a new one instead.

I use a HVLP sprayer, and I only spray waterborne finishes.  Cleaning all the components in solvents would probably overwhelm me.  I would not want to inhale all those VOCs.
 
squall_line said:
Packard said:
As an aside, can you tell us what this is used for?  A lot of machining was involved.

My guess is drill bits:

koenbro said:
I made two trays to organize my drill bits (metric and imperial) inside a tool box drawer.

I missed that.  I’m not sure I would go that route.  It takes up too much space.  I would drill holes in a block of wood, one for each drill bit.  If I wanted them to lay flat, I would put the holes in a block of wood or mdf that I could lay down in the drawer.  If it is a counter top holder, then I would stand them up. 

I would apply the finish prior to drilling the holes.  And I would make each hole one size larger than the bit it is to hold.

For the parts that are pictured, I think I would use a flocking kit and apply flocking to the surface.  It would look way cooler.
https://www.google.com/search?q=flocking finish kit&ie=utf-8&oe=utf-8&client=firefox-b-1-m
 
Some folks apply crazy glue to the tapped threads on MDF. 

Good looking trays.

Interesting to see the finished product.
 
Thank you all for the great answers.  This item is for my garage so the quality of the finish is not essential but the drills will sometimes have cutting fluid on them so that will stain the mdf hence the need for a coat.
I did not wait for all the answers, woke up at 4 and went ahead and sprayed -- had to to do it quicly outdoors as today will be another Arizona summer day. The paint laid OK, but it enhanced terrible router marks ("raised the grain").

My next project will be a kitchen item for my wife so I will use a different cutting strategy: rough cut the shape and leave 0.020" for a finishing pass. Then I will rattle can it with oil based primer; your suggestions were very helpful. My go to sealer is shellac, but am concerned about the crazing, and cannot dilute rattle cans. Like [member=74278]Packard[/member] I only use my HVLP for water based paints; for the rare oil spray, I use rattle or about once every 5 years, an "HVLP" gun from Harbor Freight  with my compressor.

Anyways here they are:

[attachimg=1]

[attachimg=2]

As for the shape, these trays will float inside a Craftsman cabinet drawer. I have an awful mess in the drill bits drawer and hope this will make it easier to find the right sized bit. I am not concerned about width, as I need to fill the width of the cabinet. I could have put all bits on one tray, and I might still do that with the second iteration.

[attachimg=3]

If this were a cabinet or other serious project I would dilute BM by adding 10% BM retarder to allow leveling, wait 12 hrs, add second coat, and do it all indoors (AZ summer speeds up evaporation). Orange peel doesn't matter in a toolbox.
 

Attachments

  • IMG_2388.JPG
    IMG_2388.JPG
    510.4 KB · Views: 657
  • IMG_2387.JPG
    IMG_2387.JPG
    699.5 KB · Views: 647
  • Screenshot 2023-07-27 at 7.52.32 AM.png
    Screenshot 2023-07-27 at 7.52.32 AM.png
    352.9 KB · Views: 652
Another workable alternative is to use a lamination approach.

Cut the outline out of 1/4” thick MDF and then glue to a 1/2” thick base.  Resulting in a 3/4” thick panel with a highly uniform depth, and a smooth bottom.

I spray B-M Advance and I find it self-levels on horizontal surface (and is prone to runs on vertical surfaces).  I dilute it so that the Ford cup empties at 2 minutes. I spray horizontal surfaces until they look wet, and it self-levels.
 
koenbro said:
My go to sealer is shellac, but am concerned about the crazing, and cannot dilute rattle cans. Like [member=74278]Packard[/member] I only use my HVLP for water based paints;

Brushing is fine for the BIN.  If you want to smooth things out, you then put a grain fill primer on top (waterborne).  Then sand smooth* and top coat.

Sometimes for really egregious milling marks, I'll slap on the thinnest BIN coat, then follow with spot putty fill (solvent type MH Ready Patch) sand down, apply another coat of thin BIN, and then the fill primer and topcoat.

* Those doing trim will inject a spot glazing putty pass here to catch the tiniest scratches
 
woodferret said:
koenbro said:
My go to sealer is shellac, but am concerned about the crazing, and cannot dilute rattle cans. Like [member=74278]Packard[/member] I only use my HVLP for water based paints;

Brushing is fine for the BIN.  If you want to smooth things out, you then put a grain fill primer on top (waterborne).  Then sand smooth* and top coat.

Sometimes for really egregious milling marks, I'll slap on the thinnest BIN coat, then follow with spot putty fill (solvent type MH Ready Patch) sand down, apply another coat of thin BIN, and then the fill primer and topcoat.

* Those doing trim will inject a spot glazing putty pass here to catch the tiniest scratches
But look at the photos.  Applying putty and sanding will be arduous.

(I use Park’s Pro filler.  It is intended for floor cracks and grain. It applies easily, sands to a powder easily and seems to accept any finish. Plus it dries hard, unlike some other fillers.  Park’s is part of the Rustoleum company and seems to be available everywhere.). 
 
e935475f6053cde14b7da2641beb95a2.jpg


499ff97d3f3176d46c8b77ce94055699.jpg


This is the mess I am trying to solve.

Sent from my iPhone using Tapatalk Pro
 
There are always several ways to approach any problem. 

I would have made a block with holes drilled to accommodate the drills.  I would have made a pivot that allowed the drill bits to lie flat when the drawer was closed, and could be flipped up when the drawer was open. 

I suspect it would be easier to apply the finish on the block.  But I doubt that I would have given it even the smallest amount of attention about the finish until it came time to apply it. 

I suspect you could make two rows of drill bits and still be able to flip it up and fold it down.  So if space becomes an issue, you might give that some thought.

I am reminded of taking a girl out to dinner on a date about 55 years ago.

She ordered steak.  And she ordered white wine.
I ordered steak and red wine.
She asked for the wine to be over ice.
I would never pour red wine over ice.
The waiter defied her request and delivered the the red wine without ice.
I would not have defied the customer’s request.
Instead of taking back the wine and putting it in a glass with ice, the waiter brought a glass that was empty except for the ice.
Instead of pouring the wine over the ice (which is what I would do), she fished ice cubes from the glass and dropped them into the wine.

So in every place where a choice was made, none matched my choices. 

(And no, I did not marry her.  In fact that was our first and last date.)

So, my idea is just a choice, not a recommendation.  I don’t know what issues would arise during the build of that type of drill holder.

Another option is to use Kydex.  Kydex is the thermo formed sheets that interior panels in  passenger planes are made of.  It is also widely used in holster manufacturing.  All you need is a form to press the Kydex into and an oven to warm it up so it is pliable.  I’ve seen it made using a toaster oven.

This guy just uses a heat gun and the actual part as a form.  Lots of videos on this subject.  I’m surprised that not more Foggers are using Kydex for their Systainers. 
 
For the last several years, I have used a vinyl sealer with a foam brush. It is quicker and easier than the diluted wood glue that I used before. It works, but is much slower drying. Another method that works is spackle. It works very well, usually only one coat, but it would be very difficult to deal with in a project like this. It's great for door edges, but intricate details would be overwhelming.
Beyond that, spray priming is best.
 
Since Your In Phoenix go to Finishers Wherehouse they should have right what you need.

Painters supply is a good source to.

But the guys Finishers Wherehouse are more freindly and helpful IMO

How ya gonna spray in this heat?

Unless your shop has AC
 
Packard said:
I’m surprised that not more Foggers are using Kydex for their Systainers. 

It would be nice for forming the tub/insert for a tool, but you have to wait until after all of the forming is done before you can trim the perimeter to fit the Systainer.  For anything small and loose, the blow-molded inserts from Festool usually have tension points on them to hold rods, bits, etc, which isn't that easy with Kydex.  Finger-holes as well.

Foam is much easier to work with, especially if it's already cut to fit the Systainer.
 
squall_line said:
Packard said:
I’m surprised that not more Foggers are using Kydex for their Systainers. 

It would be nice for forming the tub/insert for a tool, but you have to wait until after all of the forming is done before you can trim the perimeter to fit the Systainer.  For anything small and loose, the blow-molded inserts from Festool usually have tension points on them to hold rods, bits, etc, which isn't that easy with Kydex.  Finger-holes as well.

Foam is much easier to work with, especially if it's already cut to fit the Systainer.

All sound reasons.  What Kydex has going for it is it’s toughness and durability and ease of fabrication.  It is also very light weight (probably why it is used in aircraft—but not a factor for Systainers. 

I helped a buddy make a holster once.  Fairly easy to work with considering it was an unfamiliar material.  We used an old toaster oven and molded it over the actual weapon. I don’t know why he wanted to do this.  But it worked OK.
 
1f50305c8f37f8e1f076f194d7066b95.jpg


Soon after I started populating the trays with the drills, I realize that the imperial drills are more common in certain sizes largely due to the fact that I bought several kits over the years. Therefore, I knocked off some of the separators with a chisel for the 3/32, 1/8,  and 5/16 sizes. The metric ones have fewer intermediate steps, so they are more orderly.

Sent from my iPhone using Tapatalk Pro
 
Looks great.

You’re all done, but I thought I’d mention that there is colored MDF where the color goes all the way through.  So as soon as you are done machining, the job is done (though spraying a clear coat will probably keep it clean longer).

I’ve never used the stuff, but it looks cool.
https://cuttingedgecnc.co.uk/mdf-valchromat/

Gamme-Valchromat_500.jpg
 
Back
Top