finishing with Osmo Polyx before or after assembly??

humantorch

Member
Joined
Nov 20, 2013
Messages
47
Hey gang,
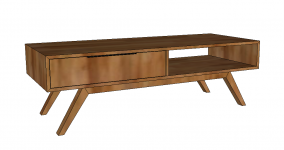
I have a project that I'm going to use Osmo Polyx oil on. It is MCM style coffee table with mitered corners and dominos. In the past I would have sprayed the individual pieces before assembly and taped off the areas to be glued, however I recently saw a piece with the Polyx and I just loved it.
I'm curious what kind of experience anyone here has with this stuff. Ideally I would like to assemble the piece and do all the necessary touch ups etc BEFORE rubbing the oil in but I'm concerned about uniformity and getting into all those hard to reach places. I do NOT have the festool oil applicator so I'll most likely be using my hands and some super fine scotch brite or a rag and the 8" opening seems a little tight to squeeze into.
Any thoughts on how to make this go smoothly??
[attachimg=1]
 

Attachments

  • Screen Shot 2015-01-05 at 10.00.17 AM.png
    Screen Shot 2015-01-05 at 10.00.17 AM.png
    122.4 KB · Views: 3,804
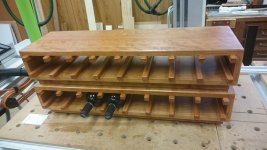
I just completed a wine rack of solid cherry and had the same question.  It seemed to me that finishing the individual pieces first would diminish the ability of the glue to hold things together, so I oiled the whole thing post-glue-up using a rag and the PolyX.  It came out quite well and despite the broad use of the chamfering bit, the oil managed to get where I needed it to go. 


Attachments

  • DSC_0001.JPG
    DSC_0001.JPG
    743.8 KB · Views: 883
I've used OSMO Polyx on several pieces and you definitely don't want to over apply it.  It needs to be completely absorbed into the wood and not just sit on top of it.

I rub the white 3M pad fairly vigorously to heat it up to aid absorption into the wood pores.  This can get fairly tiring on a large piece.

Here is an excerpt from an email I recently sent to a friend of mine in Oregon who admired some Texas Mesquite I had finished with OSMO Polyx -

There is some conflicting information on the best application method (including from the company itself) so I have included the approach I chose after viewing all the available videos and speaking with the technical support guy at Osmo USA as well as the distributor here in the States.  Remember that this was developed and is primarily used as a hardwood floor finish in Europe so the techniques for furniture are the result of different people's experimentation.

My method is as follows:

1. Sand to 150 or 180 but no more as it closes the grain and it can't absorb the oil.
2. Stir for three to five minutes to insure good suspension of the wax.
3. Apply one thin coat of Osmo Polyx using a white 3M pad & really rub it in working on a small section at a time.
4. Wipe off any excess with the grain
5. Allow to dry overnight
6. Stir at least 1 minute to ensure good suspension of the wax.
7. Apply a second thin coat of Osmo Polyx using a white 3M pad & really rub it in working on a small section at a time.
8. Wipe off any excess with the grain
9. Allow to dry overnight
10. That's it, you're done! Don't apply a third coat (although I may experiment with Peter Parfitt's "Gloss" technique featured in his third video below)

Here are the videos ranked in my personal order of value:

Wood Work Web - Phil Makin Learning to Use Osmo Part 1
Wood Work Web - Phil Makin Learning to Use Osmo Part 2

Peter Parfitt (Festool UK Reviewer) Review & Wine Test
Peter Parfitt (Festool UK Reviewer) Application Methods
Peter Parfitt (Festool UK Reviewer) Walnut "Gloss" Finish

Osmo Double Blade Scraper 

I also found this article helpful.  http://blog.lostartpress.com/2014/04/08/my-favorite-finish-for-now/

Here is a PDF from Phil Makin (First 2 Videos) with a different approach.  I think this was done earlier as it is dated 2010 and the videos were made in 2012 so the his best practices may have evolved over time.  http://www.raincoastalternatives.com/index.php/download_file/47/

It looks very similar to OSMO's official instructions for using it on furniture but like I said their own technical support guy recommended less sanding and lighter application.  http://www.osmona.com/pdfs/install/osmo_polyx_furniture_application.pdf

I bought the product from Reid at World Class Supply in the 0.75ml size as it really goes a long ways.  His number is 302-737-1441.  He's a super nice guy with a wealth of information and is well worth talking to. http://worldclasssupply.com/store/OSMO-Polyx-Hard-Wax-Oil-the-original-hardwax-oil-in-.125-.75-2.5-or-10-Liter-Sizes.html

Be sure to read his excellent responses to a thread about OSMO I started on Festool Owners Group.  Reid's username is "italkgreen".  http://festoolownersgroup.com/finishing/osmo-polyx-oil-finish-anyone-use-it/new/?topicseen#new

Here is the OSMO's North American website. http://www.osmona.com/interior/Original_polyx.shtml and the phone number for their technical support 800-515-4168.  The one big thing they recommend against is using this product on certain oily woods whose hardness and close grain make them troublesome with any oil finish.  These are listed on the last page of this document.  http://www.osmona.com/pdfs/install/osmo_polyx_application_instructions.pdf

I hope all this information isn't too overwhelming!  I tend to research stuff to death because I don't want to mess it up when I finally try it.
 
Thanks for all the great insight deepcreek!!
Question: would I be ok taking it to 120 only...otherwise I need to resupply but unfortunately the local woodworker stores don;t carry my favorite Granat paper...
Also, all this being said it sounds to me like getting into those recesses in the piece is going to be very difficult and that maybe I should consider oiling the carcass BEFORE assembling/ What are your thoughts on this and do you think that the glue will be easy enough to wipe off of the dried Polyx or is there maybe a long cure time which is buried somewhere in all that great research you did?

Thanks!
 
I would sand to 150 even if you have to wait a few days to mail order new paper.

It is important to understand that the OSMO Polyx finish is IN the wood whereas most build finishes you have worked with are ON the wood.

If you prefinish and get in the glue areas you will most likely inhibit the glue from bonding correctly.  If you don't get in the glue areas you may inadvertently leave reveals without any finish.

Personally, I would assemble and then finish this piece.  You might also try partial assembly and finishing. 

If it looks too difficult to use the OSMO, try wiping on General Finish's Seal-A-Cell followed by several coats of Arm-R-Seal Gloss and one coat of Arm-R-Seal Satin.  It's a different look as OSMO almost looks like raw wood with minimal sheen and this process would produce more depth to the finish.
 
My experience with Osmo is that it should be applied after rather than before, as it goes on relatively thick (even when you're trying to apply it thinly), and could mess up alignment of boards depending upon how you're fitting things together.  I sanded to 220, but if I were doing it again, I would probably go with a lower grit, as there was a lot of excess that had to be wiped off.  And you really do need to wipe off -- I tried just letting it sit the first time I used it, and it came out rather blotchy.  The drying time is longer than the stated 6-8 hrs as well, so if you can overnight it, you should.  I also had to use three coats on a couple of pieces, rather than the recommended 2.

There is a relatively long cure time as well.  I accidentally scraped one of the cabinets I used it on maybe 2 days after second coat, and came away with a whitish film.  But once cured, the finish is solid.

UPDATE: I just watched the first set of videos, which I had not seen before, and realized I've probably been applying too much finish.  Next time I'm going to try to use the Norton pads that they recommend.
 
I use Osmo on floors and furniture. It should be applied as thinly as possible, if applied too thickly it won't dry properly. Air movement helps the drying process as opposed to heat, for wood that has a lot of natural oil i.e. teak,  jatoba etc Osmo extra thin oil should be used for the first coat. The drying time quoted is correct if you allow air movement and apply thinly.
On furniture I can apply it thin enough for it to dry in 3 to 4 hours.
Hope that helps.
 
Back
Top