Danial1981
Member
- Joined
- Aug 3, 2014
- Messages
- 7
Hi all
This is my first post on this site. I must say that I'm impressed with the wealth of knowledge on here and the willingness to share it. The Festool Community really is a unique "accessory" when you purchase one or more (more being the usual case here!) of there fine woodworking tools. I have certainly caught the green fever [eek]
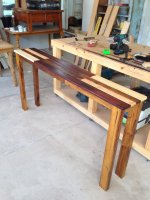
I am a Cabinetmaker by trade, however I've been out of the game for almost 8 years now. So I have decided to dabble in this area once more. My first project was a table for photos and nic nacs for my sister, she provided me with a photo of what she wanted plus the dimensions required.
As you are all probably well aware, making furniture out of pallets/recycled timber is very popular at the moment. The timber is free if you have the know how as to where to find them. Luckily for me I have a brother in law with access to lots of these [big grin].
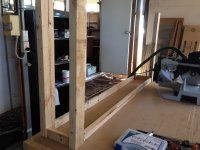
Another bonus with using recycled timber for myself is basically the practice before I start buying packs of expensive timber and getting to know my new Festool products and pushing them to there absolute limits. One thing I found with using pallets is the timber has a lot of cupping/warping through it. This first hurdle was to be expected, there was quite a bit of cutting and re-joining lengths to try and straighten out the timber.
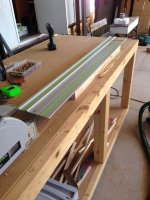
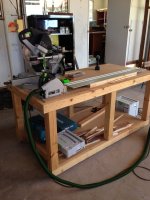
Basically I ran the timber through a thicknesser and was pleasantly surprised at the different grain I saw. This Pine timber wasn't as bad as I was expecting. I'm kicking myself now for not taking a photo of these oil soaked pallets!! Next I cut what warps I could out of them and joined them end to end using a Kreg jig plus my Kapex 120 (my Baby ;D) Then I ripped these lengths to size using the TS55 R. I was skeptical on the cut being join ready, how wrong I was! With the 48 tooth blade it created a very nice cut indeed.
I did have a bit of trouble shooting to do on how to rip these lengths down to 90mm and 60mm. A table saw would have been well suited for these narrow cuts, none the less, the TS55R handled it very well.
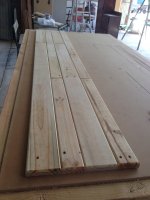
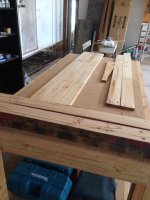
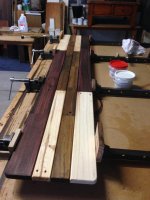
Next was the joining, this was done using a biscuit machine. I've only ever used these with joining in my trade, however I have watched a few movies on the domino and it is definitely on the wish list! You'll notice on the pictures that the timber for the top has been individually rounded on the edges and also stained different colours. I opted to stain these pieces first and then join the top together. It was a bit of a pain with cleaning of the glue (epoxy glue) a bit more patience was required haha.
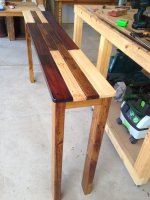
Also sanding was done with the RO 90... OMG!!! In my trade I was spray painting for a number of years and we used an ETS 150/5 and I was impressed then. But this little sander has impressed me in a whole different level. It was probably the biggest surprise out of them all! I sanded to a P240 grit then stained it. Colours were Teak and Rose Mahogony, plus natural for the top. I used Mirotone stain and Mirotone Precat laquer with a satin finish, quick and easy. This was all sprayed (sealer and 3 top coats with light sanding in between) in 3 hours. I let it dry for an hour and then assembled it. The Kreg was also used for the frame. Anyway this was a great learning experience and the first of many projects to come [smile]
[attachthumb=1][attachthumb=2][attachthumb=3][attachthumb=4][attachthumb=5][attachthumb=6][attachthumb=7][attachthumb=8]
This is my first post on this site. I must say that I'm impressed with the wealth of knowledge on here and the willingness to share it. The Festool Community really is a unique "accessory" when you purchase one or more (more being the usual case here!) of there fine woodworking tools. I have certainly caught the green fever [eek]
I am a Cabinetmaker by trade, however I've been out of the game for almost 8 years now. So I have decided to dabble in this area once more. My first project was a table for photos and nic nacs for my sister, she provided me with a photo of what she wanted plus the dimensions required.
As you are all probably well aware, making furniture out of pallets/recycled timber is very popular at the moment. The timber is free if you have the know how as to where to find them. Luckily for me I have a brother in law with access to lots of these [big grin].
Another bonus with using recycled timber for myself is basically the practice before I start buying packs of expensive timber and getting to know my new Festool products and pushing them to there absolute limits. One thing I found with using pallets is the timber has a lot of cupping/warping through it. This first hurdle was to be expected, there was quite a bit of cutting and re-joining lengths to try and straighten out the timber.
Basically I ran the timber through a thicknesser and was pleasantly surprised at the different grain I saw. This Pine timber wasn't as bad as I was expecting. I'm kicking myself now for not taking a photo of these oil soaked pallets!! Next I cut what warps I could out of them and joined them end to end using a Kreg jig plus my Kapex 120 (my Baby ;D) Then I ripped these lengths to size using the TS55 R. I was skeptical on the cut being join ready, how wrong I was! With the 48 tooth blade it created a very nice cut indeed.
I did have a bit of trouble shooting to do on how to rip these lengths down to 90mm and 60mm. A table saw would have been well suited for these narrow cuts, none the less, the TS55R handled it very well.
Next was the joining, this was done using a biscuit machine. I've only ever used these with joining in my trade, however I have watched a few movies on the domino and it is definitely on the wish list! You'll notice on the pictures that the timber for the top has been individually rounded on the edges and also stained different colours. I opted to stain these pieces first and then join the top together. It was a bit of a pain with cleaning of the glue (epoxy glue) a bit more patience was required haha.
Also sanding was done with the RO 90... OMG!!! In my trade I was spray painting for a number of years and we used an ETS 150/5 and I was impressed then. But this little sander has impressed me in a whole different level. It was probably the biggest surprise out of them all! I sanded to a P240 grit then stained it. Colours were Teak and Rose Mahogony, plus natural for the top. I used Mirotone stain and Mirotone Precat laquer with a satin finish, quick and easy. This was all sprayed (sealer and 3 top coats with light sanding in between) in 3 hours. I let it dry for an hour and then assembled it. The Kreg was also used for the frame. Anyway this was a great learning experience and the first of many projects to come [smile]
[attachthumb=1][attachthumb=2][attachthumb=3][attachthumb=4][attachthumb=5][attachthumb=6][attachthumb=7][attachthumb=8]