First foray into cabinets

woodvkk

Member
Joined
Dec 30, 2015
Messages
100
So, I want to eventually build full wall hanging cabinetry in my laundry room. However, I thought I'd start with something my wife has been asking for which is to replace the laundry floor standing cheap plastic junk sink with a cabinet and new functional embedded sink. That way I can learn from my mistakes before embarking on a larger project.

I've done some research and am planning to use 2 side pre finished maple plywood for the project.  A few questions pop up

1. Size -- What size makes sense - 3/4" or 1/2" for the plywood? 
2. Top --  I'm going to have counter top area by the sink. Should I get a counter top specifically, or just glue something on top of the plywood?  My has local wood store has pre finished wood counter tops close to the size, which would be awesome, but I'd be cutting out most of it for the sink which seems like a waste, but I also don't want to have to finish wood for being counter top ready if I don't have to. My finishing skills lag well behind my wood working skills.
3. Stability -- Any tips on stability?
4. Joints --  I'm thinking of using my domino 500 for joinery over the whole thing.
5. Hinges and shelves -- The LR32 system is too expensive since I'm a hobbyist and wouldn't be doing this beyond home projects. Is there a good inexpensive jig that's recommended for hinges? ( the ones on amazon have mixed reviews )? I do have a drill press and an OF1010 router ( and now recently a CXS with 35mm zobo ) so solutions for any of those are feasible.
6. Design - Any good designs for floor standing cabinets I should refer to? I notice there are varying recommendations on bases for floor standing cabinets.

Any information appreciated!
 
i am wrapping up making my kitchen cabinets.  I watched the poplar shop videos on youtube for a lot of my research as well as getting a couple of cabinet books.  Long story short is there are a lot of ways to make them.  I did like how erock (the poplar shop) made his since I had most of the same tools. 

I prefer 3/4" plywood for the carcass.  I have been using 1/2 for the drawers.  I also used the domino for all my joints. it sure made alignment a piece of cake. I put a couple of screws in where they wouldn't be seen since I didn't have a lot of clamps.  Seems to have worked out for me. 

If your only doing one or two, I have made a jig before out of some scrap 1/4" plywood that worked for the hinges. 
 
I'm currently building a new vanity for one of my bathrooms.  This is what I'm doing.

3/4" ply for the boxes. 
Dominoes (6mm) for the joints, glue, with Pocket screws for reinforcement.  The pocket holes will not be visible. 
The cabinets will have face frames, I will use dominoes and pocket hole screws and, because it is being painted, brad nails where necessary. 
I also purchased legs for the boxes as opposed to cutting out the toe kick.  My choice, I think it will look pretty sharp when it is done.

I am having a solid surface top made for this vanity, because that's what the boss wants. 

I have one box left to assemble and then I can begin the face frames. 
 
Check out Marc Sommerfeld's videos on youtube.  You can substitute the T&G with the domino.  Good luck  Bill
 
You might want to check out YouTube University for Eric's [member=8352]erock[/member] nice series of videos on cabinets he built.
 
Thanks for all the info everyone.  I do have a book ( Building Kitchen Cabinets by Udo Schmidt ) but I appreciate the recommendations for more and the videos.
 
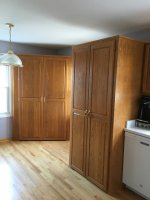
I am in the same boat - just finished the laundry room wall cabinets and trying to refine my skills so the boss will let me work on the kitchen cabinets.  I would love to have the LR32 but have 3 kids in private school.  I have been using the shelf pin jog from Rockler.  Works great for the amount I use it.  I also purchased the company concealed hinge jig from Kreg for the hinges.  Works great. Allows for most offsets and is simple, quick and accurate. 

I agree and recommend watching Eric and the Poplar Shop on making his mom's kitchen cabinets.  I spent several nights streaming them to the tv to watch.  Very helpful. 

I would use 3/4 for the carcasses. It's not much more $$$ but much more sturdy. 

Good luck and post pics.
 
mwtcarter74 said:
I am in the same boat - just finished the laundry room wall cabinets and trying to refine my skills so the boss will let me work on the kitchen cabinets.  I would love to have the LR32 but have 3 kids in private school.  I have been using the shelf pin jog from Rockler.  Works great for the amount I use it.  I also purchased the company concealed hinge jig from Kreg for the hinges.  Works great. Allows for most offsets and is simple, quick and accurate. 

I agree and recommend watching Eric and the Poplar Shop on making his mom's kitchen cabinets.  I spent several nights streaming them to the tv to watch.  Very helpful. 

I would use 3/4 for the carcasses. It's not much more $$$ but much more sturdy. 

Good luck and post pics.

Thanks - You too!
 
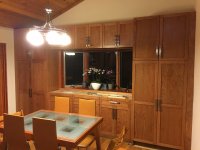
I'm a hobbyist, half way through a kitchen build.  I've done two vanities, 8 lf of laundry built is and 15 lf of built-ins for a library.  I use 3/4" plywood for the carcass sides and top, either 1/2" or 1/4" for the back.  I've found the Rockler jig is good enough for shelf pins.

Bob Lang's book was very helpful:https://www.amazon.com/Complete-Kit..._1?ie=UTF8&qid=1494281460&sr=8-1&keywords=bob+lang%27s+the+complete+kitchen+cabinetmaker

The biggest thing I think is that you need to have good planning, so you can buy the right amount of material; and then know what steps you need to put it together.  I have on more than one occasion, e.g., forgotten to notch out for tandem drawer slides in the back of a drawer.  I now have a check list for the drawers; that I go through each time.

Also, at least for me I don't want to make 25 drawer boxes and nothing else in between.  Instead I built things in sections (and have installed the first 1/3-2/3 of the kitchen).  It just gets too tedious.  I can also improve along the way if I complete a process from start to finish.  This means, that for example, I bought an extra router to keep it dialed in to my dovetail jig; otherwise, the setup time becomes unpleasant.
 

Attachments

  • IMG_3072.jpg
    IMG_3072.jpg
    1.8 MB · Views: 510
cpw said:
The biggest thing I think is that you need to have good planning, so you can buy the right amount of material; and then know what steps you need to put it together.

I too am a hobbyist, and most of time time was building various cabinets and wardrobes etc.

I have found a super useful free online tool is Optimalon's cut optimizer. (http://www.optimalon.com/online_cut_optimizer.htm - click the link that says "Run Free Online Panel Cut Optimizer Now!").

[list type=decimal]
[*]Input the standard panel size (2400 x 1200, 2440 x 1200) or any panel size you want (paying attention to grain direction if necessary)
[*]Input a saw kerf value (say 3mm)
[*]Input the "cut level" (I find level 3 or 4 is the most useful)
[*]Input the dimensions of each part  (paying attention to grain direction if necessary), and how many of each part
[*]"Run" the project
[*]View the image results - (I like "By Panel")
[/list]

It tells you how many sheets you need to buy.

Here's a sample of the output
View attachment 1

Hope this helps.
 

Attachments

  • download.png
    download.png
    14.9 KB · Views: 254
That looks beautiful, great job!

I have the rocker shelf pin jig and have used it but not any hinge jigs

Thanks for the info

cpw said:
I'm a hobbyist, half way through a kitchen build.  I've done two vanities, 8 lf of laundry built is and 15 lf of built-ins for a library.  I use 3/4" plywood for the carcass sides and top, either 1/2" or 1/4" for the back.  I've found the Rockler jig is good enough for shelf pins.

Bob Lang's book was very helpful:https://www.amazon.com/Complete-Kit..._1?ie=UTF8&qid=1494281460&sr=8-1&keywords=bob+lang%27s+the+complete+kitchen+cabinetmaker

The biggest thing I think is that you need to have good planning, so you can buy the right amount of material; and then know what steps you need to put it together.  I have on more than one occasion, e.g., forgotten to notch out for tandem drawer slides in the back of a drawer.  I now have a check list for the drawers; that I go through each time.

Also, at least for me I don't want to make 25 drawer boxes and nothing else in between.  Instead I built things in sections (and have installed the first 1/3-2/3 of the kitchen).  It just gets too tedious.  I can also improve along the way if I complete a process from start to finish.  This means, that for example, I bought an extra router to keep it dialed in to my dovetail jig; otherwise, the setup time becomes unpleasant.
 
Didn't know about that, thanks!

eddomak said:
cpw said:
The biggest thing I think is that you need to have good planning, so you can buy the right amount of material; and then know what steps you need to put it together.

I too am a hobbyist, and most of time time was building various cabinets and wardrobes etc.

I have found a super useful free online tool is Optimalon's cut optimizer. (http://www.optimalon.com/online_cut_optimizer.htm - click the link that says "Run Free Online Panel Cut Optimizer Now!").

[list type=decimal]
[*]Input the standard panel size (2400 x 1200, 2440 x 1200) or any panel size you want (paying attention to grain direction if necessary)
[*]Input a saw kerf value (say 3mm)
[*]Input the "cut level" (I find level 3 or 4 is the most useful)
[*]Input the dimensions of each part  (paying attention to grain direction if necessary), and how many of each part
[*]"Run" the project
[*]View the image results - (I like "By Panel")
[/list]

It tells you how many sheets you need to buy.

Here's a sample of the output
View attachment 1

Hope this helps.
 
"I bought an extra router to keep it dialed in to my dovetail jig; otherwise, the setup time becomes unpleasant."

I think that is the logic that leads most into a stable of routers over time, at least it's what got me my first 4 routers.
The other 2 are the big PC which stays in the router table and a PC compact router with plunge base that came free with my Unisaw when I bought it 7 years ago.

I know it certainly saves time and as you point out contributes to consistency and accuracy.
 
woodvkk said:
That looks beautiful, great job!

I have the rocker shelf pin jig and have used it but not any hinge jigs

Thanks for the info
For the hinge cups, I use my drill press; with a fence.  I got a wood peckers table, but have done plenty of those hinges with just a scrap of wood the correct distance from the bit.  For the screw holes, I just put the hinge in, get it perpendicular (by eye) and use a self-centering bit.  I did get the jig for drilling the plate the correct distance from the cabinet as well; though have done it with paper templates.  If you're doing a whole kitchen, the $8 is definitely worth it.
http://www.rockler.com/jig-it-hinge-plate-template-a
 
I'm about to start this project and picking up the materials today. I've looked around and some people use pocket holes with dominoes and some people only use dominoes. What's the deal there?  I'm thinking of only using dominoes since I don't currently have a pocket hole jig. 
 
woodvkk said:
I'm about to start this project and picking up the materials today. I've looked around and some people use pocket holes with dominoes and some people only use dominoes. What's the deal there?  I'm thinking of only using dominoes since I don't currently have a pocket hole jig.

The dominos hold the case parts in line when pocket hole joining. You don't need clamps on the carcass when using pocket holes.
Some people also like the added strength of pocket holes and domino's. It's a bit like belts and suspenders to me.
I typically use screws and domino's or biscuits. For exposed or gable ends or frame less cabinets sides I really prefer biscuits.
Tim
 
cpw said:
...
The biggest thing I think is that you need to have good planning...
...

[thumbs up]

What is the saying?
Something like... "wisdom comes from experience, and experience comes from making mistakes."
 
Miter lock the sides. You will be steak raving crazy by the time you get the set up right).

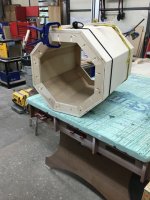
7' long miter lock on the tall cabinet in the for ground.

22.5º miter locks.

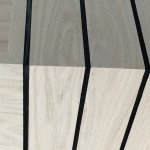
Miter lock with matched grain.

Tom
 

Attachments

  • IMG_0760.jpg
    IMG_0760.jpg
    37 KB · Views: 456
  • IMG_0249.jpg
    IMG_0249.jpg
    57.5 KB · Views: 454
  • IMG_3058.JPG
    IMG_3058.JPG
    837 KB · Views: 421
Back
Top