First jointer..

Iceclimber

Member
Joined
Oct 25, 2014
Messages
504
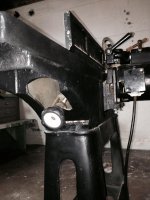
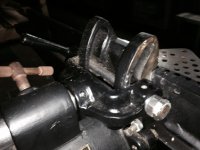
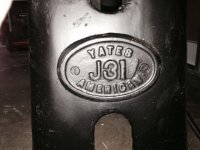
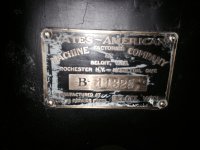
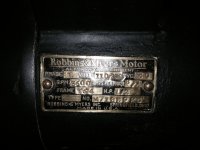
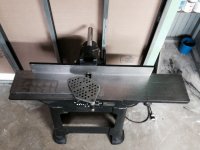
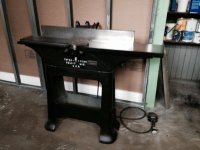
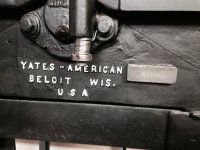
I purchased my first jointer today. It kinda feels like a big day...

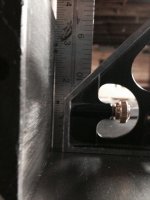
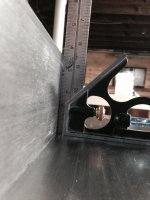
I now need a straight edge and engineers square. Oh and the little fan deck thing that are metal shims with measured tolerances.

So do i just go all Sturrett or do a sVe a few bucks and do Lee Valley and Veritas. My best Googling also found Suburban Tool. I know of the woodpeckers stuff but indont think i like the idea of aluminum...
 
Lee Valley/ Veritas make a terrific straight edge. I have the 36". It's half the price of the Starrett, and almost twice the thickness which means it is a lot more stable when set on its edge.
 
Yates J-31 6"

Its a pretty cool little machine. It will clearly not be the be all end all jointer for me but I'm still really happy with it as my first jointer purchase. Shoot i almost purchased a newish Jet 6" for the same $$$$. That woulda been a shame.

I was going to go the Hammer or Felder route long term but i this old machine has me now thinking of a old Oliver or Northfeild 10" with a upgraded Byrd Shelix. I think that will be way cooler and stand the test of time much better than a new Euro machine. The nostalgia romance factor is just so much more appealing than a new machine. Plus restoring it to its original glory will be fun.

Im already researching how to restore the little Yates i just purchased to its original glory chrome plating and all.
 
Post some pictures of the few issues/questions you had and I will help you figure it out.

Everything gets set off the outfeed table.  I usually check to see if the head is parallel to the outfeed, but it is not a real critical thing, unless way off. 

Honestly, I wouldn't spend the money on a straight edge right now.  I made one with 3 strips of melamine with 4 screws in the edges. 

I use a machinist square I bought used and an aluminum extrusion I came across at some point. 

I spent 2 days getting the tables right on my 30" jointer, it had been taken apart and put together twice once I had loaded it in my trailer.  It makes a board so flat, it sticks to the outfeed table. 

The outfeed table is what everything is set from. 

 
Werner thanks for the help.

These pics are of the fence problem. The first one is the outfeed side of the fence. As you can see it is out of square.

The second picture is the infeed side of the table and it is perfect right on the mark. I may be able to adjust this out in some way nut just a few minutes playing with it after setting back up at my house and this is what i got. Again remember those two rear bolts that hold th top to the base and i said were not installed when i looked over the machine at the buyers house. I wonder if this could be maybe why they were not installed.
 

Attachments

  • image.jpg
    image.jpg
    276.7 KB · Views: 239
  • image.jpg
    image.jpg
    300.3 KB · Views: 217
Pictures of the backside of the table. This picture shows where the upper table and cutter head bolt to the base. The seller did not have these bolts in when i looked over the machine e at his house. As we were taking the machine apart to put it in my truck he mentioned those bolts and told m to put washers in the back two bolts only. I asked if the base had out of square or something and he said maybe a little but was dismissive.

As he had the machine we were able to get both side of the fence reading perfect with a Veritas 36" straight edge and a machinist square.
 

Attachments

  • image.jpg
    image.jpg
    297.6 KB · Views: 215
Third problem is the shim i mentioned on the fence. The seller mentioned it to me prior to the sale and spoke of just adding a washer to resolve the issue of excessive wear/play in the fence tightening mechanism.

When i got there he had added a couple of spot welds and ground or filed them smooth. Seems like a good fix to me?


Attachments

  • image.jpg
    image.jpg
    225.4 KB · Views: 201
  • image.jpg
    image.jpg
    224.5 KB · Views: 182
And now just for some good old tool porn. Is it ok i say that. I figure yes if no remove it I'm sorry.

If all ends up in good working order i will tear the machine down and strip all the paint and repaint it properly with a good sprayed on industrial finish like ML Cambel or the like. Probably color matched to the original color, maybe not?

Ill then have all the parts that should have been polished or chromed refinished and nuts and bolts polished back to new. There are a couple bits like the feather board tension spring that are not right but thats minor and i think i can get it back to how it was originally manufactured working off a picture of another identical machine.

It will be while as i have a couple other projects going on in my workshop other than work. When i run out of $$$ for expensive lumber for my personal projects this will give me something to do.

I think this will be a great machine to learn with. I can already feel the jointer bug creeping in like the green tool bug!


Attachments

  • image.jpg
    image.jpg
    719.5 KB · Views: 197
  • image.jpg
    image.jpg
    229.7 KB · Views: 179
  • image.jpg
    image.jpg
    829.2 KB · Views: 171
  • image.jpg
    image.jpg
    932.4 KB · Views: 185
  • image.jpg
    image.jpg
    831.4 KB · Views: 190
  • image.jpg
    image.jpg
    828.5 KB · Views: 200
  • image.jpg
    image.jpg
    845.7 KB · Views: 232
  • image.jpg
    image.jpg
    932.4 KB · Views: 167
Yeah i think so. I feel pretty lucky this is my first machine.

The link you shared is actually the picture i will work off with regard to the getting the feather board back to original.

I have a uncle who owns and restores early 1900's Pierce Arrows. He is always cleaning up old metal bits and pieces and having new ones made up if need be. I am sure i can have him walk me through a immaculate restoration of this old machine to its original glory.

WarnerConstCo. said:
Seems pretty nice, just a bit of tinkering will get it dialed in

http://www.vintagemachinery.org/photoindex/detail.aspx?id=8673
 
Nice looking little jointer.  I think it is mid to late 30's.  I can't find a catalog cut of that exact style, all are the ones after it. 

Honestly, I would put some lumber across it and see what it does, sometimes the best way to figure out what you need to do. 
 
I did throw a pice of 3/4 x 5" birdseye across is last night after i set it up. Ill get pictures of the piece with my square on it later. The edge was perfect but the face was off side to side.

I am confident ill get this thing running 100% perfect.

If you do dig up any old info on this machine please share it with me.

Feels pretty cool to know its a early 30's machine. I own a 1926 craftsman bungalow Sears kit home in near mint original condition. I purchased it from he original owners son after his father passed. His father built the home himself in 1926. He was a fine craftsman as the hose it testament to. Something feel very right about bringing a machine of the same era back into his old workshop...
 
Back
Top