First time Laminating boards to make thicker stock

sofa_king_rad

Member
Joined
Mar 26, 2016
Messages
100
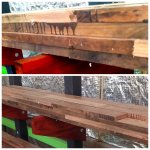
i bought some surfaced 4/4 curly birch boards. I've ripped them down to boards roughly 4.5" wide by 40 inches long. The boards weren't wide enough to do three 3.5" wide boards...so I went with 4.5" with a goal to make 4 bed posts at 4" wide by roughly 1.75" thick.

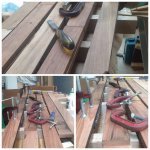
SO, i need to laminate boards together. I'm looking for any tips, techniques or tricks.

How far apart do you space clamps?

How many boards can I clamp within one set of clamps....is it okay clamping all four pairs together within the same set of clamps?
 
4 clamps @ 1/2', 1-1/2', 2-1/2', 3-1/2 feet.

All glued at the same time means that they can act as caul sheets for the inside ones.
Maybe add a couple of 2x4 for the outside.

Some tape around each post may "burrito" the post parts and keep the individual boards from sliding around and before the clamps are wound up/wound down... I.e. Glue tape, do the next one, etc, clamp them.
 
Laminating does produce a strong and, if properly done, stable solution. The only problem is that the grain will show that the bed posts (or whatever) have been laminated and this is not always ideal.

Have you thought about using the lock mitre approach. You use this jointing technique to make a long square box which will have a void in the middle. It is very strong and the evidence of jointing is hidden at the edges (or top/bottom).

Peter

 
He only has the 1010, so no ability to run a lock mitre bit.

You can double up if you want, but I would recommend doing them one by one to start.  Since it's a strong and stable face grain to face grain bond, it will not require that much clamping time to fix the glue up, and you can remove them after an hour and glue up the next one.

More clamps the better -- I sometimes do them every 8 to 10 inches inches for something like this.  Not sure what type of clamps you have, but for at 4.5" you may have to clamp on either side of the board, and not just in the center.  If you have some scrap the length of the post, you can put that on the outside of each side of the lamination to spread the clamping force.  In case you run short on clamps, Home Depot usually sells those handy 6" Bessey GSCC clutch clamps in 4 packs (sometimes the packs have a pair of 6" and a pair of 12"), which are perfect for this sort of application.

Important note on the boards and grain direction: check the boards before glue up to see if they have any bowing.  You can do this by laying the boards on top of one another and seeing where the gaps are on the mating surface.  You want to cancel out, and not strengthen any bowing in the lamination, so make sure you join the boards either like this: )( or this (), but not like this (( or this )).
 
The award for best use of parentheses in a woodworking forum goes to you, sir.
 
[size=13pt]Victorian Otway Ranges Blackwood
Shorts lamination; work in slow progress -

[attachimg=1][attachimg=2]
 

Attachments

  • image.jpeg
    image.jpeg
    825.6 KB · Views: 1,368
  • image.jpeg
    image.jpeg
    898.1 KB · Views: 1,317
I haven't considered a lock mitre b/c i dont' know what it is :)
That sounds like a good way to go. I actually had wanted more a 4x4 type post visually just just couldn't figure out a good way to do it.

This is really my first project. it's a twin size bed for my almost 3 year old. Wifey wants it to be painted, so it sorta help lend itself to a good first project. I'll be doing some narrow bookshelves that go on each side of it also.

I have 5 of these  Jorgensen Master Clamps
31ST1J2SYZL.jpg


Along with a couple 48" quick clamps... but i'm arleady feeling like I need more clamps, especially some smaller once for just mocking things up and stuff.

Here is a rough mock-up drawing of what I'm attempting. The heabooard and foot board will be identical as the bed will be day bed style with a trundle underneath (eventually).


You need a router with a 1/2" collet to do lock mitres.  And while [member=4105]tjbnwi[/member] has video proof that it's possible free hand, it's normally something that one would want to start with on a router table.
 
Edward is right. It is best done on a router table (you will need one anyway for the rest of your woodworking enjoyment) and you will also need a router with a 1/2" collet (you will need one...blah blah).

There must be loads of videos about the lock mitre around. If push comes to shove I will dig out a link to one of mine.

Peter
 
Edward A Reno III said:
...
Important note on the boards and grain direction: check the boards before glue up to see if they have any bowing.
...

A hand plane can be handy, // || \\

The lock mitre is slick, but for a first project that is painted it may be ambitious?

One can never have too many clamps, but you have enough.
 
You said the magic words [member=40772]Holmz[/member]
http://festoolownersgroup.com/various-woodworking-crafts-topics/you-can-never-have-too-many-clamps/

Holmz said:
Edward A Reno III said:
...
Important note on the boards and grain direction: check the boards before glue up to see if they have any bowing.
...

A hand plane can be handy, // || \\

The lock mitre is slick, but for a first project that is painted it may be ambitious?

One can never have too many clamps, but you have enough.
 
sofa_king_rad said:
I haven't considered a lock mitre b/c i dont' know what it is :)
That sounds like a good way to go. I actually had wanted more a 4x4 type post visually just just couldn't figure out a good way to do it.

This is really my first project. it's a twin size bed for my almost 3 year old. Wifey wants it to be painted, so it sorta help lend itself to a good first project. I'll be doing some narrow bookshelves that go on each side of it also.

I have 5 of these  Jorgensen Master Clamps
31ST1J2SYZL.jpg


Along with a couple 48" quick clamps... but i'm arleady feeling like I need more clamps, especially some smaller once for just mocking things up and stuff.

Here is a rough mock-up drawing of what I'm attempting. The heabooard and foot board will be identical as the bed will be day bed style with a trundle underneath (eventually).


Profile of a lock miter joint.

Key is do not get carried away with the glue. It is possible to hydraulic lock the joint with to much glue in it.

Would not try a lock miter hand held without the 2200.

Tom


Attachments

  • IMG_0683.jpg
    IMG_0683.jpg
    51.9 KB · Views: 239
For face laminating I prefer hand screw clamps.  Require a little practise they're perfect for the application.  Long clamping surface reduces the number of clamps needed to do the job and they weigh less than steel clamps which is nice when you have to lift the assembly off the bench.  When I have to make full sized doors I always laminate stiles and rails.  Orient with the growth rings opposing each other and the glue up will tend to stay straight.  I spread the glue out of a paint tray with a roller to get it on quick and stack multiple parts to save on clamps.
 
sofa_king_rad said:
More and more I wish I'd just gotten the 1400 instead :(

They all have their place. The rule of thumb is---new router bit--new router [thumbs up]

Tom
 
sofa_king_rad said:
More and more I wish I'd just gotten the 1400 instead :(

If you are just going to have one router then the OF1400 is a great choice. As your skill level increases and your ambition to take on more challenging projects grows the OF1400 will allow you to buy bigger and better cutters with 1/2" shanks.

Do not despair - the OF1010 is the sweetest router in the line up. If you ask any experienced woodworker he or she will tell you that you cannot manage with just one router and so you are halfway there to having two routers. Get the OF1400 as soon as you can and enjoy the best of the best.

Peter
 
sofa_king_rad said:
More and more I wish I'd just gotten the 1400 instead :(

A router table is considered by many to be worthwhile. And for a router table a porter-cable is usually plenty fine... And big 1/2" job.

That 1010 still is handy.

That lock joint is elegant, but you've been talking about this bed for a while... Just go with your current plan and build up to a more challenging joints after this one.
 
Holmz said:
sofa_king_rad said:
More and more I wish I'd just gotten the 1400 instead :(

A router table is considered by many to be worthwhile. And for a router table a porter-cable is usually plenty fine... And big 1/2" job.

That 1010 still is handy.

That lock joint is elegant, but you've been talking about this bed for a while... Just go with your current plan and build up to a more challenging joints after this one.

Excellent advice.

Peter
 
thanks!

I finally said the hell with it and bought a domino also....its more about time than anything. While i'm learning, I think it will help me still manage projects in a reasonable amount of time.

I'm going to start gluing up the posts today. Originally I had planned for one large piece of plywood in the middle, then the cross boards to just be decorative. However, I think the head and foot board will be to boring if one side is just a solid panel, especially since it will sit as a day bed and both sides of each will be exposed.

So I plan to domino the center cross in and float the panels in routed groves of the bosts and cross boards so that visually the headbooard and footboard are close to the same on both sides. I also wanted more depth  originally by having the center cross pieces be set back from the main posts and connected beams, however, working with only 1-3/4" stock deep i don't think i have enough depth to work with.
 
All my lock miter lovin breathern may want to avert your eyes from this post.... But, I have never encountered a more ill behaved joint for gluing up a long post. Maybe if you have a power feeder and are meticulous with your stock (flat and thicknessed) you can make it work. If so, my hat is off to you.  Would definitely not recommend it for a first project.  I'm building a bed now and have fought with lock miters and they have nearly whipped me. Ultimately, I had to cut the ears off the lock miters and just glue them up as best I could. Pictures of the work in progress and that nasty (failed) lock miter are attached.
 

Attachments

  • image.jpeg
    image.jpeg
    1.4 MB · Views: 277
Back
Top