Fixing Kapex 120 EB motor problem.

EdWilliams

Member
Joined
Aug 23, 2011
Messages
13
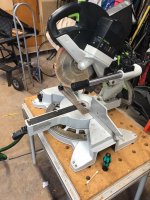
  I was recently given a Kapex 120 EB (495822) whose "motor burned up".  The owner didn't want to pay the $600-$700 for the out of warranty repair plus shipping.  Since I have time on my hands, I thought I'd try for a repair for the cost of parts.  Plugging it in, the saw would turn slowly then pop a breaker.  I tried with and without my dust collector in the circuit and with no extension cords.
  Googling around suggested that the armature was likely shot.https://www.festoolownersgroup.com/...another-dead-kapex-55656/msg543728/#msg543728  provided very helpful instructions. 
was also useful.
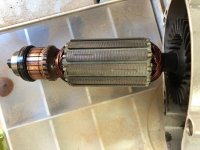
  However, after getting the armature out, it appears to be undamaged, no sign of overheating, no shorts from the commutator to ground and the adjacent contacts on the commutator were all about 0.4 Ohm.  The field coils appeared undamaged to visual inspection.
  One thing I found when temporarily reassemblling was that the armature was hard to turn.  At thought I thought there was some misalignment or bad bearings or something - but I believe it is just the electromagnetic brake. Turning the armature requires 12 steps, each of which feels springy, not frictional. (There are twelve armature windings.)
  Anyway, I'm now looking for some diagnostics to try to pin down where the problem is.  I'm suspicious of the speed controller. Can I bypass it somehow?  How about some check of hidden damage to the stator coils. Are there some measurements I can make?  A circuit schematic would be very helpful.
  Looking for suggestions.
 

Attachments

  • IMG_0586-1.jpg
    IMG_0586-1.jpg
    884.4 KB · Views: 1,506
  Is that the file in the thread I linked to in my message? 
EDIT  The link showed up - yes it's the instructions I used to get at the armature.
 
  OK. The third recommended test on the armature is to measure the resistance across opposite sides of the commutator (i.e. brush to brush) and make sure it doesn't vary much from pair to pair.  I'd got inconclusive results using my multimeter which struggles a bit measuring ~0.5 Ohm resistances.  So I used a variable power supply set to 1 volt and measured the current - this varied from 1.4 to 2.3 amps.  This is clearly bad. The coils are open or shorted somewhere. So I've ordered the armature (Festool calls it the "end shield" P. No. 203552) and new brushes.  Hopefully this will fix the saw...

I should also emphasize the warning about being careful unscrewing the four T25 M5x50mm that hold the motor down to its baseplate.  First, you need a long torx screwdriver. I bought one from Wiha.  Second, despite my efforts cleaning the bolt heads at the bottom of  the 4" deep holes, I still managed to strip them.  I had to drill them out. This required "aircraft length" 6" cobalt bits.  Jobber bits are too short. The self-tapping bolts that Festool used were really jammed into the aluminum baseplate.  I intend to clean the threads with an M5 tap and use regular bolts and hand torque!

 
Interesting story to follow though it's way beyond my technical grade. I could manage to replace a bulb or two for my car -- after watching a YouTube tutorial video! :-[
 
  Testing the armature I got from youtube:
  But doing it confidently with a multimeter requires a better quality one than I own.
  Getting the armature out of the saw was linked above.  If I'd had the right tools for that (a long T25 torx - don't risk jamming in a flat-head) and hadn't stripped any of the **#* buried T25 bolts, it would have been less than an hour's work.  Also, if the saw hadn't been sitting around broken for months, I think a smell test would have told me it really was the armature. As it was, it looked undamaged and so I had to worry that it might be the field coil or the controller board.  I think a test for the latter would have been to remove the motor cover and test the rms voltage between the two brushes and running the speed control up and down.  If variable power was going to the saw motor, it would pretty much rule out the controller board - but that's an untested theory.
 
  Just as a follow-up.  It took three weeks to get a replacement armature.  I also installed new brushes, though the old ones were barely worn.  Yesterday I put the saw back together.  It took most of the afternoon, since it was six weeks since I took it apart and I was a little fuzzy on where everything went.  I had one minor hang up in trying to slide the motor assembly down onto its gearing. It just didn't want to engage.  I finally figured that a piece of the plastic shell was interfering with keeping it square. I cut it away and it dropped into place immediately. With an extra helping hand, it could probably have been pushed out of the way...  See the picture.
Now I just need to adjust the lasers and make sure everything is square.
 

Attachments

  • IMG_0683.jpg
    IMG_0683.jpg
    757.6 KB · Views: 873
  • IMG_0685.jpg
    IMG_0685.jpg
    1.3 MB · Views: 1,375
Nicely done, a cheap Kapex can’t be bad.
Just thought I’d mention, you have the auxiliary fences mounted the wrong way, the smaller tapered ends go towards the blade. 👍🏻
 
  Just to update.  The right edge laser was misaligned when I got it and clearly had never been adjusted as I had to punch the decal to get at the set screws.  The adjustments required excessive torque on the set screws and wouldn't stay in adjustment anyway. I took it apart to take a look.  The lasers appeared to be solidly in place. What ended up working was lubing the set screw threads. It then only took just a few minutes to follow the instructions in the manual and get it tweaked.  So if your saw lasers have not been adjusted in years. be warned the set screws may be corroded.
 
EdWilliams said:
  Just to update.  The right edge laser was misaligned when I got it and clearly had never been adjusted as I had to punch the decal to get at the set screws.  The adjustments required excessive torque on the set screws and wouldn't stay in adjustment anyway. I took it apart to take a look.  The lasers appeared to be solidly in place. What ended up working was lubing the set screw threads. It then only took just a few minutes to follow the instructions in the manual and get it tweaked.  So if your saw lasers have not been adjusted in years. be warned the set screws may be corroded.

Thanks for the info, I think you will get real satisfaction using your Kapex, more than the usual amount that other users get, because you brought the saw back to life and got to see how it all goes together and works.

Fair play to you  ;)
 
Yes the steps you feel is the magnets in the fields.Dont worry about that,I have not time to read all the answers so sorry if i repeat someone elses comment.Also there is now a revision on electronics and armature (armature white and comes as set with electronics at least about europe)
 
  The replacement armature I put in looked a little different to the original - but it didn't bundle with any electronics.  I suspect I don't have the "new improved" motor.  OTHOH, I'm just a hobby woodworker, so it hopefully will last a while.
 
I think you did get the new improved one,but maybe because you are not 240v it is not in bundle or something.you are doing fine!!!
 
Back
Top