Floating shelves new technique

Crazyraceguy

Member
Joined
Oct 16, 2015
Messages
4,887
There has been some office leap-frog going on for the last few days at work. One person moved into the empty office vacated by the former shop foreman, then it cascaded through 4 others.
As a result, the first one needed some new floating shelves, since the last ones I made stayed in his old office.
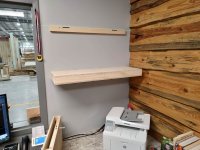
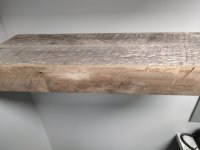
The live-edge siding has been on that office wall for a few years, so it was decided to stick with that rough aesthetic. I had quite a bit of that barn wood left over from the last bar I built.
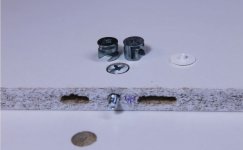
This was somewhat of a surprise project, with no commercial hardware in stock. I came up with this experiment, using the Lamello Zeta Clamex connectors.
The main cleat is 1" thick Poplar, cut to the same width as the 1/2" ply core, with more of that 1" Poplar as the receiving end of the connectors. All of this just clips to the wall and is easily removable. It is very solid, far better than most surface-mounted hardware out there.
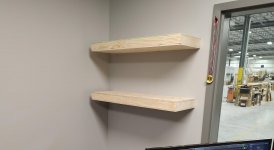
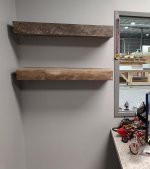
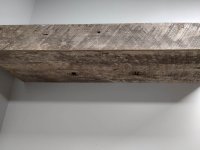
The barn wood sleeves just slip right over. If you "attach" them a little more firmly with magnets this design could be used as a stash spot. There is no need for that here. It's pretty much just display space.
 

Attachments

  • Floating Zeta.jpg
    Floating Zeta.jpg
    288.7 KB · Views: 257
  • Floating ply.jpg
    Floating ply.jpg
    162.6 KB · Views: 192
  • Floating left side.jpg
    Floating left side.jpg
    139.9 KB · Views: 201
  • Floating right.jpg
    Floating right.jpg
    211.3 KB · Views: 156
  • Floating surface.jpg
    Floating surface.jpg
    218.3 KB · Views: 173
Nice work, that's really clever doing it that way! I just got a delivery of the various connectors so I'm just itching to use my Zeta!
 
[member=75933]luvmytoolz[/member] this method worked out very well for me. I made the back cleat to fit flush to the back of that plywood shell, with the hope that the thickness would help to straighten any bow in the walls. The plan was that, if the fit was too loose, I could run the back side across the jointer, to tighten it up.
The Clamex connectors will pull a small gap closed, but it's not much. Your fit has to be pretty close.
I had one that was a little bit too tight, wouldn't catch, but when I installed the other one first, it pulled the wall enough to allow the other one to latch properly.

I wouldn't store my bowling ball collection on them, but that's as much the fault of metal studs as anything. They are plenty sturdy for normal display items.
If the studs were wood (and you didn't care about removability) you could put some wood glue in the Poplar joint and do chin-ups off of them  [big grin]

The Zeta is a fantastic addition to your tools, you will really like it.
 
Interesting and nice but I have some questions.

You created the ply shelves and then laminated each of the 5 surfaces with barn wood?

How much weight will the double Clamex/Zeta connectors support?

Could 3, 4 or more Clamex connectors be added for additional load sharing?

Would they be a good alternative to the cleat system for garage/shop shelving?

How do you tighten the Clamex connectors? Through an access hole in the bottom of the shelf?

And then to more interesting & distracting tidbits:
The photo of the HD dresser at the rear of the photo looks like a phone...is that correct?

 
smorgasbord said:
Interesting approach.
I thought if I were going to do a floating shelf I’d check out this hardware:

That's the hardware I'm familiar with using.
 
We did not have this specialized hardware when I put up a floating shelf.  We just drilled 3/8” hole into the edge of the shelf on 14” centers.  Then we used dowel centers to mark the location on the wall, and drilled there too.

I know that floating shelves are popular now, but I don’t like them.  It is in human nature to try to understand things around them.  And even if you know how the floating shelf is mounted, the mounting method is still occupying a part of your mind, detracting from whatever is on display.

I much prefer a minimalist shelf bracket instead.
 
[member=58857]Crazyraceguy[/member], rather than the Clamex, in your experience, do you think the Festool connectors could be used? Would they work in this tension application? Thank you, Michael.
 
Michael Paul said:
[member=58857]Crazyraceguy[/member], rather than the Clamex, in your experience, do you think the Festool connectors could be used? Would they work in this tension application? Thank you, Michael.

If I understand CRG's method correctly, I'd say so, as long as the stock is thick enough for use with the connectors.

Even this might work with the dominoes (min. 16mm thickness) though it's nowhere near neat in execution as the Clamex:

https://www.leevalley.com/en-ca/sho...rdware/40049-knock-down-fittings?item=00W9501


Attachments

  • floating.JPG
    floating.JPG
    32.5 KB · Views: 48
Cheese said:
Interesting and nice but I have some questions.

You created the ply shelves and then laminated each of the 5 surfaces with barn wood?

How much weight will the double Clamex/Zeta connectors support?

Could 3, 4 or more Clamex connectors be added for additional load sharing?

Would they be a good alternative to the cleat system for garage/shop shelving?

How do you tighten the Clamex connectors? Through an access hole in the bottom of the shelf?

And then to more interesting & distracting tidbits:
The photo of the HD dresser at the rear of the photo looks like a phone...is that correct?

Yes, the ply core is complete and self contained. It could be used exactly as-is, if you painted it or covered in some other way. It's only 1/2", so pretty light, but enough to be structural.

The barn wood piece is an also self-contained unit. It is a shell the slides over the plywood base. It's about 1/4" taller in the ID and 1/2" wider in the ID, so it slides over easily and just rests there by gravity, the gap going toward the bottom of course. I did that for a couple of reasons. First, there are no visible fasteners. Second, for expansion/contraction.
The barn wood panels were planed to 3/8" thickness, the front/sides to 3/4" with a 3/8" x 1/2" rabbet.
The front/sides mitered into a [ shape, and the panels glued to them, only across the front and a couple of inches down the sides. They were then pinned in place, both directions in the rabbet. This will allow for some movement without tearing itself apart.

I have no idea how much force the Clamex connectors will take in tension, which is all they will see here. That was part of the experiment. I could have added more, but it adds to the complexity, of course. The Clamexs are near the top, because that is the best for resisting the leverage, so the access holes are in the top of the plywood part. In fact, you can see the hex key sticking in one of the connectors, where the shelf is sitting on the desk. That was part of the design of having the barn wood parts being separated, they cover the access holes.
The shear force is controlled by the Poplar cleat on the wall.

As far as in a shop situation, sure why not? Though making them with less depth would probably be better, for supporting more weight. These are almost 13" deep.

Yes the red HD is a phone, actually as you will see in the added pic, 3 of them are phones. There are 2 that are the same (except for the base) the other phone is the older springer with the sidecar.

[member=77266]smorgasbord[/member] The problem with those, as well as many others, is that they require a perfectly drilled hole. Generally this is also deeper than the travel of most drill press quills. The really nice ones, like you posted, also require drilling into the studs. That doesn't work in this application because of metal studs with the wall thickness of the average beer can. They also require multiple studs in acceptable locations, neither of which I had here. There is only 1 stud behind each of them, at 24" centers.
If this had been planned in advance, something similar would likely have been ordered, but as previously mentioned, not ideal in this case anyway.

Michael Paul said:
[member=58857]Crazyraceguy[/member], rather than the Clamex, in your experience, do you think the Festool connectors could be used? Would they work in this tension application? Thank you, Michael.
I certainly don't see why not. They do a similar enough job, but I have no hands-on experience with the Festool connectors. As ChuckS mentioned, this could be done with Dominos too, but they will not draw the joint together. You would also have to run a couple of screws down into the Poplar cleat, through the plywood skin. But at that point, the Dominos really aren't doing anything anymore.

Packard, that 3/8" rod solution depends not only on the studs (and location) but the accuracy of the drilling. I have seen some Youtube videos of people really struggling with that. Plus, there is still nothing pulling them tight.

a pic with some stuff on them.
 

Attachments

  • Floating last.jpg
    Floating last.jpg
    406.7 KB · Views: 61
Back
Top