fignewton
Member
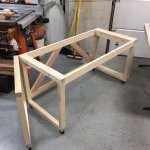
My sister is opening a quilting/embroidery/sewing store and wants about 16 dual-purpose tables. She wants a sturdy table to set the machines on for students. She also has craft guilds that want to meet in her store a couple of times a week, so needs larger table surface area for their meetings. And she wants to be able to roll them all back to an area where they won't take up as much room when not needed. I had seen a cool table at Costco and liked the design, so I adapted it and this is the prototype I built for her.
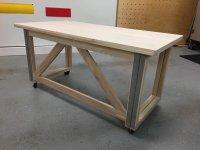
Tops are ~60 x 30 cut from one 60 x 60 sheet of 19mm birch ply. Working height is 29" on the casters. Leg sets are 2x2s of ash, and I used ash for the apron, stretcher, and diagonals. All planed to true 4/4. Used 10mm dominoes for the leg sets and 8mm for the apron, etc. Base unit leg set bolts through the apron with 3/8 countersunk bolts. Sourced the stainless .070 piano hinges from McMaster-Carr (expensive!) 3" for the legs and 1.5" for the top. Tops are edged with ash, and it rolls on 6 2.5" casters I got from Lowes. Altogether, I have about $250 in this one. Now that I have the process steps and measurements figured out, I think it will take about 9-10 hours total for each additional table. There is some economy of scale in cutting, but many or the other steps (like the 60 screws in the top hinge) just take a fixed amount of time. Right now they are just sanded; she will probably leave the bases natural with clear poly, but stain the tops in a reddish color.
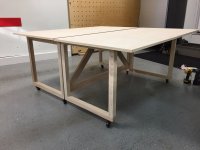
I think this could be scaled to be an interesting MFT asssembly table in open configuration, using a different type of leg device that would let it drop down to the floor for stability. I've seen some Rockler sets that would prob work for that.
Was a fun project; waiting for her to come get it to see if there other design changes she'd like to make.
Tops are ~60 x 30 cut from one 60 x 60 sheet of 19mm birch ply. Working height is 29" on the casters. Leg sets are 2x2s of ash, and I used ash for the apron, stretcher, and diagonals. All planed to true 4/4. Used 10mm dominoes for the leg sets and 8mm for the apron, etc. Base unit leg set bolts through the apron with 3/8 countersunk bolts. Sourced the stainless .070 piano hinges from McMaster-Carr (expensive!) 3" for the legs and 1.5" for the top. Tops are edged with ash, and it rolls on 6 2.5" casters I got from Lowes. Altogether, I have about $250 in this one. Now that I have the process steps and measurements figured out, I think it will take about 9-10 hours total for each additional table. There is some economy of scale in cutting, but many or the other steps (like the 60 screws in the top hinge) just take a fixed amount of time. Right now they are just sanded; she will probably leave the bases natural with clear poly, but stain the tops in a reddish color.
I think this could be scaled to be an interesting MFT asssembly table in open configuration, using a different type of leg device that would let it drop down to the floor for stability. I've seen some Rockler sets that would prob work for that.
Was a fun project; waiting for her to come get it to see if there other design changes she'd like to make.