Frames, frames, and more frames.

mrFinpgh

Member
Joined
Oct 30, 2015
Messages
568
Last fall, we somehow ended up purchasing a number of prints and posters.  Since then, I have been intermittently making frames for them.  This has been a good exercise in learning about framing that doesn't involve 2x4s.  I thought I would create a new thread to share them and add to it as more frames come in.

One benefit of this has been working on cutting my miters by hand. I always need to clean them up with the shooting board, but I am ending up with much tighter miters than I have ever previously gotten.  So I suppose it has been good practice using my plane for shooting miters.

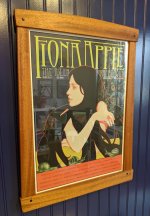
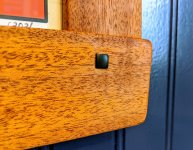
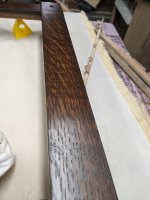
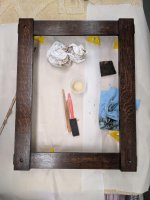
I just finished this one today - a poster my girlfriend has been hanging onto for years and it has never had even a plastic frame that was properly sized for it.  In this case, the wood is lyptus and the plugs are 1/4" ebony.  The joints are all dominoes.  [big grin]  The finish is Osmo polyx. 

View attachment 1

View attachment 2

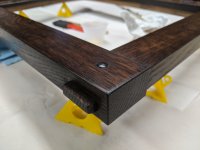
This one is a gift for a friend who is an aspiring writer.  The frame is Catalpa and it has a few coats of ultra blonde shellac finish.  I really like the smell of Catalpa when cutting and planing it.  However, it is a pain to do finish prep - it scratches very easily and willingly.

View attachment 3

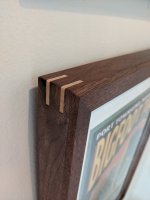
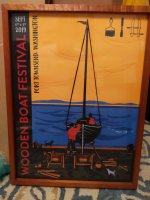
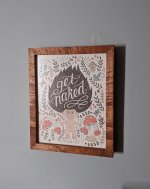
Last one(s) are three in air dried walnut with curly maple splines.  Finish is Osmo. Inspired by a vacation in the Pacific Northwest that we took last fall. The Sasquatch thing is big there, and there were lots of whimsical chainsaw carvings of bigfoot all around. It's something we look back on fondly, especially now when it might be some time before we can responsibly return.

View attachment 4

View attachment 5

I think I'm down to four remaining posters. Looking forward to exploring some new techniques with them, including doing a veneered frame.  I'm not really sure how I will do that one yet, but i think I may veneer over solid wood so I can easily shoot my miters.  The idea of shooting MDF just doesn't sound like a good time.


Attachments

  • IMG_20200517_180415.jpg
    IMG_20200517_180415.jpg
    123.2 KB · Views: 220
  • IMG_20200517_180616.jpg
    IMG_20200517_180616.jpg
    221.8 KB · Views: 195
  • IMG_20200423_093332.jpg
    IMG_20200423_093332.jpg
    1 MB · Views: 209
  • IMG_20200403_175728.jpg
    IMG_20200403_175728.jpg
    714.1 KB · Views: 218
  • IMG_20200403_175652.jpg
    IMG_20200403_175652.jpg
    152.2 KB · Views: 179
Beautiful job!

Got to love a nice splined mitre.

This one is Brushbox and Maple.

b6062ae183ddbfe288a305637fccd2b1.jpg


Sent from my iPhone using Tapatalk
 
mrFinpgh said:
I thought I would create a new thread to share them and add to it as more frames come in.

I think I'm down to four remaining posters. Looking forward to exploring some new techniques with them, including doing a veneered frame.  I'm not really sure how I will do that one yet, but i think I may veneer over solid wood so I can easily shoot my miters.  The idea of shooting MDF just doesn't sound like a good time.

Nice job, very nice job...any detail shots available on making the splines or cutting the splines or making the ebony plugs or shooting the miters? How were the rebates made?  Hand plane, table saw, router table, hand held router or jointer?

Just some thoughts for the next go-around of show & tell.  [smile]
 
I appreciate the positive comments, guys.

[member=44099]Cheese[/member] I'm terrible about documenting things as i go along.  Part of it is just not thinking to pick up my phone and take a shot, part is because my shop/basement is usually terribly messy (I'm working on this..), and I'm sure part is because I figure for most folks this is all old news.

I suppose one interesting element is that I don't own a tablesaw, so I make a lot of use of the router table. I use my router table to cut the rabbets - usually rabbeting the stock before joinery for mitered frames.  For the g+g type looking ones I wait until after, and the experience is like standing in the way of the output side of a wood chipper. 

Splines - I have a little jig that I use with a slot cutting bit, again on the router table.  The splines themselves, I just eyeball and rip at the bandsaw, then clean w/ a block plane to fit.  Trimming all happens with a flush cut saw and the block plane.

The ebony plugs are kind of interesting - i used the William Ng method this time around, chucking a piece of 1/4" square ebony in a drill and running against a cushioned piece of sand paper, working up to 1200g.  I don't have rouge, so I just stopped at 1200 - plenty shiny. 

I use the lee valley punch for square holes.  I make sure to polish the outside up to 8000g (on the side of the stone) - it seems to help a lot w/ the cutting action.

I will keep documentation in mind, though, for the next one.  I have a Perrier poster which has a future in the kitchen (another project I failed to document). I'm planning to do some veneers and different species, so it should be at least one or two new techniques to try out.  Maybe I'll get around to making a scratch stock for some beading.
 
I made a few frames a while back. I really enjoyed it!  There is a thread here somewhere that had some more details.

593932d9339d5905cd1b806eac045444.jpg


Sent from my iPhone using Tapatalk
 
[member=21412]bkharman[/member] that's really nice.  Is that maple inlay?  Did you do the matting as well?

a couple more from the archives:

Quartersawn white oak with through tenons and a finish consisting of black/medium brown dye, shellac, gel stain, more shellac, and arm r seal:

View attachment 1

View attachment 2

View attachment 3

Spanish Cedar with walnut splines.  Finish is Osmo.

View attachment 4

Neither I nor my girlfriend know much about boats, but we happened to be in Port Townsend that week so we went.  It was a great experience.
 

Attachments

  • 4860612808889001533.jpg
    4860612808889001533.jpg
    701.2 KB · Views: 171
  • IMG_20191220_114841.jpg
    IMG_20191220_114841.jpg
    1,011.2 KB · Views: 132
  • IMG_20191220_114348.jpg
    IMG_20191220_114348.jpg
    410.9 KB · Views: 169
  • IMG_20191220_114308.jpg
    IMG_20191220_114308.jpg
    560.1 KB · Views: 170
mrFinpgh said:
[member=21412]bkharman[/member] that's really nice.  Is that maple inlay?  Did you do the matting as well?

Thanks!  Yes, maple inlay and splines. Funny enough, the photos are reproductions from the turn of the century to the start of WWI. They are the tall stacks of Cincinnati. Boats! 

be208a836f008d8372e1c8effbd64123.jpg


Love this last frame!  Great work!

Cheers. Bryan.

Sent from my iPhone using Tapatalk
 
Thanks!  Yes, maple inlay and splines. Funny enough, the photos are reproductions from the turn of the century to the start of WWI. They are the tall stacks of Cincinnati. Boats!

Very cool.

This afternoon, some more matting/glazing came in (I ordered it in early April, but the Covid-19 situation delayed the shipment for about 6 weeks).  I was able to get another one assembled, using the leftover Spanish Cedar from the same board as the previous one.

Nothing really noteworthy here except for some really nice figure in the wood.  That made for an interesting time prepping the surfaces.  I used a krenov style smoothing plane with a 10 degree back bevel for most of it, and it handles the curl quite well.  By the time it's assembled, I usually need to use a scraper, so I end up sanding to 150 before applying the Osmo.

View attachment 1


Attachments

  • IMG_20200523_183958.jpg
    IMG_20200523_183958.jpg
    1.1 MB · Views: 142
Back
Top