French Cleat Storage Wall

lunchman

Member
Joined
Mar 19, 2015
Messages
123
As I continue organizing my shop, moving things from the garage down into the basement, storage becomes a higher priority. The shop is only 11' x 17', so it's tight but doable. I finally moved my workbench into it this week and now find it would be nice to have more items downstairs and avoid running up to the garage to retrieve things.

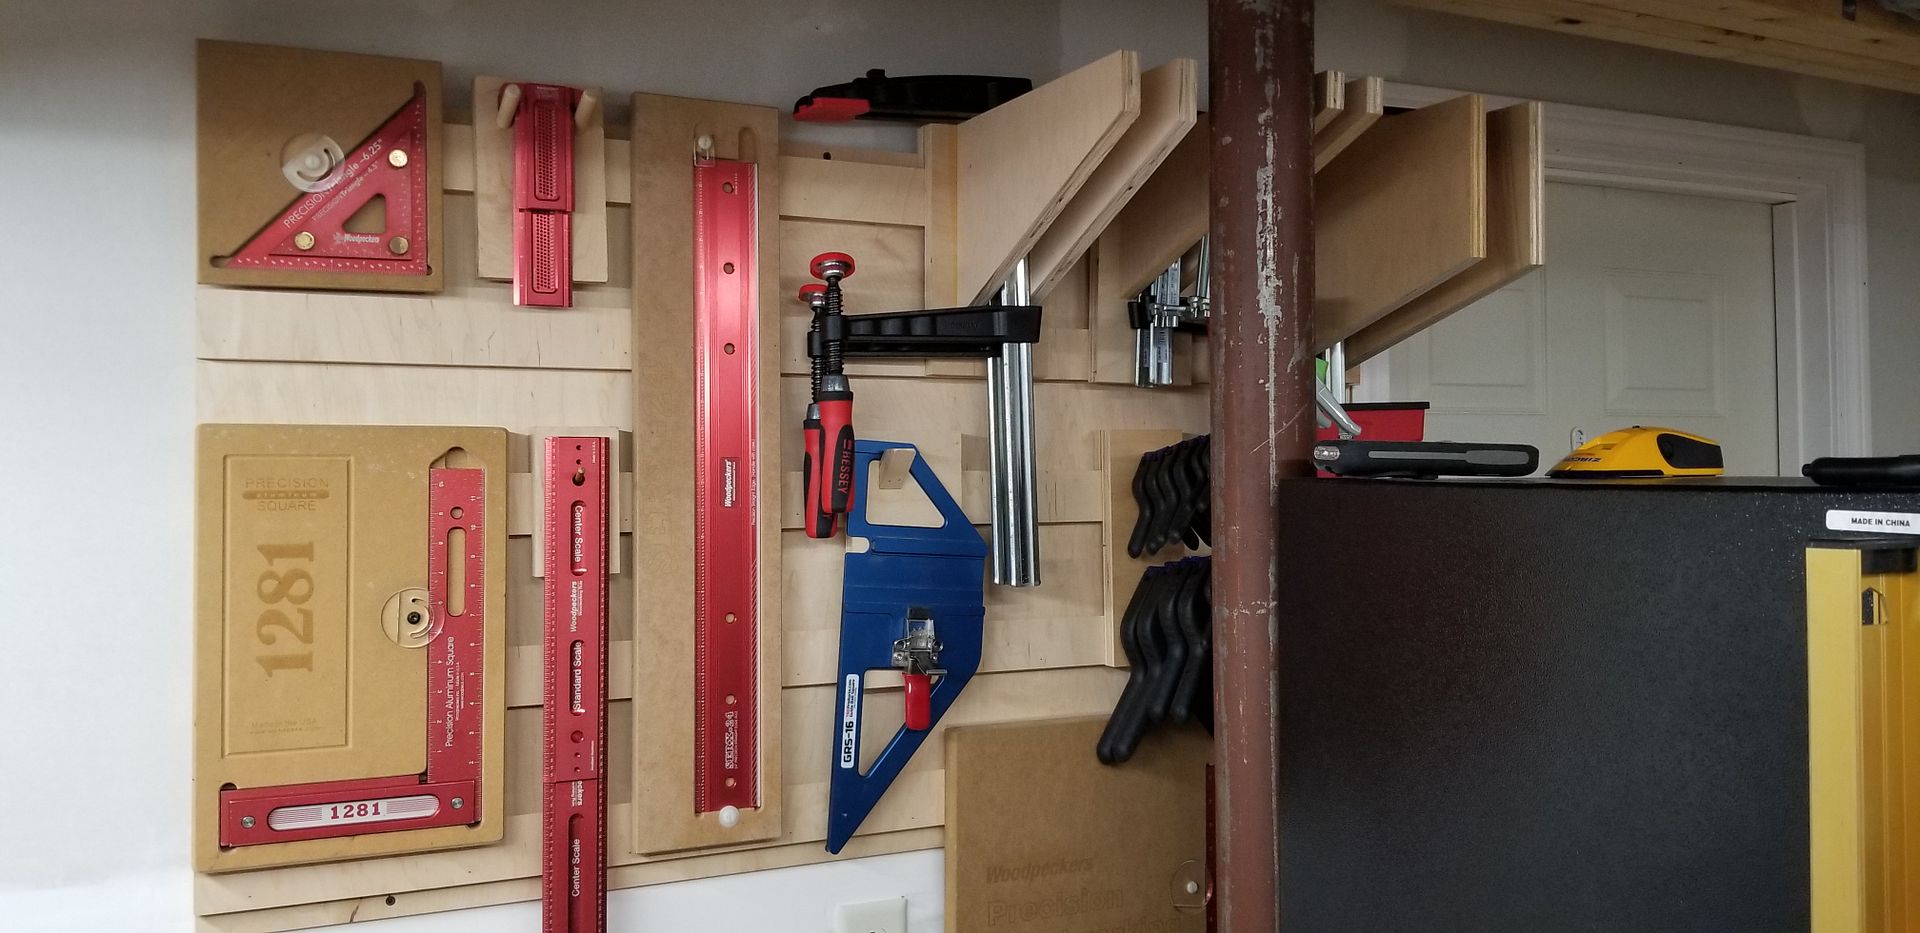
I took some ideas from Frank Howarth's videos on his office cleat wall and decided that would be great for the shop. I wanted to avoid simply screwing things here and there on walls, changing my mind and leaving holes everywhere. I've used up a bunch of scrap plywood I've had from previous projects and built the first wall section. It's simply 1/2" plywood with 3/4" French cleats. The 1/2" ply is screwed to the wall studs. All the hangers are 3/4" plywood. The intent is to easily move things around as needed.

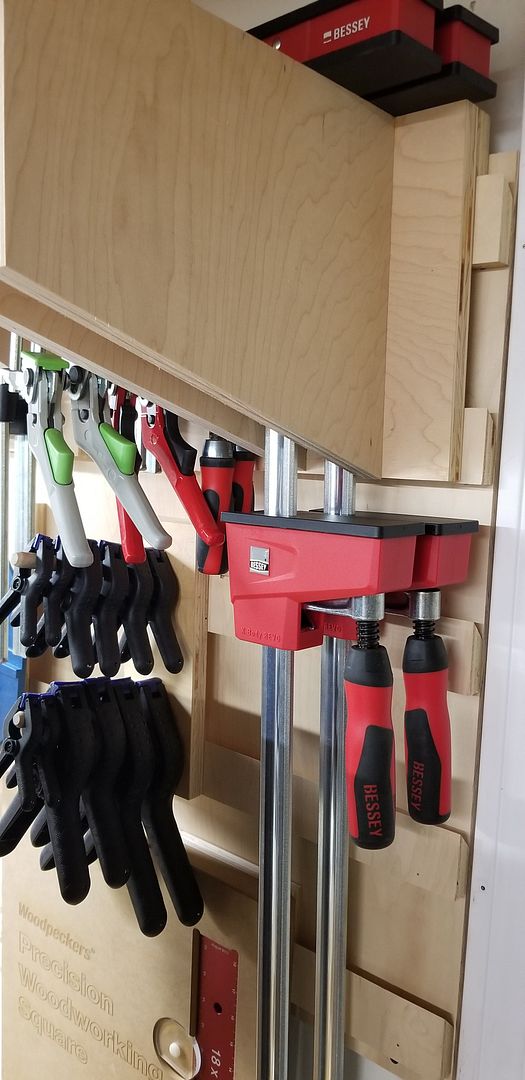
First off: clamps. Although I don't own a ton of clamps, the ones that I have are where ever I can fit them in the garage. The pipe clamps are the only ones actually hanging, the remainder are placed under benches. All the clamp hangers came from ideas found on a Woodcraft website. Each holder accommodates six clamps. The pipe clamps and others I own can remain hanging in the garage for now.

Next up: Woodpeckers tools. The only item that has ever been hanging in its holder is the 1281. Everything else has been under the workbench. I simply attached French cleats to the back of the Woodpecker fixtures and made dowel hangers for the TS-3 and TS-6 and the rulers.

This is only wall storage location #1. I intend to build a lot more of these and right now, it's holding clamps and Woodpeckers gear. I anticipate that this area will be used for all clamps, the Woodpeckers gear will get moved over the workbench. This took only a few hours to put together and as I need holders, it's easy to knock one together. This section is all of 28" x 48".


And from the other side -


I'm amazed at how useful this system has already turned out to be. I intend to build some storage containers, bins, whatever. All depends on what is needed and how much scrap ply I have on hand.

Regards,
-Dom
 
I will be following along closely as I'm still organizing my 12x16 basement shop. Did you cut the cleats with a track saw or table saw? I only own a track saw.
 
DynaGlide said:
I will be following along closely as I'm still organizing my 12x16 basement shop. Did you cut the cleats with a track saw or table saw? I only own a track saw.

I cut them all to width first (4") with the TS55, then ripped them at 45 degrees on the table saw to "try" and get two equal sized pieces - which turned into a math problem. Where to position the fence to yield two equally sized pieces at 45 degrees, accounting for the kerf? I decided to do some web searching as I'm sure this has been asked before and every answer I found was "trial and error", then rip the taller piece to width. Not what I was expecting.

I should have taken note of the setting, but I was close. One half was about a 1/4" taller than the other and in this case it doesn't matter if they're slightly off. But figure you've got to set the middle of the saw blade where the dimension will actually be 2". Not easy when the saw is tipped at 45 and you really need the midpoint in both width and height. It was close enough for shop fixtures but I really should have written down my fence setting. When I cut more I'll take better notes.

I'm sure this can be done with the track saw, but I'm not a real fan of cutting bevels with the track saw, particularly on narrow stock.

-Dom
 
To counter the narrow stock issue couldn't you do your 45 cuts on one big wide sheet... Then rip to width after rather than try to do it the other way around?
 
I'm not sure I'm totally following you on this. Cutting the bevels first would still leave you with narrow strips to deal with at some point, wouIdn't it?

f you're cutting with the track saw and want to work with as large a section of sheet under the track as possible for safety reasons, I suppose you'd have to switch back and forth between cutting at 0 and cutting at 45 degrees. It's probably safer cutting that way but sort of a pain to keep changing the saw bevel.

My intent when I cut my strips was to cut all the straight cuts, then switch over and do all the bevel cuts. I just found it easier to use the table saw for the bevel cuts (rather than the track saw) and make use of the Gripper push blocks for safety.

 
The way DynaGlide described is how we usually do the cleat cutting. I was making four sets of cleats for cabinets this afternoon:

Stock width: 6"
Set the fence to 3" mark and blade at 45*
Rip the stock
Set the blade at 90*
Use the narrow cleat to set the fence
Rip the wider cleat to the same width of the narrow cleat, IF DESIRED which isn't necessary for cabinets.

 
I do pretty much the same thing then ChuckM with one small modification.

I use 1x8 poplar set the blade at 45deg cut in half. Set the blade at 90deg run the two pieces to get the same width. Than I move the fence ~1/16" to remove the sharp edge.
 
Fine Woodworking uses a 40 degree angle for French cleats instead of 45.  Anyone know why?
 
RobBob said:
Fine Woodworking uses a 40 degree angle for French cleats instead of 45.  Anyone know why?

I read some where that the degree doesn't matter down to 30deg. The beauty of 45deg is that you have two identical pieces that you cannot mix up.
 
Mario Turcot said:
RobBob said:
Fine Woodworking uses a 40 degree angle for French cleats instead of 45.  Anyone know why?

I read some where that the degree doesn't matter down to 30deg. The beauty of 45deg is that you have two identical pieces that you cannot mix up.
That happens at all angles, the top one always is identical to a bottom one rotated by 180° (along the axis through the long side).

Possible a smaller angle give a less sharp exposed edge (thus adds a bit more stability to it) which makes it slightly nicer to grab at the cleat when lifting from the ground and a little easier to clean the bottom groove (that forms between the bottom part and a straight wall) as it's a little wider, should material accumulate there. Also slightly reduces the height you have to lift the thing for insertion/removal, which could make it a bit easier to handle.

Or they just started with 40° at some point (for whatever reason, even be it that they just had setup the saw wrong on the initial prototype) and have simply reached 'we have always done it like this' country...
 
RobBob said:
Fine Woodworking uses a 40 degree angle for French cleats instead of 45.  Anyone know why?

A smaller angle would mean a taller cleat, which would mean more stability in some situations—more height to stop someone knocking an item out of its cleat. It would also mean that the forces on the load hold it even closer to the wall. As a thought experiment, imagine the opposite—a 90 degree angle—the load would be easier to knock off accidentally and the forces would not pull it in towards the wall at all.

However, if you make the angle too small you have the issues that:
- being taller and thinner, a very low angle wooden cleat is more likely to break (wall cabinet fixing brackets, which effectively take the angle pretty much to 0, can only work in metal, not wood);
- it’s a PITA to keep changing saw angles, as the angle of the part attached to the load is the complement of the wall part’s angle;
- the wall part and the load part are not interchangeable, so you need to create pairs (so you can’t, for instance, simply cut a spare offcut in half to make a new smaller cleat).

Personally, I think the advantages of 45-degree cleats outweigh any disadvantages.

( Edit: deleted last point, as they are the same. )
 
I did a little rudimentary work in SketchUp and I think with something like this it wouldn't be too hard to figure out where exactly to set your fence to get right in the middle of the piece.

Honestly I'd probably do the 'trial and error' in SketchUp myself than on real stock.  No waste.

I did this for a 1/8" blade at 45 degrees in 3/4" stock that was 2" wide.  I threw some extra measurements on it just so I was sure what I was working with.  That said it looks like you lose 11/64" of width as viewed from the edge of the material with a 1/8" blade at 45 degrees - so if you wanted to rip a 2" block in exactly half you'd need to have the blade, where it comes out of the table, 17/32" from the fence.
 

Attachments

  • su.png
    su.png
    60.3 KB · Views: 515
[attachimg=1]

It wouldn't be hard to use this model to figure out how long to make the stock before cutting cleats to get cleats of the height you wanted either - just push/pull the ends of the stock out in SketchUp until the overall cleat height is what you want.
 

Attachments

  • su.png
    su.png
    25.6 KB · Views: 2,102
Mario Turcot said:
I read some where that the degree doesn't matter down to 30deg. The beauty of 45deg is that you have two identical pieces that you cannot mix up.

How would any angle other than 45 result in two different pieces? 
 
Paul G said:
Mario Turcot said:
I read some where that the degree doesn't matter down to 30deg. The beauty of 45deg is that you have two identical pieces that you cannot mix up.

How would any angle other than 45 result in two different pieces? 
It wouldn't.  If you cut it at 30 degrees, you'll have 30 and 60 on one side of the cut and 30 and 60 on the other side.  In short both cleats would have the same angles.
 
IndyMike said:
Paul G said:
Mario Turcot said:
I read some where that the degree doesn't matter down to 30deg. The beauty of 45deg is that you have two identical pieces that you cannot mix up.

How would any angle other than 45 result in two different pieces? 
It wouldn't.  If you cut it at 30 degrees, you'll have 30 and 60 on one side of the cut and 30 and 60 on the other side.  In short both cleats would have the same angles.
I agree with you, it's simple geometry. I couldn't understand how Mario would get two different pieces.
 
IndyMike said:
Paul G said:
Mario Turcot said:
I read some where that the degree doesn't matter down to 30deg. The beauty of 45deg is that you have two identical pieces that you cannot mix up.

How would any angle other than 45 result in two different pieces? 
It wouldn't.  If you cut it at 30 degrees, you'll have 30 and 60 on one side of the cut and 30 and 60 on the other side.  In short both cleats would have the same angles.
Special math. :)
 
[member=68651]IndyMike[/member], appreciate the SketchUp plans.

I've been looking through a number of YouTube videos and websites for additional items to build and place on the walls, some very good ideas out there. Since I'm limited in shop space, my Craftsman rolling toolbox may need to remain in the garage for automotive tools. My thought is to place as many woodworking tools on the wall and easily accessible rather than having them in drawers.

It'll be a lot of fun coming up with designs. Today I'm focused on finishing the spackling/sanding of the wall my workbench resides on so the cleat storage construction can commence above it.
 
lunchman said:
[member=68651]IndyMike[/member], appreciate the SketchUp plans.
Absolutely.  It only took me a minute or two in order to draw it up - and this is how I'd figure it if I was doing it myself.... That said - I am actually going to be sheathing my walls with 1/2" plywood and putting 3/4" cleats on the walls too.  I am very limited in shop space myself so using the walls that are blank/empty right now is a great way to have things stored where I can not only see them - but readily access them.

lunchman said:
I've been looking through a number of YouTube videos and websites for additional items to build and place on the walls, some very good ideas out there. Since I'm limited in shop space, my Craftsman rolling toolbox may need to remain in the garage for automotive tools. My thought is to place as many woodworking tools on the wall and easily accessible rather than having them in drawers.
I am in the exact same position - I have a fairly large toolbox in my garage that takes up a fair bit of floorspace.  I actually just spent about a whole day re-arranging everything in the garage including unloading, moving, and re-loading several 8 foot shelving units I built.  Basically I took wasted space in various areas in the garage and filled them with things I don't need for woodworking that were taking up my woodworking space.

It's all the same stuff but it feels like the area I have to work with nearly doubled!

lunchman said:
It'll be a lot of fun coming up with designs. Today I'm focused on finishing the spackling/sanding of the wall my workbench resides on so the cleat storage construction can commence above it.
I'm personally planning on having my walls spray-foamed and then sheathing it with 1/2" OSB and painting it white and then installing cleats.  I want to install a mini-split to control humidity and temperature and my garage doors are already insulated.

I'm debating whether I want to paint the sheathing and the cleats white - or leave the cleats wood colored.  I definitely want to paint the OSB because I really hate the way it looks when it's plain!
 
Back
Top