"Frontline" True 4-Way Panel Clamps Review

luvmytoolz

Member
Joined
May 17, 2021
Messages
2,140
Location
Oz
Frontline Interlocking (Panel) Clamps Review

Hi all, as a woodworker I always greatly appreciate product reviews to help determine the value and usefulness of tools, so I'm taking the liberty to re-post a review I did years ago on a primarily Aussie members forum, as I'm hoping it may be of benefit to others here as there doesn't really seem to very much on this product anywhere outside Australia even though it's sold world wide.

Disclaimer: My apologies in advance as this fairly comprehensive review might be a bit lengthy and is based purely on my opinion and experiences, which may not align with yours, or others views. In essence, I wanted to detail the many reasons I became such an immediate fan of Frontline Interlocking clamps, along with as many technical details as possible, so people can see exactly why these are so different to anything else in this market, and are well worth every cent.

Spending large amounts of hard earned cash can be daunting for anyone, especially if you aren't entirely sure what you buy will work as required or will potentially be a waste of money. I think we're all guilty of having bought tools thinking they'll be perfect for an intended purpose, only to find they didn't perform as advertised, were difficult in some aspect or function, or just a damn PITA to use generally.

That's exactly the opposite of how I felt when I first got my Frontline clamps some 25 years ago, and it was further reinforced the first time I used them. Any thoughts I'd had of "well that was a helluva lot of money spent" went out the window, and I have never regretted them a single day since!

While these clamps can be more expensive and/or prohibitively so for most hobbyists or casual DIY'ers, and I hear loads of comments to that effect in the forums, the value for money these clamps provide is just astounding. They are purpose built and borne out of a need of a (clearly very entrepreneurial) professional woodworker who ran a large cabinet making company for many years. So after looking at them, and especially after using them, it's quite obvious they are not only designed to perform, but are also built to a standard, not down to a price. There's a number of very good reasons why you'll see these clamps used extensively in cabinetry and furniture making businesses in Australia, instead of other types or brands of clamps.

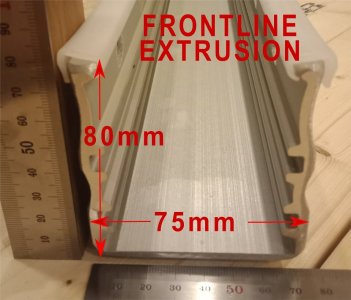
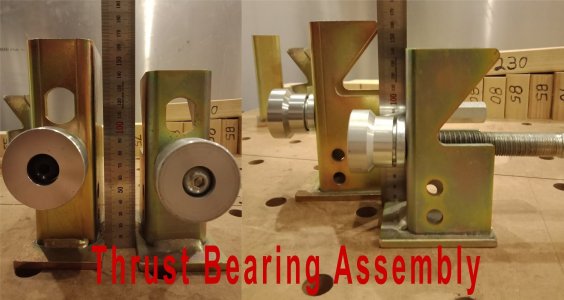
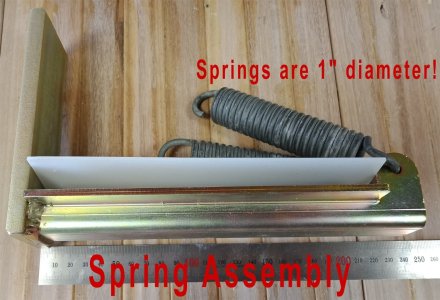
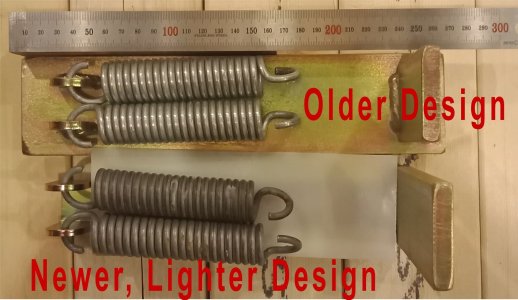
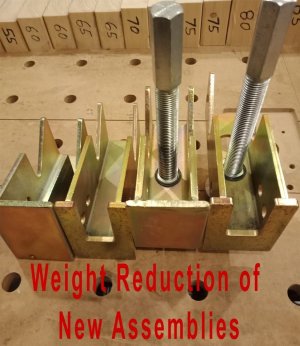
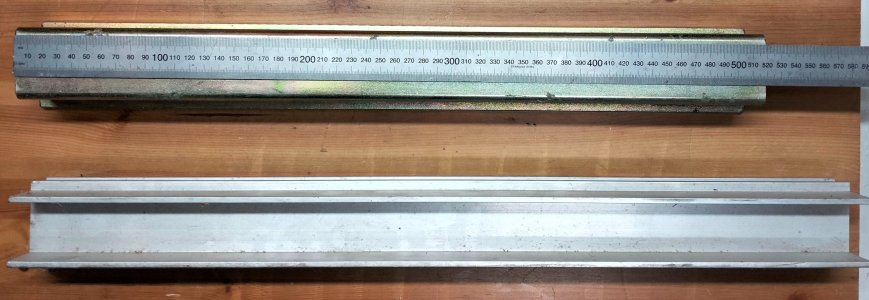
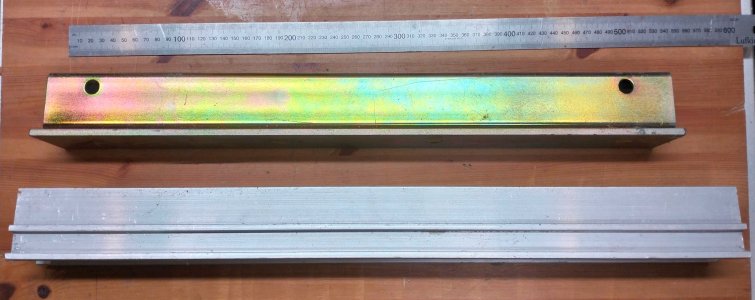
I can see numerous ways in which the inventor Con could have chosen to save on materials, manufacturing costs, increased limits, etc, but of course all at the expense of the high standard he set. Do the assemblies really need 10mm thick hardened steel plates? probably not, would one high quality spring instead of two do the job? maybe, does the aluminium profile really need all the edges chamfered when other brands simply square cut the ends of their clamps? not really, etc, etc. But these are the design touches that show the inventors pride in work and help set this product apart from all the other ones on the market, it's immediately apparent absolutely no corners were cut, and everything has been over engineered to guarantee maximum robustness, performance, quality, and longevity.

These are the clamps you buy once, and use for the rest of your life. Or if unfortunately circumstances change, resell them if necessary, as the resale value of these as with all really high quality products is very good, Festool resale type good!

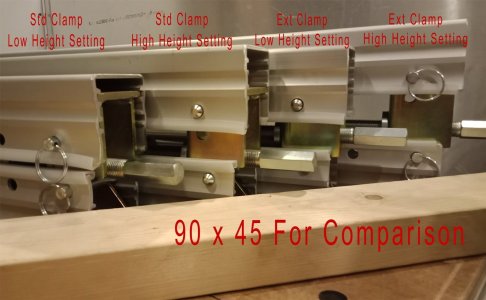
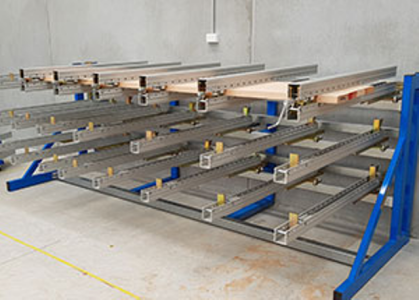
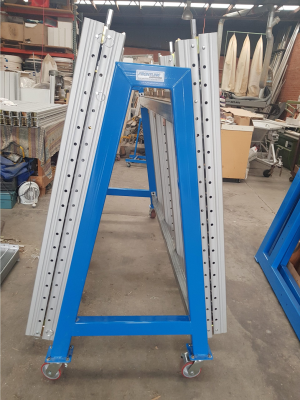
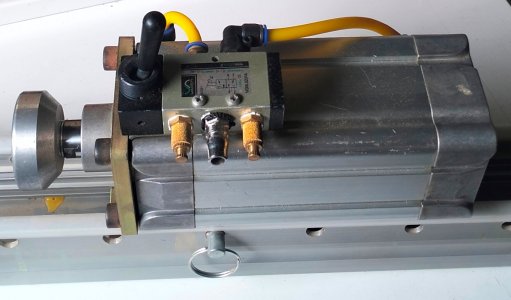
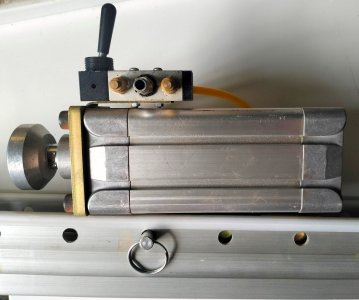
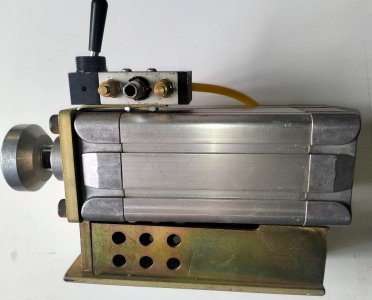
Since I bought my first set of 4 clamps around 25 years ago, I've since added a set of the extended height clamps, some extension bars, some 1.8m clamps, as well a couple of 2.4m ones I use as sash clamps, and a really exciting and incredibly useful pneumatic piston clamp that I'll detail here at a later date when I can.
 
Last edited:
First Glance:

I'll go into more detail on each aspect of the clamps later, but at first glance It's really hard to appreciate just how large, rugged and well designed these clamps are from online pics or videos. Holding them up close however it becomes very apparent that every part has not only been beautifully machined, but also really well designed. It's not until you use them that you appreciate the level of thought and engineering that went into them. The rails measure 80mm high x 75mm wide, and are exceptionally well made and due to the profile, provide a level of rigidity that is astounding.

Con sells clamps in standard sizes of 900mm, 1200, and 1500mm (and longer ones used industrially mainly), in a standard height, and an extended height. The difference between the two is the height of the assemblies. My 1200mm clamp set is 1450mm long overall, and I actually get around 1230mm max clamping width, so it will easily accommodate standard 4' (Imperial) size panels. The handle is Chrome Vanadium steel, and makes winding the leadscrew an effortless task. The 1200mm clamp sets are each a touch under 13Kg, and with the substantial size of the rail profile, sit nice and firmly on whatever surface they're on.

Looking at the end on comparison pics below, the left two clamps are both standard height sets, in low and high mode, the two on the right are extended height clamp sets, also in low and high mode. You can see how the assembly slides into the upper or lower channel to use the low or high mode. The solid locking pins (12mm x 85mm hardened steel) have a spring loaded ball bearing to retain them, and are easily popped in/out of the rails to change the clamping width or height as required.

You can also get nylon protective strips which makes cleaning up really easy. These strips are purpose designed for this profile, and are a very strong, and firm material, getting them onto the rails can be a tricky affair, but is made far easier by simply clamping one end of the rail down to a bench or table to allow you some leverage.

Great review by Stu's Shed (check out his channel!):
Episode 52 Frontline Interlocking Clamp | Stu's Shed

Another great review from Steve's Festool Shed (another great channel)
Part 1: Frontline Engineering Clamps Part 1 - YouTube

Part 2: Frontline Engineering clamps Part 2 - YouTube

Part 3: Frontline Clamps Part 3 - YouTube

Video from Tool Guy republic (starring Con himself!):
Frontline Wood Clamp System - Flatten & Clamp in One Action - YouTube

Video from Con, the inventor of Frontline clamps (again starring Con!):
 

Attachments

  • 01 Rail_Extrusion.jpg
    01 Rail_Extrusion.jpg
    122.6 KB · Views: 5
  • 06 Locking_Pins.jpg
    06 Locking_Pins.jpg
    145.7 KB · Views: 5
  • 05 Chrome Vanadium Handle.jpg
    05 Chrome Vanadium Handle.jpg
    218.4 KB · Views: 3
  • 04 Nylon_Protection_Strips.jpg
    04 Nylon_Protection_Strips.jpg
    171.5 KB · Views: 6
  • 03 End_On_Comparison_2.jpg
    03 End_On_Comparison_2.jpg
    153.5 KB · Views: 8
  • 02 End_On_Comparison_1.jpg
    02 End_On_Comparison_1.jpg
    154.6 KB · Views: 8
Last edited:
Plano / Frontline Comparison:

I don't want to turn this into a turf war or be too negative, and again this is purely based on my own opinions and experience with these clamps, so I won't dwell too much here, especially as I think the attached photos tell the story pretty well!

But what prompted me to finally write this review is in part because of queries/comments over the years regarding Frontline, a true 4 way clamp, and other clamps that claim to be a 4 way clamp, occasionally with references from people who have never seen a Frontline clamp in the wild, let alone held one, make direct comparisons to Plano clamps, homemade bar clamps, and even the Veritas style bar clamp kits, often asserting "no difference bar cost"!

Comparing any of these to a Frontline clamp is like comparing a dowelling jig to a Festool Domino, there just is no comparison and they are NOT like for like!

Out of the very small amount of alternate panel style clamps on the market, Plano is pretty much the only other real commonly available contender to a Frontline style clamp, but in my opinion, after having bought and used them myself, the build quality, performance, and usability simply do not compare to Frontline clamps. As mentioned earlier, in use I found them far too flimsy and finicky, with sub-par results, and I absolutely hated the fiddly mechanisms. I'm sure they have a welcome place and prove useful for many Plano owners and that's great, but they didn't work out that way for me unfortunately.

At the very least though no matter how popular they may be for some, I'm sure most people would agree they are just ridiculously priced given the performance, parts design and build quality, especially given how much more expensive they are in Australia. I know I certainly felt more than a bit ripped off after using them.

The timber seen clamped has simply been placed and clamped, no mallet use or board alignment performed on either clamp set. The thickness did vary slightly with a few boards, 90 x 45 Pine framing being what it is. The Plano clamp set shown (900mm) weighs 3.76Kg total, with a third of the weight (1.225Kg) in the steel mechanisms, so calculating the weight of the aluminium rails (2.535Kg) will make a 1200mm set around 4.45Kg all up including the mechanisms.

The Frontline 1200mm clamp sets weigh in at 12.75Kg for the Standard Height (older design) clamps, and 12.8Kg for the Extended Height (newer design) clamps. The newer assemblies have reduced the weight quite a bit, whilst remaining as strong, if not even stronger due to the enhanced shape.
 

Attachments

  • 01 Clamp_Comparison_1.jpg
    01 Clamp_Comparison_1.jpg
    108.4 KB · Views: 7
  • 02 Clamp_Comparison_2.jpg
    02 Clamp_Comparison_2.jpg
    125.7 KB · Views: 6
  • 03 Clamp_Comparison_3.jpg
    03 Clamp_Comparison_3.jpg
    138.3 KB · Views: 8
Last edited:
Minimum and Maximum Clamping Ranges for the Standard and Extended Height Clamps:

The attached pics show one of each of the Standard Height clamps and Extended Height clamps each in a Low and a High height mode, so 8 pics total. To change the height to be clamped simply involves sliding the metal End Stop and Thrust Bearing assemblies into the upper or lower channel in the rails, suitable for the thickness you want to clamp. The spring loaded assembly stays put.

I've also included pics of two variants showing the pin engagement on the assemblies, as sometimes I tend to push the clamping range to the max, while still maintaining a safe clamping setup so I can squeeze that extra bit of thickness out. As the clamps are forced in opposite directions pulling them against the locking pins, and my clamps in use are invariably out of the way either standing against a wall, or laying on a frame or table, consequently I've never been concerned about the prospect of them coming apart (never had one come apart yet) if it was hit by something sufficiently big/heavy enough. If you were really concerned about running too close to the wind though, you could probably shave 1.5-2mm off the max height to give a larger margin of safety, or whatever you're comfortable with really. Again, it's a 45 degree slot on the assembly that engages the locking pin at each end, so the amount of force holding them in place is quite large.

The ranges as measured on my own clamps:

- Standard Height Clamp Set in Low Height Mode had a range of 10mm - 55mm
- Standard Height Clamp Set in High Height Mode had a range of 33mm - 75mm
- Extended Height Clamp Set in Low Height Mode had a range of 34mm - 80mm
- Extended Height Clamp Set in High Height Mode had a range of 52mm - 105mm

It's important to note though, if you're using the Nylon Protective Strips, you'll need to deduct exactly 4mm total off each of the Min and Max ranges. The strips add exactly 2mm to each clamp.

If you find the Min clamping range is too high for the material you want to clamp, you can simply use a packing strip of MDF or whatever, ideally wrapped in Gladwrap or foil (to not stick) under the timber to be clamped, this will work perfectly fine, and even allow you to successfully do materials as thin as veneers with ease (obviously with a board top/bottom for even all over pressure).
 

Attachments

  • 02 Std_Clamp_Low_Setting_Max.jpg
    02 Std_Clamp_Low_Setting_Max.jpg
    157.7 KB · Views: 8
  • 01 Std_Clamp_Low_Setting_Min.jpg
    01 Std_Clamp_Low_Setting_Min.jpg
    118.2 KB · Views: 8
  • 03 Std_Clamp_Low_Setting_Engagement.jpg
    03 Std_Clamp_Low_Setting_Engagement.jpg
    254.7 KB · Views: 8
  • 04 Std_Clamp_High_Setting_Min.jpg
    04 Std_Clamp_High_Setting_Min.jpg
    127.9 KB · Views: 7
  • 05 Std_Clamp_High_Setting_Max.jpg
    05 Std_Clamp_High_Setting_Max.jpg
    146.8 KB · Views: 7
  • 06 Std_Clamp_High_Setting_Engagement.jpg
    06 Std_Clamp_High_Setting_Engagement.jpg
    140.7 KB · Views: 7
  • 07 Ext_Clamp_Low_Setting_Min.jpg
    07 Ext_Clamp_Low_Setting_Min.jpg
    140 KB · Views: 6
  • 08 Ext_Clamp_Low_Setting_Max.jpg
    08 Ext_Clamp_Low_Setting_Max.jpg
    149 KB · Views: 6
  • 09 Ext_Clamp_Low_Setting_Engagement.jpg
    09 Ext_Clamp_Low_Setting_Engagement.jpg
    146.1 KB · Views: 5
  • 10 Ext_Clamp_High_Setting_Min.jpg
    10 Ext_Clamp_High_Setting_Min.jpg
    136.3 KB · Views: 5
Sash Clamp Mode:

Each clamp set can also operate in a high or low sash clamp mode using either the end assembly or the spring assembly from the bottom rail, along with the thrust bearing assembly from the top rail as shown.

This is incredibly useful for quick and simple glue ups, and as the rail profile is so wide, it sits flat and stable, unlike the precarious nature of traditional sash clamps that always seem to want to flip on their side.

Another thing to note is the shape of the rail profile itself, this is no cheap tube or square walled rail like most cheap clamps are, these are maximised for rigidity, so that even in sash clamp mode, they will strongly resist any tendency to bow, unlike pipe/sash clamps which seem to have a mind of their own in use!
 

Attachments

  • 01 Sash_Clamp_Mode_1.jpg
    01 Sash_Clamp_Mode_1.jpg
    216.2 KB · Views: 4
  • 02 Sash_Clamp_Mode_2.jpg
    02 Sash_Clamp_Mode_2.jpg
    198.1 KB · Views: 4
  • 03 Sash_Clamp_Mode_3.jpg
    03 Sash_Clamp_Mode_3.jpg
    843.9 KB · Views: 4
Thrust Bearing Assembly:

Out of all the well machined and designed components with these clamps, nothing screams quality and thoughtful engineering to me as much as these bearing assemblies, just feast your eyes on all those beautifully machined parts! A huge chunk of machined aluminium with a very large, good quality (German I believe) thrust bearing, so no matter how much it's tightened, you get no lift or shift of material whatsoever! Pretty amazing really, I certainly have never had clamps that thought of such a simple and obvious, but very crucial and helpful detail like that. And I don't think I've even seen others designed like that from my recollection.

I know from my CNC machine and spindles that good quality thrust bearings are quite expensive, so the manufacturing and material costs certainly couldn't be cheap for this assembly!

As you can seen by the attached pic, this assembly is a very sizable and impressive bit of kit, and can achieve an absolutely astounding amount of force when clamping. In fact it is pretty easy with not much effort at all to over tighten the clamp and end up really crushing the timber, which is why you would always want to have an offcut of timber between the panel to be glued and the clamp ends.

The leadscrew, 3/4" or M19 thread by the look, allows you to apply large amounts of force gradually and very smoothly, instead of the clunky, aggressive pitch on a lot of other clamps, and it can be moved into a lower or upper position on the assembly depending on how you're using the clamps, and the size of the timber. Generally though, unless you are using the clamp in sash clamp mode, you would probably never move it from the default position. Or maybe that's just me being lazy.

The leadscrew as mentioned prior does also allow a very generous ~112mm travel, which you may not think matters that much, but it is extremely useful in practice to not be bound by a small amount of travel with a clamp.

I've been using my set close to 25 years now, and must admit I probably tend to apply too much of a death grip, but my set has no detectable wear or issues of any kind, despite the staggering amount of use over the years. I have no doubt they'll well and truly outlast me!
 

Attachments

  • 01 Thrust_Bearing_Assembly_Front.jpg
    01 Thrust_Bearing_Assembly_Front.jpg
    200.9 KB · Views: 4
  • 02 Thrust_Bearing_Assembly.jpg
    02 Thrust_Bearing_Assembly.jpg
    103.6 KB · Views: 5
  • 03 Leadscrew_Travel.jpg
    03 Leadscrew_Travel.jpg
    114 KB · Views: 4
Spring Assembly (True 4-Way Clamping):

The two massive (1" diameter!) springs on these assemblies are what helps apply the clamping pressure across the face of the material, forcing the top and bottom clamps to slide in opposite directions using a simple yet absolutely ingenious, angled inter-locking mechanism, this exerts a tremendous amount of pressure on the faces which first aligns the boards dead flat, before any side pressure has even been applied! This is the meaning of a true 4-way clamp. Once the sides have been clamped, the whole assembly is dead flat, and straight, and the clamps can exert something along the lines of 4 ton pressure, so you can really apply a massive amount of force!

The clamps come supplied with a piece of polycarbonate that protects the assemblies from any glue drips.

If I can work out a way of measuring the actual force applied I'll do that down the track, but in use I've found the force is enough to flatten quite thick (~45mm), and somewhat twisted boards (as can be seen by the twisted 90 x 45 Pine framing in the pic comparing the Plano to the Frontline).

Obviously if they are overly twisted/cupped, etc, and depending on what type of timber it is, it might well be that nothing short of magic will automatically flatten them so they might need a few hits with a mallet. Boards that are quite bowed but glued together along the face, not the edges, will usually work out just fine. I've made a few work tops over the years for mates out of quite bowed and lightly twisted 90 x 45 Pine framing, and they have held up well I've been told despite the abuse given to them.

Thin boards (~8mm-13mm or so) no matter how bowed/twisted (within reason) seem to come together and stay that way pretty fine I've found, thicker boards (~19mm-30mm or so) if not too bowed/twisted generally work out just fine. Going thicker than that with ideally minimal twisting/bowing also tends to work out fine usually. Again, common sense applies, if you're gluing up boards that are that twisted and especially if it's a dense hardwood, you'll likely find that in use the timber will naturally (and sometimes quickly) fracture, or work the joins apart to find equilibrium anyway.

It's important to note, in order to let the springs do their job in flattening the panel faces before side pressure is applied, you need to leave some space, 2-3 inches is good, between the boards being glued up and the thrust bearing assembly, so the springs have room to extend, thus putting pressure on the clamp rails to ensure flatness of the panel. Again, very thoughtful design has ensured you have around 112mm travel, leaving plenty of room to spare! No bruised knuckles when clamping up!
 

Attachments

  • Spring_Assembly.jpg
    Spring_Assembly.jpg
    244.9 KB · Views: 4
Last edited:
Design Improvements/Evolution:

Con hasn't been standing still with his original clamps design, and has been refining and improving certain aspects of them, although there's not really much that can be improved upon, he has managed to reduce the weight of the hardened steel assemblies with a new, and even stronger design. I won't detail all the differences here, but as an example, the (older design) Standard Height Spring Assembly at 270mm long x 142mm high weighs in at 1.675Kg while the (newer design) Extended Height Spring Assembly at 230mm long x 166mm high weighs in at only a fraction more at 1.72Kg, whilst further increasing the strength and rigidity of this component. Without the improvements to weight reduction, the Extended Height set I would have estimated to come in around the 14.5Kg mark all up based on the existing older design components in my set.

I believe he has also recently changed to a new stronger Aluminium alloy that has allowed him to reduce the weight while maintaining or increasing the overall strength. I'll try to find out more about that and update here at a later date.

The pneumatic piston clamps for these rails are also just amazing, and I'll endeavour to add a comprehensive review on them when I can. Although they really are more an industrial purpose tool.
 

Attachments

  • 01 Old_&_New_Spring_Assemblies_1.jpg
    01 Old_&_New_Spring_Assemblies_1.jpg
    223.7 KB · Views: 4
  • 02 Old_&_New_Spring_Assemblies_2.jpg
    02 Old_&_New_Spring_Assemblies_2.jpg
    147.5 KB · Views: 4
  • 03 Weight_Reduction_1.jpg
    03 Weight_Reduction_1.jpg
    116.3 KB · Views: 5
Mobile & Stationery Racks:

To allow more efficient use of space when clamping any size or quantity of panels, Con also has a range of custom racks in single and multi tiers, in horizontal and vertical inclines.

In my shed I use several of the small "A" frame mobile stands shown in the last 2 pics for smaller glue-ups, I find these are insanely useful being compact and mobile.

For longer panels I simply screwed a timber rail to the wall for the clamps to rest against held in place with a clip from the top, and a piece of framing on the floor to push the bottom of the clamps 4" out, so it's practically vertical but won't tip over, and takes up very little space in use. This simple but effective setup can be seen in the crudely rendered pic.
 

Attachments

  • 04 Mobile & Stationery Racks.png
    04 Mobile & Stationery Racks.png
    9.3 KB · Views: 7
  • 03 Mobile & Stationery Racks.png
    03 Mobile & Stationery Racks.png
    438.2 KB · Views: 7
  • 02 Mobile & Stationery Racks.png
    02 Mobile & Stationery Racks.png
    2.4 MB · Views: 8
  • 01 Mobile & Stationery Racks.png
    01 Mobile & Stationery Racks.png
    311 KB · Views: 7
  • 05 Mobile & Stationery Racks.jpg
    05 Mobile & Stationery Racks.jpg
    1.1 MB · Views: 5
  • 06 Mobile & Stationery Racks.jpg
    06 Mobile & Stationery Racks.jpg
    1.7 MB · Views: 4
Last edited:
Clamp Rail Extenders:

Con makes (or made? I'll confirm this) 2 types of extender insert bars, both made to his very high standard of over-engineering. One is an Aluminium Alloy, and the other is made from steel, but I'm not sure atm whether he still produces both or just one now. They can be used in pairs to assemble very long panel clamps, or singular to make a long sash clamp. The Aluminium sample one below hasn't been drilled yet, but the insert pin holes can be seen in the steel one, giving an incredibly rigid result helping to keep the extended rails straight and inline.
 

Attachments

  • 01 Expansion Bars.jpg
    01 Expansion Bars.jpg
    201.2 KB · Views: 3
  • 02 Expansion Bars.jpg
    02 Expansion Bars.jpg
    517.7 KB · Views: 3
  • 03 Expansion Bars.jpg
    03 Expansion Bars.jpg
    413.5 KB · Views: 5
Last edited:
The angled brackets are just ingenious and such a time saver as they give an instant positive lock without any fussing around. So once they're setup, assembling a glue-up is really quick, even when using Domino's.

Putting spring loaded bearings in the pins is another indication of the thought that went into every aspect of these clamps, such a simple trivial little thing, but so incredibly practical and useful, you never need to worry about anything moving when you least want it too.

When I was using my old T type sash clamps many years back, the pins would fall out if you looked sideways at them, I was so glad when I got rid of them all.
 
where do you buy these? manufacturer website lists no pricing or online sales or dealer contacts. the website is all about filling out a form like its 2005
 
where do you buy these? manufacturer website lists no pricing or online sales or dealer contacts. the website is all about filling out a form like its 2005
I've always just emailed or rung up when buying, I think he used to supply a US distributor but I think all his sales are now direct out of his factory in Morwell Aust.
 
Back
Top