Glue line router bit - faulty bit or technique?

ryanjg117

Member
Joined
May 18, 2015
Messages
329
Router bit I am using:https://www.ebay.com/itm/115797974586

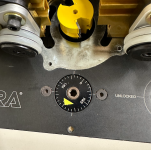
I won’t confess how much time I spent today fiddling with this bit to get it dialed in (complicated by the discovery that it was slowly lifting out of the router table collet while in use, a bit concerning). After reefing on the collet with two beefy wrenches, I’m confident it will stay put.

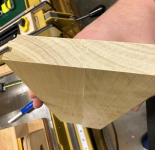
I have fence set to the inside-most cutter and have micro adjusted it perfect. Through plenty of test cuts, I also have the height set perfectly.

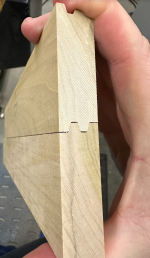
However, I can’t get the joint to close up. I can tell the surfaces are coplanar, but there’s a 1/32” gap that I can’t close even with heavy clamping force.

[attachimg=1]

To me, it looks like the tongue is too thick for the groove. I’m thinking at this point it’s probably a defective bit, and I should just go bite the bullet on the $60 Freud equivalent, but just wanted a quick sanity check that I’m doing something wrong.

Adjusting the fence further forward or back doesn’t help.
 

Attachments

  • bit.png
    bit.png
    1.1 MB · Views: 277
Solved it, with some additional labor. I took the "up" panel and ran it through the router again, this time adjusting the height +/0 three ticks on the Incra plate, which I think corresponds to .0117" of total offset. The boards fit together perfectly now. Incra precision to the rescue.

This is what happens when you use a router bit you found at a garage sale.  [mad]

[attachimg=1]

[attachimg=2]
 

Attachments

  • bit2.png
    bit2.png
    1.1 MB · Views: 247
  • bit3.png
    bit3.png
    1.1 MB · Views: 248
I was about to post agreement that it is a bad bit…

I can’t understand how changing the height lets the boards fit closer together?
 
Michael Kellough said:
I was about to post agreement that it is a bad bit…

I can’t understand how changing the height lets the boards fit closer together?

It narrows the tongues and widens the grooves, allowing them to lock together.
 
Michael Kellough said:
I can’t understand how changing the height lets the boards fit closer together?

This style of bit is "reversible." It doesn't mean you reverse the bit, but rather the two mating workpieces. One is run face-up, the other face-down. So by very slightly altering the height of the first board, I'm essentially widening the groove that the other boards' tongue will fit in to. Since I can see it's the side of that tongue that's rubbing and preventing closure, I figured this would work. Looks like it does.

A PITA to do for my project, and a step that should not be necessary if it was a good quality bit. But this project is fairly small - making panels for bathroom vanity.
 
So you ran the boards through for a second pass after adjusting the height slightly?
 
Does one of the boards have to be run twice, at slightly different cutter heights?

Hah! Luvmytoolz beat me by less than a minute.
 
Michael Kellough said:
Does one of the boards have to be run twice, at slightly different cutter heights?

Hah! Luvmytoolz beat me by less than a minute.

Running it through twice is the only thing that makes sense to me if the height was the only thing adjusted as stated, as the the curves are relative to each other and would simply shift the cut up/down on the timber. Moving the fence in/out slightly, now that would then alter the fit.
 
I can 100% attest to how critical bit height is to get perfect mating surfaces. My own personal nightmares often revolve around matching male/female bit sets for doing cope & scribe joints on window sash bars. Having just built 12 x vast schoolhouse windows each containing 18 x 4-pane casements - mismatching joints will arise if the female cutter is out seemingly by the height of a human hair or so it seems.
 
woodbutcherbower said:
I can 100% attest to how critical bit height is to get perfect mating surfaces. My own personal nightmares often revolve around matching male/female bit sets for doing cope & scribe joints on window sash bars. Having just built 12 x vast schoolhouse windows each containing 18 x 4-pane casements - mismatching joints will arise if the female cutter is out seemingly by the height of a human hair or so it seems.

With female cutter you're talking panel bits aren't you? As this is a single cutter that you flip the timber over to then mate. You could raise/lower it, and the only change I could possibly see is you increase the over/underhang on the faces, because the middle section is still the same, just moved to a lower/higher point.
 
Hi ryanjg117,

I'm glad to hear that you were able to dial-in your glue line cutter. 

I regularly use a glue line shaper cutter produced by Rangate to glue up panels and bottom rails for doors:https://rangate.com/products/deep-groove-glue-joint-cutter

One tip I can suggest is to take a full reference cut when using this kind of bit. So, you were on the right path by aligning the fence with the minor diameter of the cutter, but I'd suggest subtracting one full millimeter (and setting your out-feed fence to accommodate the offset). This technique helps to account for irregularities in the edge, and serves as one last edge-jointing pass while you're producing the joint.

So, if you look at the tool drawing:

[attachimg=1]

you'll see the minor diameter is 130mm. So, I'll set my out-feed fence to 130mm, and my in-feed fence to 129mm.

Glad to hear you're getting the hang of the cutter, it's one of my most-used tools.
 

Attachments

  • Image 2-1-24 at 6.14 AM.jpeg
    Image 2-1-24 at 6.14 AM.jpeg
    403.8 KB · Views: 178
It looked like Ryan already had a full depth cut (fence set to minor diameter).
If true the boards should have fit tightly together even if the surfaces were offset (wrong cutter height), so I thought the bit was defective.

I think the depth of cut was a little too shallow and raising the cutter a little and making a second (additional) cut was sufficient compensation.

Was the second cut required on every other board or all of them?

Like Tom said, with this type of cutter you need to overcut initially while dialing-in the fence and height settings.

 
Michael Kellough said:
It looked like Ryan already had a full depth cut (fence set to minor diameter).
If true the boards should have fit tightly together even if the surfaces were offset (wrong cutter height), so I thought the bit was defective.

I think the depth of cut was a little too shallow and raising the cutter a little and making a second (additional) cut was sufficient compensation.

Was the second cut required on every other board or all of them?

Like Tom said, with this type of cutter you need to overcut initially while dialing-in the fence and height settings.

Hi Michael,

Technically, if the in-feed fence is set to the minor diameter it's not taking a full cut, as the minor diameter portion of the cutter would be skipping along the surface of the work and not actually taking a cut. The only way to ensure a full cut is to have the entire cutting surface in positive contact with the material, therefore the additional 1mm on the in-feed fence.

One benefit of the above-described full contact "jointing cut" is that your material doesn't need to be perfectly milled prior to profiling. For instance, with the in-feed fence set to the minor diameter, you need a perfectly milled edge to ensure a proper milling pattern. On the other hand, with the in-feed fence set to Minor Diameter - 1mm, I can go from ripping on the bandsaw directly to the shaper without an intermediate stop at the jointer to edge-joint (I'll also use a shaper set up with a rebating head if I have miles of edge jointing to perform).

The other benefit of going with a full-reference cut is that it's actually more forgiving if the fence position isn't perfect, For instance, if you're aiming for perfect alignment with the minor diameter and you're actually at Minor Diameter + 0.3mm, then the joint won't close. Whereas, if you're setting up for Minor Diameter - 1mm and you're off by 0.3mm, you're still getting a full profile (though there might be a little snipe).

 
Tom Gensmer said:
One tip I can suggest is to take a full reference cut when using this kind of bit. So, you were on the right path by aligning the fence with the minor diameter of the cutter, but I'd suggest subtracting one full millimeter (and setting your out-feed fence to accommodate the offset). This technique helps to account for irregularities in the edge, and serves as one last edge-jointing pass while you're producing the joint.

Tom, good tip on offsetting the router fences. That would help me skip the edge jointing step in the future if I found myself doing these en masse. However, this would not have solved the narrow groove issue that prevented the pieces from closing up, correct?
 
Interesting discussion, who'd think when purchasing a router bit that you'd have to check the geometry to make sure it works as advertised.  [eek]

Another good reason for going with known performers.
 
ryanjg117 said:
Tom Gensmer said:
One tip I can suggest is to take a full reference cut when using this kind of bit. So, you were on the right path by aligning the fence with the minor diameter of the cutter, but I'd suggest subtracting one full millimeter (and setting your out-feed fence to accommodate the offset). This technique helps to account for irregularities in the edge, and serves as one last edge-jointing pass while you're producing the joint.

Tom, good tip on offsetting the router fences. That would help me skip the edge jointing step in the future if I found myself doing these en masse. However, this would not have solved the narrow groove issue that prevented the pieces from closing up, correct?

Hi Ryan,

The full profile/"jointing cut" should solve the issue of the joint not fully closing, assuming the cutter had the proper geometry to start with, and assuming the geometry hasn't been changed by attempts as sharpening, or accumulation of resins.

For a shaper cutter with insert cutters like I'm using, it's also important to make sure the inserts are aligned properly, both in the vertical axis as well as properly seated in their sockets.

The other issue that might affect fit is feed. I use a power feeder for all of my linear milling, which goes a long way towards ensuring consistent pressure against the table, pressure against the fence, and proper feed rate, never mind improved safety. Really important for this kind of precision milling. I'm a huge fan of the Co-Matic DS400 on shapers, but if you're using a router table you might want to consider a "baby" feeder like the Co-Matic AF12:https://www.shopgearinc.com/products/Junior-Power-Feeder-p492730332

I get a lot of use out of my glue joint cutter, probably one of my top-5 most used cutters. Not only does it increase gluing surface, it really aids in alignment, making panel glue-ups a breeze once you have the machine set-up dialed in.

If you look closely at the Rangate cutter drawing, you'll see that in the "valleys" there's a 0.2mm gap to accommodate glue....
 
Back
Top