"H.O.W." Table Saw Insert Plate with replaceable Inserts for Sawstop

TheSergeant

Member
Joined
Nov 14, 2015
Messages
103
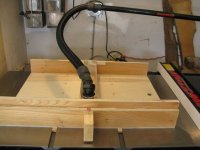
Not sure how many of you have seen this video from "Hooked on Wood" but I encourage you to check it out here

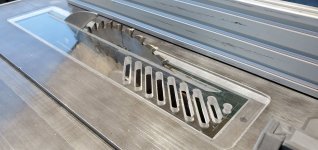
I've been running a very similar insert on my Inca 259 table saw.  I realized how much more effective this was after using a wide dado insert with a 1/4" blade and seeing the dust fly up into the air and then get sucked back down in the insert. 

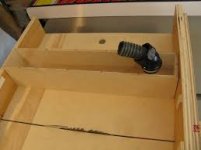
For an insert like this to be effective you really need to have your cabinet sealed as much as possible.  It was an easy effort on my Inca 259 but Sawstop has so many gaps in the cabinet it took some real work.  I sealed all the gaps under the table with pipe insulation, and all the vents, including the front slot behind the handwheel, with magnetic sign material.  I removed the internal hose to keep air moving through the cabinet to keep in clean and the motor cool.  I need to do some testing to see with and without the hose to see what kind of impact it has on cabinet cleanliness, airflow and motor temp. 

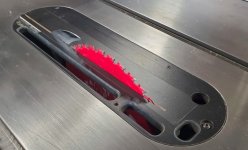
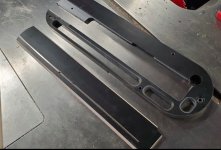
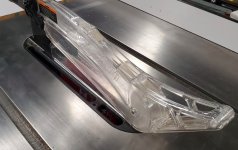
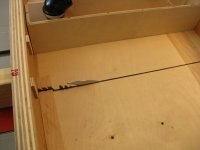
The insert I used was an original sawstop phenolic insert before they went to the lever style.  It was pretty chewed up and I never used it so I had nothing to lose by modifying it.  I machined the insert to accept 1/4" melamine faced MDF inserts like the "Infinity Tools/Colliflower" insert.  I do have a Colliflower insert, which I like but did not want to machine holes into it. 

If you have a table saw and are disappointed with the dust collection I highly recommend this modification.

[attachimg=1]
[attachimg=2]
[attachimg=3]
 

Attachments

  • Screen Shot 2020-04-06 at 12.01.13 AM.jpg
    Screen Shot 2020-04-06 at 12.01.13 AM.jpg
    170.7 KB · Views: 2,327
  • Screen Shot 2020-04-06 at 12.01.37 AM.jpg
    Screen Shot 2020-04-06 at 12.01.37 AM.jpg
    168.3 KB · Views: 2,221
  • Screen Shot 2020-04-06 at 12.01.53 AM.jpg
    Screen Shot 2020-04-06 at 12.01.53 AM.jpg
    170.4 KB · Views: 1,415
Thanks for posting this.  I’ve got a sawstop that I’m trying to improve dust collection on and I think I’ll give this a try
 
I will give it a try too, but I won't seal up all the gaps in my SawStop because at another forum where SawStop has a presence, a SawStop rep. specifically advised against sealing up the cabinet. Is it because it would affect the motor or the finger-saving operation? I don't know.

The dust collection blade guard is already doing a great job (except for edge cuts), and I have two ZCIs so I can modify one to see if there're any differences.
 
I’ve got the contractor model with the motor hanging off the back, so I don’t think the heat would be an issue for mine- but if you have a link to that discussion, I’d like to see it.
 
The reply by the SawStop rep. was at least a year or two old, made to someone asking if it was ok to seal up the front opening with a removable magnetic sheet. Whether the official reply meant anything, I couldn't say, but I've resisted any urge to make the cabinet more air-tight since.

In the YouTube video, the HOW woodworker mentioned about sealing up the cabinet to some extent to increase the air suction. Mine is a PCS which should have a better enclosure than the Contractor model. I will cut two similar slots on the ZCI as shown in the video, and look at the dust collection performance by comparing:

1) slotted ZCI vs un-altered ZCI
2) slotted ZCI with the front opening as is
3) slotted ZCI with the front opening covered.

 
ChuckM said:
The dust collection blade guard is already doing a great job (except for edge cuts)
If you use overhead collection you can modify it for edge cuts. Add a side drop plate to cover the edge. It would be easier and more effective.
The problem with slotted insert is that its useless for non edge cuts, but all other openings are plugged already (per video), which kills airflow.
 
The SawStop dust collection blade guard already has the side drop plates (I call them fins, one on each side).
 
I attached a dedicated Festool vac to the overarm blade guard. It powers up when I turn the saw on. Dust collection is greatly improved over using the standard T connection.
 
Similar hook-up here, used with the iVAC. The dust collector and shop vac are on as soon as the saw is powered up. When the shop vac's noise ceases, I know the blade has come to a complete stop (and that's when I will handle the off-cuts, if any).

When I use the cross-cut sled, I connect the shop vac suction to the dust shroud. In practical terms, cross-cutting is dust-free (dust-less?).
 

Attachments

  • dust shroud.jpg
    dust shroud.jpg
    24.5 KB · Views: 651
  • dust shroud 2.jpg
    dust shroud 2.jpg
    5.5 KB · Views: 390
The additional picture I can find on my computer shows the blocks attached to the front and back fences to allow the shroud to slide up and down for slipping workpieces underneath. The shroud is made of plywood and 1/8" acrylic (polycarbonate?). The elbow was from Lowe's.

If the piece is too short to support the other side of the shroud after being cross cut (as the one shown in the picture), I can add a spacer of similar thickness of the work on the other side before crosscutting.

This dust shroud has been in use for close to 6 years now, offering both supreme dust collection and safety protection at the same time. Those who don't have the SawStop overarm dust collection set-up can use a shop vac for the same result.
 

Attachments

  • dust shroud 3.jpg
    dust shroud 3.jpg
    73.7 KB · Views: 367
I found these videos on how to build a sled that works with a blade guard.  They are linked at:

Cross Cut Sleds that work with a Blade Guard

I haven't built a cross cut sled yet, but this looks like an interesting approach.   

BTW, I am pretty happy with the SawStop blade guard, both for safety and dust collection.

Bob
 
bergjeopbergjeaf said:
Sergeant,

I also have an Inca 259 table saw. Do you have pictures of the insect on your Inca 259 table saw?


Attachments

  • 93687111_725663274921157_2539979947309531136_n.jpg
    93687111_725663274921157_2539979947309531136_n.jpg
    335.1 KB · Views: 1,183
Hi Sergeant,

Thank you for the picture of the Inca Major insert. I really appreciate that.

I really love your video's on Youtube about the inca Tablesaw improvements.

Is it possible that you publish detailed pictures, a drawing or even better a video ([thumbs up]) of the way you handle the dustcontrol of the Inca tablesaw? I live in a small house and have sacrificed my only bedroom to have a dedicated workshop in house. As you understand, dustcontrol is crucial here.

BTW are you also Ryan on the Inca group?

Thank you very much in advance. 

 
TheSergeant said:
bergjeopbergjeaf said:
Sergeant,

I also have an Inca 259 table saw. Do you have pictures of the insect on your Inca 259 table saw?

That’s a nice design. Looks like it would work great for trimming edges on a saw where the cabinet can be sealed from incoming air. Mine can’t. I use a dust extractor hose held near the front of the blade with a magnet.
 
Birdhunter said:
I attached a dedicated Festool vac to the overarm blade guard. It powers up when I turn the saw on. Dust collection is greatly improved over using the standard T connection.

Is there off-the-shelf hardware to connect the Festool vac so that it turns on when the saw is powered on?  Also, what hose are you using?  I have a CT22 with a boom arm that I am thinking of connecting to the Sawstop blade guard with dust port.  I'm thinking the bags will fill up quickly and I'm not sure how much longer bags for the Ct22 will be available.  Maybe a Dust Deputy or such would help with bag longevity.  Any thoughts?  Thanks....
 
As Birdhunter noted, the vac or CT's bag doesn't get filled up quickly because most of the dust should get collected by the under-the-table dust extraction (presumably via a dust collector).
 
I use an IVAC PRO Switch and an IVAC PRO Tool Plus to automatically switch on/off the Mini connected to the SawStop overarm blade guard. The IVAC PRO Tool Plus is connected to the 220v SawStop power cord. when i turn on the saw, the IVAC PRO Tool Plus senses the current flow and supplies power to the Mini. When the saw is turned off, the Mini runs about 10 seconds and then cuts off.

Dust collection improved greatly when i installed this system.
 
Back
Top