shanegrilah
Member
- Joined
- Jan 3, 2009
- Messages
- 55
Gentlemen,
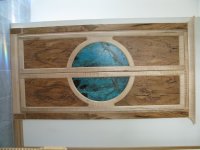
I'm mostly a reader here in the background but thought I post this about a built in cabinet I made for a hallway in my home to replace a 1950's vintage cabinet. The only thing I haven't completed yet are the door handles as I haven't decided what to do yet. Building this was a learning process from start to finish because there were many things I haven't done before. Several steps in the process I ended up redoing more than once.
The wood came from old growth soft maple trees which were in the backyard of my boyhood home. My dad and I took one tree down ourselves and hired a professional to take another two because they were only 12' or so from the house. All three were about 30-36” dia at the base and 25-30' to the first large branch. I hired a guy with a band mill to come in and saw the logs into lumber, stacked it with stickers for a few months to let it dry some before I took it to a guy with a large wood kiln.
The guy with the kiln was a retired teacher with his own stationary saw mill and was very helpful with sharing his knowledge about how the logs should be cut when I told him who I was hiring. He said, “xxxx has made more fire wood than good lumber”. But with his instruction I was able to tell the sawyer what I wanted and everything seems to have turned out OK. I would have had the teacher cut the logs but we didn't have the equipment to move the logs to his mill. Plus his rig was a circular saw with a thicker saw kerf than the portable band mill I hired so I think I ended up with a little more lumber.
One of the trees had a large diseased bulge at the base which was about 3' dia x 4.5' tall. The wood in the cabinet all came from this tree and no stain was used anywhere.
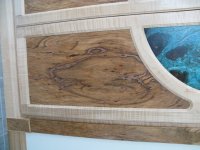
The upper and lower panels in the doors are made from book matched veneer cut from the diseased bulge. I glued the 1/8” thick veneers to plywood which I thought might be a problem so I laminated one test panel on both sides. Didn't matter as it curled up like a potato chip anyway. So I cut three equally spaced horizontal saw relief kerfs nearly through the plywood panels from the back side then covered them with thin strips of veneer. The slots in the rails and styles seem to be holding the panels flat enough.
The veneers did have some large holes in them so I decided to fill it with shredded copper. I stripped the insulation off extra house wiring I had saved just in case I might need a piece. You know the pieces that are always 4” too short and you have to go buy a new roll anyway? I'd tell you how I shredded the wire but some might perceive it as a bit dangerous; not sure I should post here. Used a set of magnifier loupes so I could see while pushing the shredded copper into the cavities in the veneers and not leave any laying on the top. Poured System 3 Mirror Coat over one test panel. The mistake made during this process was doing it in my basement when it was too cold so the epoxy flowed and cured very slow. Yes, I read the instructions but I didn't want to wait months until the basement was warm enough to try this. The porous veneer and gaps in the shredded copper caused air bubbles and a rippled surface in the epoxy. I didn't feel like staying up until the early morning hours with a blow torch to keep breaking the bubbles until they stopped showing up. Sanded the epoxy off with low grit paper. The epoxy did hold the copper in place and sanding gave it a brushed finish. Decided to coat the panel with brush on Deft lacquer then sand with high grit Abranet to get rid of the brush marks and give a satin finish.
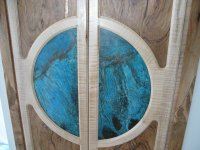
The semi circular panels in the center are made from copper flashing I had leftover from a project on the house. I used contact cement to laminate both sides of 1/4” plywood with the copper. The green/blue color on the copper is created from a process found on “Instructables” using water, table salt and ammonia in a fume chamber. I ended up wire brushing the copper clean after this process more than once because I didn't use enough water the first time. Not enough water causes the copper to just turn a dark brown/black. See the dark spots on the right side panel at the bottom which I left just because I like them. The flowing effect is sort of a happy accident as my fume chamber wasn't level and the water flowed very slowly as it dried. The final blue/green finish is rather delicate and even bubbled up in places. There is one spot that bubbled up so much it is stabilized with thin super glue. The entire panel is stabilized with 3 coats spray lacquer then 3 coats of brush on lacquer. If I had to do it over again I'd probably do more coats because people like touching it for some reason.
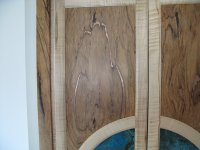
The vertical trim on the sides is made from the same wood as the panels. The wood I had left though wasn't long enough to span the entire height. So I took two narrow pieces, cut them down the center to book match then spliced them along a natural live edge with dominoes. The seam was anything but perfect so I used a v-bit in a router to open it up a little to be able to put some shredded copper in it. Seam is about at the center of the semi circular panels.
The remaining work is more standard woodworking. Sorry for the long post but hope you at least find it somewhat interesting.
Regards,
Shane
I'm mostly a reader here in the background but thought I post this about a built in cabinet I made for a hallway in my home to replace a 1950's vintage cabinet. The only thing I haven't completed yet are the door handles as I haven't decided what to do yet. Building this was a learning process from start to finish because there were many things I haven't done before. Several steps in the process I ended up redoing more than once.
The wood came from old growth soft maple trees which were in the backyard of my boyhood home. My dad and I took one tree down ourselves and hired a professional to take another two because they were only 12' or so from the house. All three were about 30-36” dia at the base and 25-30' to the first large branch. I hired a guy with a band mill to come in and saw the logs into lumber, stacked it with stickers for a few months to let it dry some before I took it to a guy with a large wood kiln.
The guy with the kiln was a retired teacher with his own stationary saw mill and was very helpful with sharing his knowledge about how the logs should be cut when I told him who I was hiring. He said, “xxxx has made more fire wood than good lumber”. But with his instruction I was able to tell the sawyer what I wanted and everything seems to have turned out OK. I would have had the teacher cut the logs but we didn't have the equipment to move the logs to his mill. Plus his rig was a circular saw with a thicker saw kerf than the portable band mill I hired so I think I ended up with a little more lumber.
One of the trees had a large diseased bulge at the base which was about 3' dia x 4.5' tall. The wood in the cabinet all came from this tree and no stain was used anywhere.
The upper and lower panels in the doors are made from book matched veneer cut from the diseased bulge. I glued the 1/8” thick veneers to plywood which I thought might be a problem so I laminated one test panel on both sides. Didn't matter as it curled up like a potato chip anyway. So I cut three equally spaced horizontal saw relief kerfs nearly through the plywood panels from the back side then covered them with thin strips of veneer. The slots in the rails and styles seem to be holding the panels flat enough.
The veneers did have some large holes in them so I decided to fill it with shredded copper. I stripped the insulation off extra house wiring I had saved just in case I might need a piece. You know the pieces that are always 4” too short and you have to go buy a new roll anyway? I'd tell you how I shredded the wire but some might perceive it as a bit dangerous; not sure I should post here. Used a set of magnifier loupes so I could see while pushing the shredded copper into the cavities in the veneers and not leave any laying on the top. Poured System 3 Mirror Coat over one test panel. The mistake made during this process was doing it in my basement when it was too cold so the epoxy flowed and cured very slow. Yes, I read the instructions but I didn't want to wait months until the basement was warm enough to try this. The porous veneer and gaps in the shredded copper caused air bubbles and a rippled surface in the epoxy. I didn't feel like staying up until the early morning hours with a blow torch to keep breaking the bubbles until they stopped showing up. Sanded the epoxy off with low grit paper. The epoxy did hold the copper in place and sanding gave it a brushed finish. Decided to coat the panel with brush on Deft lacquer then sand with high grit Abranet to get rid of the brush marks and give a satin finish.
The semi circular panels in the center are made from copper flashing I had leftover from a project on the house. I used contact cement to laminate both sides of 1/4” plywood with the copper. The green/blue color on the copper is created from a process found on “Instructables” using water, table salt and ammonia in a fume chamber. I ended up wire brushing the copper clean after this process more than once because I didn't use enough water the first time. Not enough water causes the copper to just turn a dark brown/black. See the dark spots on the right side panel at the bottom which I left just because I like them. The flowing effect is sort of a happy accident as my fume chamber wasn't level and the water flowed very slowly as it dried. The final blue/green finish is rather delicate and even bubbled up in places. There is one spot that bubbled up so much it is stabilized with thin super glue. The entire panel is stabilized with 3 coats spray lacquer then 3 coats of brush on lacquer. If I had to do it over again I'd probably do more coats because people like touching it for some reason.
The vertical trim on the sides is made from the same wood as the panels. The wood I had left though wasn't long enough to span the entire height. So I took two narrow pieces, cut them down the center to book match then spliced them along a natural live edge with dominoes. The seam was anything but perfect so I used a v-bit in a router to open it up a little to be able to put some shredded copper in it. Seam is about at the center of the semi circular panels.
The remaining work is more standard woodworking. Sorry for the long post but hope you at least find it somewhat interesting.
Regards,
Shane
") )
)