ear3
Member
- Joined
- Jul 24, 2014
- Messages
- 4,341
Recently learned a great lesson of how hand tools can save the day on a build that I thought I'd share.
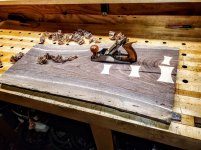
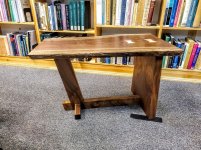
Had a small offcut leftover of the walnut slab I used to do a Japanese style coffee table, discussed here, which I decided to turn around for a similar style, smaller version.
I had a a fail right off the bat, after I added some dutch key inlays in a new style I had never tried. I decided almost immediately to switch them out for new ones using a more usual pattern, but to cover my tracks I had to fatten them up, leading to this ugly outcome.
[attachimg=1]
The fix just proved to be lopping off the end a few inches, leaving in place the slightly less ill-proportioned two smaller keys.
[attachimg=2]
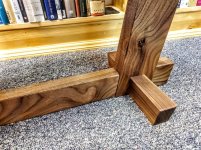
Unlike the original, longer version of the table however, the tripod base on this smaller piece made the table unacceptably tippy at the front. So I was left wondering whether I just hadn't wasted a good piece of wood and quite a few hours.
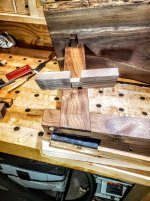
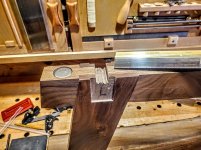
But then I realized it would actually be fairly straightforward to add a cross-piece at the front for additional stability, just as long as I did it precisely.
So I made the cross piece and set about defining the fields for the shallow mortises I would have to cut on either side of the vertical to make it fit.
[attachimg=3]
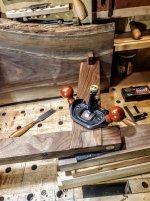
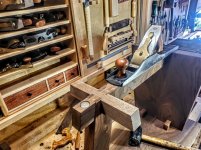
Chiseled out most of the waste, then finished up with router plane to sneak up on a snug fit.
[attachimg=4]
[attachimg=5]
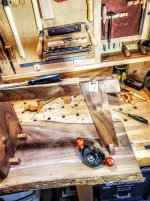
Once I could slide it on, I marked off the crosspiece itself the channel needing to be cut in the bottom
[attachimg=6]
Then got most of the waste out using a dovetail saw (since I was cutting through a joint with both end grain and cross grain), and finished up the final depth again with a router plane
[attachimg=7]
[attachimg=8]
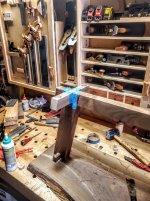
I fit the crosspiece so it was just proud of the bottom, so it could then be planed flush and finally fitted for glue up, taking care to tape around the joint to prevent too much of a mess on the already finished sections.
[attachimg=9]
[attachimg=10]
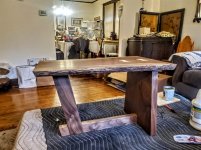
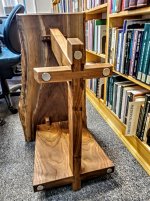
Result was brilliant, and by all appearances looked like I had meant to do it this way from the beginning
[attachimg=11]
[attachimg=12]
[attachimg=13]
[attachimg=14]
So, I'm happy I'm at a point in terms of tools and skills where this sort of thing is possible.
Had a small offcut leftover of the walnut slab I used to do a Japanese style coffee table, discussed here, which I decided to turn around for a similar style, smaller version.
I had a a fail right off the bat, after I added some dutch key inlays in a new style I had never tried. I decided almost immediately to switch them out for new ones using a more usual pattern, but to cover my tracks I had to fatten them up, leading to this ugly outcome.
[attachimg=1]
The fix just proved to be lopping off the end a few inches, leaving in place the slightly less ill-proportioned two smaller keys.
[attachimg=2]
Unlike the original, longer version of the table however, the tripod base on this smaller piece made the table unacceptably tippy at the front. So I was left wondering whether I just hadn't wasted a good piece of wood and quite a few hours.
But then I realized it would actually be fairly straightforward to add a cross-piece at the front for additional stability, just as long as I did it precisely.
So I made the cross piece and set about defining the fields for the shallow mortises I would have to cut on either side of the vertical to make it fit.
[attachimg=3]
Chiseled out most of the waste, then finished up with router plane to sneak up on a snug fit.
[attachimg=4]
[attachimg=5]
Once I could slide it on, I marked off the crosspiece itself the channel needing to be cut in the bottom
[attachimg=6]
Then got most of the waste out using a dovetail saw (since I was cutting through a joint with both end grain and cross grain), and finished up the final depth again with a router plane
[attachimg=7]
[attachimg=8]
I fit the crosspiece so it was just proud of the bottom, so it could then be planed flush and finally fitted for glue up, taking care to tape around the joint to prevent too much of a mess on the already finished sections.
[attachimg=9]
[attachimg=10]
Result was brilliant, and by all appearances looked like I had meant to do it this way from the beginning
[attachimg=11]
[attachimg=12]
[attachimg=13]
[attachimg=14]
So, I'm happy I'm at a point in terms of tools and skills where this sort of thing is possible.
Attachments
-
 20201016_210848.jpg461.2 KB · Views: 603
 -
 20201204_131330.jpg407.1 KB · Views: 600
 -
 20210623_202552.jpg464.1 KB · Views: 606
 -
 20210623_203349.jpg483.8 KB · Views: 605
 -
 20210623_210357.jpg453.4 KB · Views: 592
 -
 20210623_214556.jpg426.8 KB · Views: 587
 -
 20210624_100425.jpg428.8 KB · Views: 570
 -
 20210624_101817.jpg477.9 KB · Views: 566
 -
 20210624_105908.jpg469 KB · Views: 554
 -
 20210624_120803.jpg463.6 KB · Views: 549
 -
 20210701_161617.jpg535.6 KB · Views: 532
 -
 20210701_161702.jpg489 KB · Views: 494
 -
 20210701_161536.jpg543.2 KB · Views: 463
 -
 20210701_161542.jpg536.2 KB · Views: 451