Has anyone built Gary Katz's assembly and cutting table

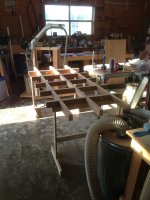
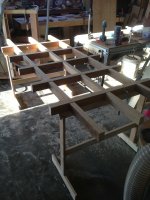
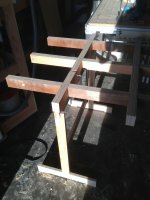
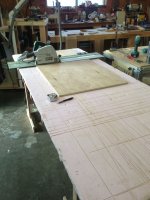
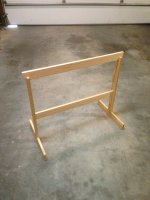
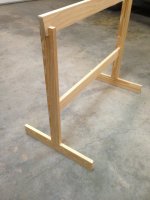
Well I finally got around to making the grid for my cutting table.  Copied the idea from fletchtool.  I'm using my Krenov style sawhorses to hold the grid and it works great.  Very lightweight set up but will hold sheet goods with no problem.  Although not in the pictures I'll be using a piece of pink board on top of the grid. Now the pics.

Rusty

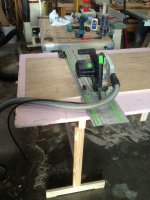
PS Also copied Hemlocks dust collection trolly.  That thing is great.
 

Attachments

  • IMG_1649.jpg
    IMG_1649.jpg
    2.3 MB · Views: 1,345
  • IMG_1650.jpg
    IMG_1650.jpg
    2.5 MB · Views: 1,098
  • IMG_1652.jpg
    IMG_1652.jpg
    2.3 MB · Views: 911
  • IMG_1651.jpg
    IMG_1651.jpg
    2.2 MB · Views: 1,034
Looks great Rusty. I see now why you needed all those rips of plywood.

I spent yesterday fiddling with some cabinet work, making paint-grade end panels and edge banding them, and found another use for the t-bolt clamps used with the MFT and 8020 extensions. It started with just the clamps to rest the bottom of a large panel on & then morphed into the clamps + plywood for narrower panels:

[attachthumb=#]

[attachthumb=#]

[attachthumb=#]

A section of 8020 also became a quickie boom arm, my primary work area being outside:

[attachthumb=#]

[attachthumb=#]

I like that trolly setup. How well does the dust deputy with with a typical shop vac instead of the CT?

Sandy got my CT36, which I replaced with a CT 26 but around the same time I learned of the issue with static and the electronics so I never used my ultimate dust deputy with the new CT26. I was thinking about getting a cheap shop vac and setting it up with the dust deputy, I don't want to risk killing the CT.

Thanks,

RMW
 

Attachments

  • ScreenClip [1].png
    ScreenClip [1].png
    470.9 KB · Views: 1,459
  • ScreenClip [2].png
    ScreenClip [2].png
    676 KB · Views: 1,439
  • ScreenClip [4].png
    ScreenClip [4].png
    452.1 KB · Views: 652
  • ScreenClip [3].png
    ScreenClip [3].png
    992.2 KB · Views: 1,449
  • ScreenClip.png
    ScreenClip.png
    942.4 KB · Views: 1,268
I usually try to do everything as cheap as I can [big grin], so the plywood strips were from an old cabinet I tore apart.  I had already made the sawhorses early on.  Everything looks like it will work just fine.  I could have used single plywood grid but I would have used more pieces so it kinda evens out.
As for the dust deputy, it works great with the little Ridgid vac.  I don't have a CT, maybe one of these days, but for now this set-up works fine.  I got the idea for the trolly from a member named Hemlock.  It was just what I was looking for.
Any progress on the pin holder things for the MFT?  Be sure an let me know when you get those going.

Rusty
 
Ok, here it is in use!  Works very well indeed.  My only complaint is my sawhorses may be a bit high.  I'm only 5' 7" so it seems just a little high for me.  Easy to fix, just make some shorter sawhorses!!!  I'll use it this way for a while and see how it goes.  That's the good thing about this type of set-up, it's fairly easy to get it just like you want.  If you have to make new sawhorses the others can still be used for other things.

Rusty

PS  Also think I'll have to raise the boom arm on the trolly.
 

Attachments

  • IMG_1656.jpg
    IMG_1656.jpg
    2.3 MB · Views: 1,059
  • IMG_1655.jpg
    IMG_1655.jpg
    2.5 MB · Views: 1,064
Rusty -- great post!  Not wure how I missed this earlier, but your post has inspired me.  I had thought about using a similar set-up awhile back and just never got around to making it -- your set-up is very clean and looks perfectly suited to the task.  Great job.

Scot
 
Thanks Scot.  I had a table made from 2 x 4s with some fold-up table legs under it that I've used for quite a while, but it was heavy and had to lean it against a wall so it was kinda hard to store.  This new setup stores easily because there's not much to it.  Everything is very light.  The hardest piece to put up is the foam board, but I really like using it because it supports the whole piece that I am cutting.

Rusty

PS  Let me be sure and give credit where it is due.  Fletchtool is the one that came up with the grid idea, it was my idea for the Krenov style sawhorses mainly because they are very light and not much to making them.
 
Hi Rusty, your setup using the Krenov style sawhorses looks great!! Seeing your build and reading your comments about quick/easy setup has convinced me the Krenov sawhorses have to be one of my next projects (AGAIN).

How thick is the pink foam you are using? Do you think 1/2 inch would work? I haven't used anything before but last week I was cutting up 12 sheets of 1/8" hardboard and it was so wavy, I decided I need to have more support on my grid.

Once more, really nice job on your cutting table!

Fletchtool
 
Fletchtool,
The piece I'm using is about 1" thick.  I'm sure any thickness would work.  I've seen pictures of guys using 2", but all I could find locally was the 1".  As for the Krenov sawhorses, there was an article in Nov/Dec 2009 issue of Fine Woodworking.  You can pretty much figure them out just by looking at them.  I used an 8mm domino to join the foot to the upright, (which could also be used for the lower cross member).  I did do a through mortise for the lower cross member on mine and wedged it.  The nice thing about these is the fact that you can make them any size you want, just do a pair at a time.  You can also use just about any material, although hardwood would be best, I just made mine from yellow pine. If you have any more questions PM me.

Rusty

Although it does show in these pics, I put little 1/4" x 3/4" x 2" pads on each end of the feet to make it easier to set on the floor without rocking.
 

Attachments

  • IMG_1541.jpg
    IMG_1541.jpg
    2.7 MB · Views: 767
  • IMG_1542.jpg
    IMG_1542.jpg
    2.6 MB · Views: 747
Fine saw horses! What is the purpose of the canted ends on the upper crossbar?

I really like yellow pine. Unfortunately we can't get in in the NE (except as pressure treated).
It's easier to get Doug Fir from the NW than it is to get YP  from the SE here.

 
Thanks Michael.  The angled ends on the top rail are just for looks, you can cut them however you like.  Also since they are held in by a screw you could make differ top pieces for different situations.  Like I said about materials you could use cherry or oak or popular or pine or bubinga (if you really want some fancy ones), I mean they are just sawhorses so use what you have on hand.

Rusty
 
Wow, what a GREAT THREAD!

Excellent ideas from RMW, fletchtool, Rusty... And RonWen with the idea to use a Domino tenon instead of a dowel on fletchtool's "grid" device.

Really good read, guys - thanks!

"Has anyone built Gary Katz' assembly and cutting table?"

After studying this thread, does anybody need to?
 
Billions,
Thanks for the comments.  I just love this forum!  I have learned so much and picked up some many good ideas that it sometimes seems impossible to try them all.  I am always looking forward to Richards posts, he is always coming up with great ideas as are so many others here.  All I can say is keep up the good work guys & gals, I know you have plenty more stuff to come up with.

Rusty
 
Spring has arrived in Brigantine!

This weekend and last I got to spend out on lower my shop/deck (today in my steel-toed flip-flops) working on prettying up the area, wrapping the PT deck posts/beams in Azek and installing some vinyl lattice to screen the underside. I also extended the 80/20 modular cutting table and added some goodies to hold tools/squares/guide rails etc. Everything you see sets up/breaks down in 15 minutes and stores on 3 sets of pegs on the shop wall when not in use. The table itself can handle 8' material and sheet goods pretty easily now.

[attachthumb=1]

[attachthumb=2]

[attachthumb=3]

[attachthumb=4]

[attachthumb=5]

[attachthumb=6]

[attachthumb=7]

[attachthumb=8]

The drawback to the open design of the cutting table is there is nowhere to set tools down when not in use, which is hard on precision squares and TS-55's, as I have learned over time. The solution is a bunch of pegs/hooks/brackets to hold stuff between uses. 

The last photo shows the fasteners, they are t-bolts that slip into the slot, when you tighten them the first turn rotates the head 90 degrees and the T engages the 80/20 extrusion. Makes it simple to move stuff around as needed.

One or two more days on the deck honey-do & then I can get back to finishing the shop itself, then on to building the MFT/SYS cart. Someday I may even do some woodworking...

RMW
 

Attachments

  • ScreenClip [14].png
    ScreenClip [14].png
    2.5 MB · Views: 925
  • ScreenClip [13].png
    ScreenClip [13].png
    2.3 MB · Views: 938
  • ScreenClip [12].png
    ScreenClip [12].png
    2.4 MB · Views: 913
  • ScreenClip [11].png
    ScreenClip [11].png
    1.8 MB · Views: 1,189
  • ScreenClip [10].png
    ScreenClip [10].png
    2.5 MB · Views: 1,034
  • ScreenClip [9].png
    ScreenClip [9].png
    2.5 MB · Views: 1,410
  • ScreenClip [8].png
    ScreenClip [8].png
    1.6 MB · Views: 1,718
  • ScreenClip [15].png
    ScreenClip [15].png
    2.1 MB · Views: 965
Richard,
Great to see your post, haven't seen your posts in a while.  Keep coming up with those 80-20 ideas.

Rusty
 
Oh, man- RMW, can we get some details on that extendable leg you've got going?  THat's the holy grail for me and 80/20.

Thanks!
 
Dane said:
Oh, man- RMW, can we get some details on that extendable leg you've got going?  THat's the holy grail for me and 80/20.

Thanks!

[member=3078]Dane[/member]

That leg is made up of a 30/30 profile I traded w/ Rusty to get, and a 1.5" HT (Holey Tube) 80/20 extrusion from eBay. Tap the end of the 30/30 w/ 5/16"-18 and thread in a foot/leveler, then use a 5/16-18 handle and tee nut to secure it. The 30/30 is slightly loose/sloppy inside the HT but not enough to matter.

If this does not make sense I can post some photos.

[member=53]Rusty Miller[/member] - howdy back, & you should recognize the 30/30...

RMW
 
Hey Richard,
Yea, been wondering when I would see some of that 30-30 we traded for being used.  Sure does look good.  Been working on any other goodys lately?  Good to hear from you.

Rusty
 
Back
Top