Help! ETS125eq leaving swirl marks...can't figure out why

Joined
May 23, 2014
Messages
3
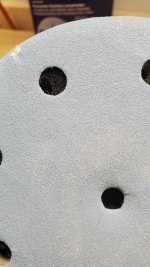
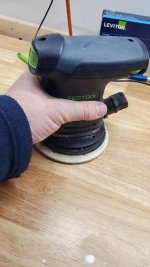
Here's the deal...just bit the bullet and purchased my first festool and couldn't be happier, or so I thought. I'm using the 125 to finish sand walnut and maple.  I Clean the wood and then I usually start with 100grit granat and am noticing immediately after the first pass I'm left with swirl marks.  I then sand through to about 240 (granat) and still have them.  I've read through everything here (I think) and tried all the suggestions of turning down the suction all the way, turning down the speed but just can't seem to figure out what is going on.  I was hoping somebody might have some insight as to what I'm missing or doing incorrectly. Thanks for the help guys.
 
Try cutting the suction of the dust extractor to half.  This will keep the sand paper from digging in and creating the swirls.  If they are still there, ease it down some more.  Don't add any pressure.  I am assuming you are in random orbit mode and not rotary. 

The dust collection is amazing when it it set correctly.  I did a bar in a restaurant with the RO125EQ and a Midi set at 1/2, starting in rotary mode with 80 saphir to remove the old finish.  I went up through 220 before applying marine varnish with a brush.  I lightly sanded with 220 between coats and it came out like glass.  And I never had to dust the bar sinks or the floor in front of it.
 
I use Rubin 2 on my ETS125 because I get better results on bare wood.  And just let the weight of the sander do the job.

Andrew
 
Wonder wino- it's an ets125...no rotary mode, RO only and I've had the suction turned all the way down with the same result.

Andrew- so are you literally just holding the sander down with a finger and letting it do ALL the work?  I'm so used to an old makita and giving it a little extra pressure.

Thanks
 
If you have  brand new ETS125 you might need to break it in. Out of the box, the brushes aren't properly seated yet and need to wear a bit to get the optimal shape to fit the armature. When the brushes aren't seated yet the sander only works with reduced power. After 8 hours of use the sanders is broken in and works at full power. A method often used by people on this forum is to hang the sander by a thread and let it run freely for 8 hours.

The lack of power might be the reason of your swirl marks.    

Edit: just read you start with 100 grit. That is a relatively low grit, and will easily leave swirl marks with any sander. Start at a higher grit.
 
All good suggestions.  What I do when sanding a piece is to turn the tool and CT on at about half suction and then while it is running slowly turn the suction done.  When you hear the rpm's go up on the sander then you know you are about there.  Turn the suction down just a smudge more and am ready to sand.  I often show how smooth my sander is my starting it up and then direct the sander by the hose.

Also don't forget to vac your work between grits!

Peter
 
I probably just let it take the weight of my hand - not my arm.  I'm amazed at just how effective this little sander is.

I've never used it on painted surfaces, and I concluded Rubin 2 gave me better results than Granat and Cristal.

Andrew
 
All of the above, plus make sure to go slow enough, with a steady motion, over a section to allow the orbital motion to cancel any little scratches against the grain. There's a bunch of videos on youtube showing good sanding technique.  (FWIW, I also have the ETS125 and really love this sander.)
 
It is a great little finishing sander and my favorite in that application. All of the above tips are good but you also need to manage the weight of the vacuum hose and power cord, if not your sander will be off balance and you will get some swirl marks.

As with all Festool sanders there is a learning curve, let the sander do the work with minimal pressure on it, making sure that it is flat to the surface (hose and cable management), controlling the suction power and using the right sandpaper with the correct grit progression. We are taking 10-20 hours of sanding before it becomes second nature to you.

Bruce
 
Error in model noted.  [embarassed]

Peter's suggestion about vacuuming between grits is right.  Stray abrasive particles do cause problems.  I usually wipe with a damp cloth, which also raises the grain for a smoother finish with subsequent grits.
 
Thanks for all of the replies. Ive used the sander quite a bit so it's definitely beyond the 8hr breaking in period. I guess I'm thinking it has to do with jumping into 100 grit. What grit do you guys normally start with?  If I go too much higher I'm worried that it will be a little too fine to begin with. That could be wrong though.
 
The answer is more subjective and a matter of the condition of your walnut and personal tastes on sanding through various grits. If there's plane marks or saw cut marks, than I sand from 80-120 grit, depending on the roughness of the board, and then go up the grits from there. The secret is to keep the sander moving and be careful not to take away more than necessary.
If the board is already smooth and looking pretty good, then most likely I go with 180-220 grit as a start. Again, it all depends on what you're starting with.
 
Wonderwino's suggestion about the damp cloth is true, my first job was as a stainer in  a custom kitchen factory.  Average cost in 1971 was $15,000.  We actually sprayed water on all woods (oak and maple) other than pine (because of resin it  blotches.
 
Despite turning down the suction to the lowest setting and no downward pressure on the sander, I still got these pigtail swirl marks. After many months of trying to solve the problem I finally came up with a solution that works. I added a clear piece of PVC tubing between the vacuum hose and the sander with a 3/8" hole drilled in it to further reduce the suction pressure. FINALLY, the pigtail swirls are gone and I can be happy with this sander! If anyone is still getting pigtail swirls, give this a try!
 
I found offsetting the holes helps. Saw this in another post. My CT26 at full low is too much at times. Depends on wood and finish.

Also hold from the side as it removes the excess weight. Lets the tool work.
 

Attachments

  • 20221027_222754.jpg
    20221027_222754.jpg
    93.1 KB · Views: 126
  • 20221027_222821.jpg
    20221027_222821.jpg
    58.4 KB · Views: 139
Full revs on sander and extractor for me always and move the sander along the grain as if I am hand sanding.
 
At full suction the CT will suck the sander to the surface. Probably less so with the CT-VA 20 in between as that introduces more air leakage and lower flow in general.
 
Not in my experience, I have tried turning the stl down because everyone keeps suggesting it and never noticed any improvement. Perhaps would be more notable on slow sanding/moving.
 
Back
Top