You are using an out of date browser. It may not display this or other websites correctly.
You should upgrade or use an alternative browser.
You should upgrade or use an alternative browser.
Help finding Kapex Armature Replacement Guide
- Thread starter jeh
- Start date
- Joined
- Jul 8, 2007
- Messages
- 13,129
Jim,
That thread was not deleted to the best of my knowledge. We ran that one up the flagpole and Festool allowed it to stay.
Just like you I have searched and searched in areas you can't get to, but honestly I haven't found it yet. If I do I will post a link here for you.
Peter
That thread was not deleted to the best of my knowledge. We ran that one up the flagpole and Festool allowed it to stay.
Just like you I have searched and searched in areas you can't get to, but honestly I haven't found it yet. If I do I will post a link here for you.
Peter
I get the part where you pull the wires out of the plastic channel and then pull the motor housing upwards to separate it from the body. Then you use the screwdriver to separate the motor housing. Are you removing any wires to set it aside or leaving the wires in place why you work. It looks like other than the brushes all wires are still connected.
I am going to do it tomorrow night so I expect it will be more obvious when I get it apart.
I am going to do it tomorrow night so I expect it will be more obvious when I get it apart.
GoingMyWay
Member
- Joined
- Oct 11, 2017
- Messages
- 3,804
Is this the thread you were looking for:http://festoolownersgroup.com/festool-tool-problems/another-dead-kapex-55656/?
Cheese
Member
- Joined
- Jan 16, 2015
- Messages
- 12,522
Ya after 70 years of life....I’ve learned not to bookmark, but rather to save. Bookmarking just saves you a position in time that may or may not ever exist again.
I’ve saved this armature replacement as a .pdf.. I can also save it as a .jpg...I can also save it as a...well you get my drift. Don’t bookmark, save.
I’ve saved this armature replacement as a .pdf.. I can also save it as a .jpg...I can also save it as a...well you get my drift. Don’t bookmark, save.
Thanks for the tip. I usually do this on the important things, but this one slipped through the cracks. It was more of a "if I don't read about it then it won't happen to mine". I bought mine within the 1st month or so of it being released in NA. It was long run. I'm not complaining other than it should not happen with the frequency we see on FOG.Cheese said:Ya after 70 years of life....I’ve learned not to bookmark, but rather to save. Bookmarking just saves you a position in time that may or may not ever exist again.
I’ve saved this armature replacement as a .pdf.. I can also save it as a .jpg...I can also save it as a...well you get my drift. Don’t bookmark, save.
As for the guide it is important to note the required length of the T25 for removing the motor. I had a 4" screwdriver which I though was plenty. It gets very close, but the bottom of the handle hits the adjacent plastic protrusions on all four screw holes. Buying a driver bit later today so I can finish tonight. I 4" bit would work with the fast fix or an extension. I'm going with 6" to make sure I don't come up short. I'd also recommend just buying a Torx set instead of grinding down a flat screwdriver. They can be had cheaply at Harbor Freight or Amazon and Festool uses them in most if not all of their tools. I bought the set for removing the insert on the bottom of the OF1010. Way easier than futzing with the toolie.
deepcreek
Member
- Joined
- Apr 20, 2009
- Messages
- 1,000
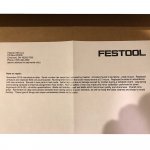
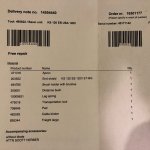
These were included with a recent ad for a reconditioned Kapex in the classified section of FOG.
Seemed like good info to keep in case if I ever have to replace the armature, etc.
Festool service does a little more than just changing out the armature.
"Replaced armature and replaced field coil as a precaution... Replaced brushes in accordance with new armature. Burned in new parts in test mode."
Attachments
Cheese
Member
- Joined
- Jan 16, 2015
- Messages
- 12,522
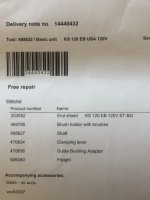
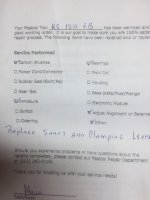
deepcreek said:These were included with a recent ad for a reconditioned Kapex in the classified section of FOG.
Along with what Joe has just posted, here are a couple of photos of what others have had replaced on their Kapex. I saved this info just in case. [big grin]
[attachimg=1]
[attachimg=2]
Attachments
Three things:
1. How do you remove the armature from the fan and end shield (large metal cover)? The armature is no coming loose from the fan.Looking down the shaft I can see what looks like a very small hex head screw. I don't want to make any moves until I get an opinion or two on this.
2. The Field assembly smells like a bar ashtray. I don't see any damage, but the smell is quite strong. It's $82.50 so I'd rather no just add in to my second parts order unless I need it. Again looking for an opinion on this.
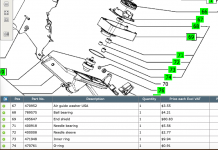
3. Looks like I need some additional parts:
These parts were damaged/broken. I am surprised the air guide was damaged.
67 470952 Air guide washer (large piece of plastic) USA $3.55
74 470761 o-ring $.91
Not really necessary (maybe) but getting anyway
68 789575 Ball Bearing $4.21
57 457920 Tachometer Coil
I getting a spring plate which will hopefully fix the stickiness when rotating the base to select a different angle. It was smooth at first, but has gotten progressively worse. Sometimes it is near very tough to move.
1. How do you remove the armature from the fan and end shield (large metal cover)? The armature is no coming loose from the fan.Looking down the shaft I can see what looks like a very small hex head screw. I don't want to make any moves until I get an opinion or two on this.
2. The Field assembly smells like a bar ashtray. I don't see any damage, but the smell is quite strong. It's $82.50 so I'd rather no just add in to my second parts order unless I need it. Again looking for an opinion on this.
3. Looks like I need some additional parts:
These parts were damaged/broken. I am surprised the air guide was damaged.
67 470952 Air guide washer (large piece of plastic) USA $3.55
74 470761 o-ring $.91
Not really necessary (maybe) but getting anyway
68 789575 Ball Bearing $4.21
57 457920 Tachometer Coil
I getting a spring plate which will hopefully fix the stickiness when rotating the base to select a different angle. It was smooth at first, but has gotten progressively worse. Sometimes it is near very tough to move.
Cheese
Member
- Joined
- Jan 16, 2015
- Messages
- 12,522
I think the armature comes as an assembly with the fan and everything else assembled...thus it’s outrageous price.
I’d pull the armature and put it somewhere by itself for a few days and then go back and sniff the field coils. My experience has been that if the part has been smoked it will never give up its stench.
However as Tom stated, if you separate the two elements from each other for a few days, the item that got smoked will still smell while the item that was just an accessory to the crime, will start to lose its stench.
The fan is part of the armature and I tapped the armature/fan combo out of metal frame. Next issue is the ferule and bearing that are above the fan. See attached photo. How are these remove and what holds them in place?
Attachments
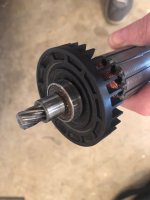
Typically just friction. You need a bearing puller. The bearing should be replaced.JimH2 said:The fan is part of the armature and I tapped the armature/fan combo out of metal frame. Next issue is the ferule and bearing that are above the fan. See attached photo. How are these remove and what holds them in place?
The bearing is 68. Not sure which of 71/72/73 I need based on the names and primitive drawing. They are not enough money to squabble over. I'm going to let the armature air out to see if it or the field assembly is what smells. Thanks to all for the guidance.
Off to Harbor Freight to see if they have one. It looks the claws have to be small to fit under the bearing.Svar said:Typically just friction. You need a bearing puller. The bearing should be replaced.JimH2 said:The fan is part of the armature and I tapped the armature/fan combo out of metal frame. Next issue is the ferule and bearing that are above the fan. See attached photo. How are these remove and what holds them in place?
Is the ferule just holding it in place with friction and will pulling by the bearing hurt it. Does not matter in this case since I am ordering a new one anyway.
Will this style work (looks like I would need something else to make it work):https://www.amazon.com/Shankly-Bear...ords=small&qid=1549655963&s=Automotive&sr=1-1
or this (not sure if the lip will fit underneath the bearing)https://www.amazon.com/dp/B071R2NX7L/ref=sspa_dk_hqp_detail_aax_0?th=1
Also will it pull the bearing and the sleeve up at the same time and do I need something to push the new ones back down with.
or this (not sure if the lip will fit underneath the bearing)https://www.amazon.com/dp/B071R2NX7L/ref=sspa_dk_hqp_detail_aax_0?th=1
Also will it pull the bearing and the sleeve up at the same time and do I need something to push the new ones back down with.
Similar threads
- Replies
- 8
- Views
- 1K
- Replies
- 5
- Views
- 2K
- Replies
- 1
- Views
- 317
- Replies
- 8
- Views
- 8K